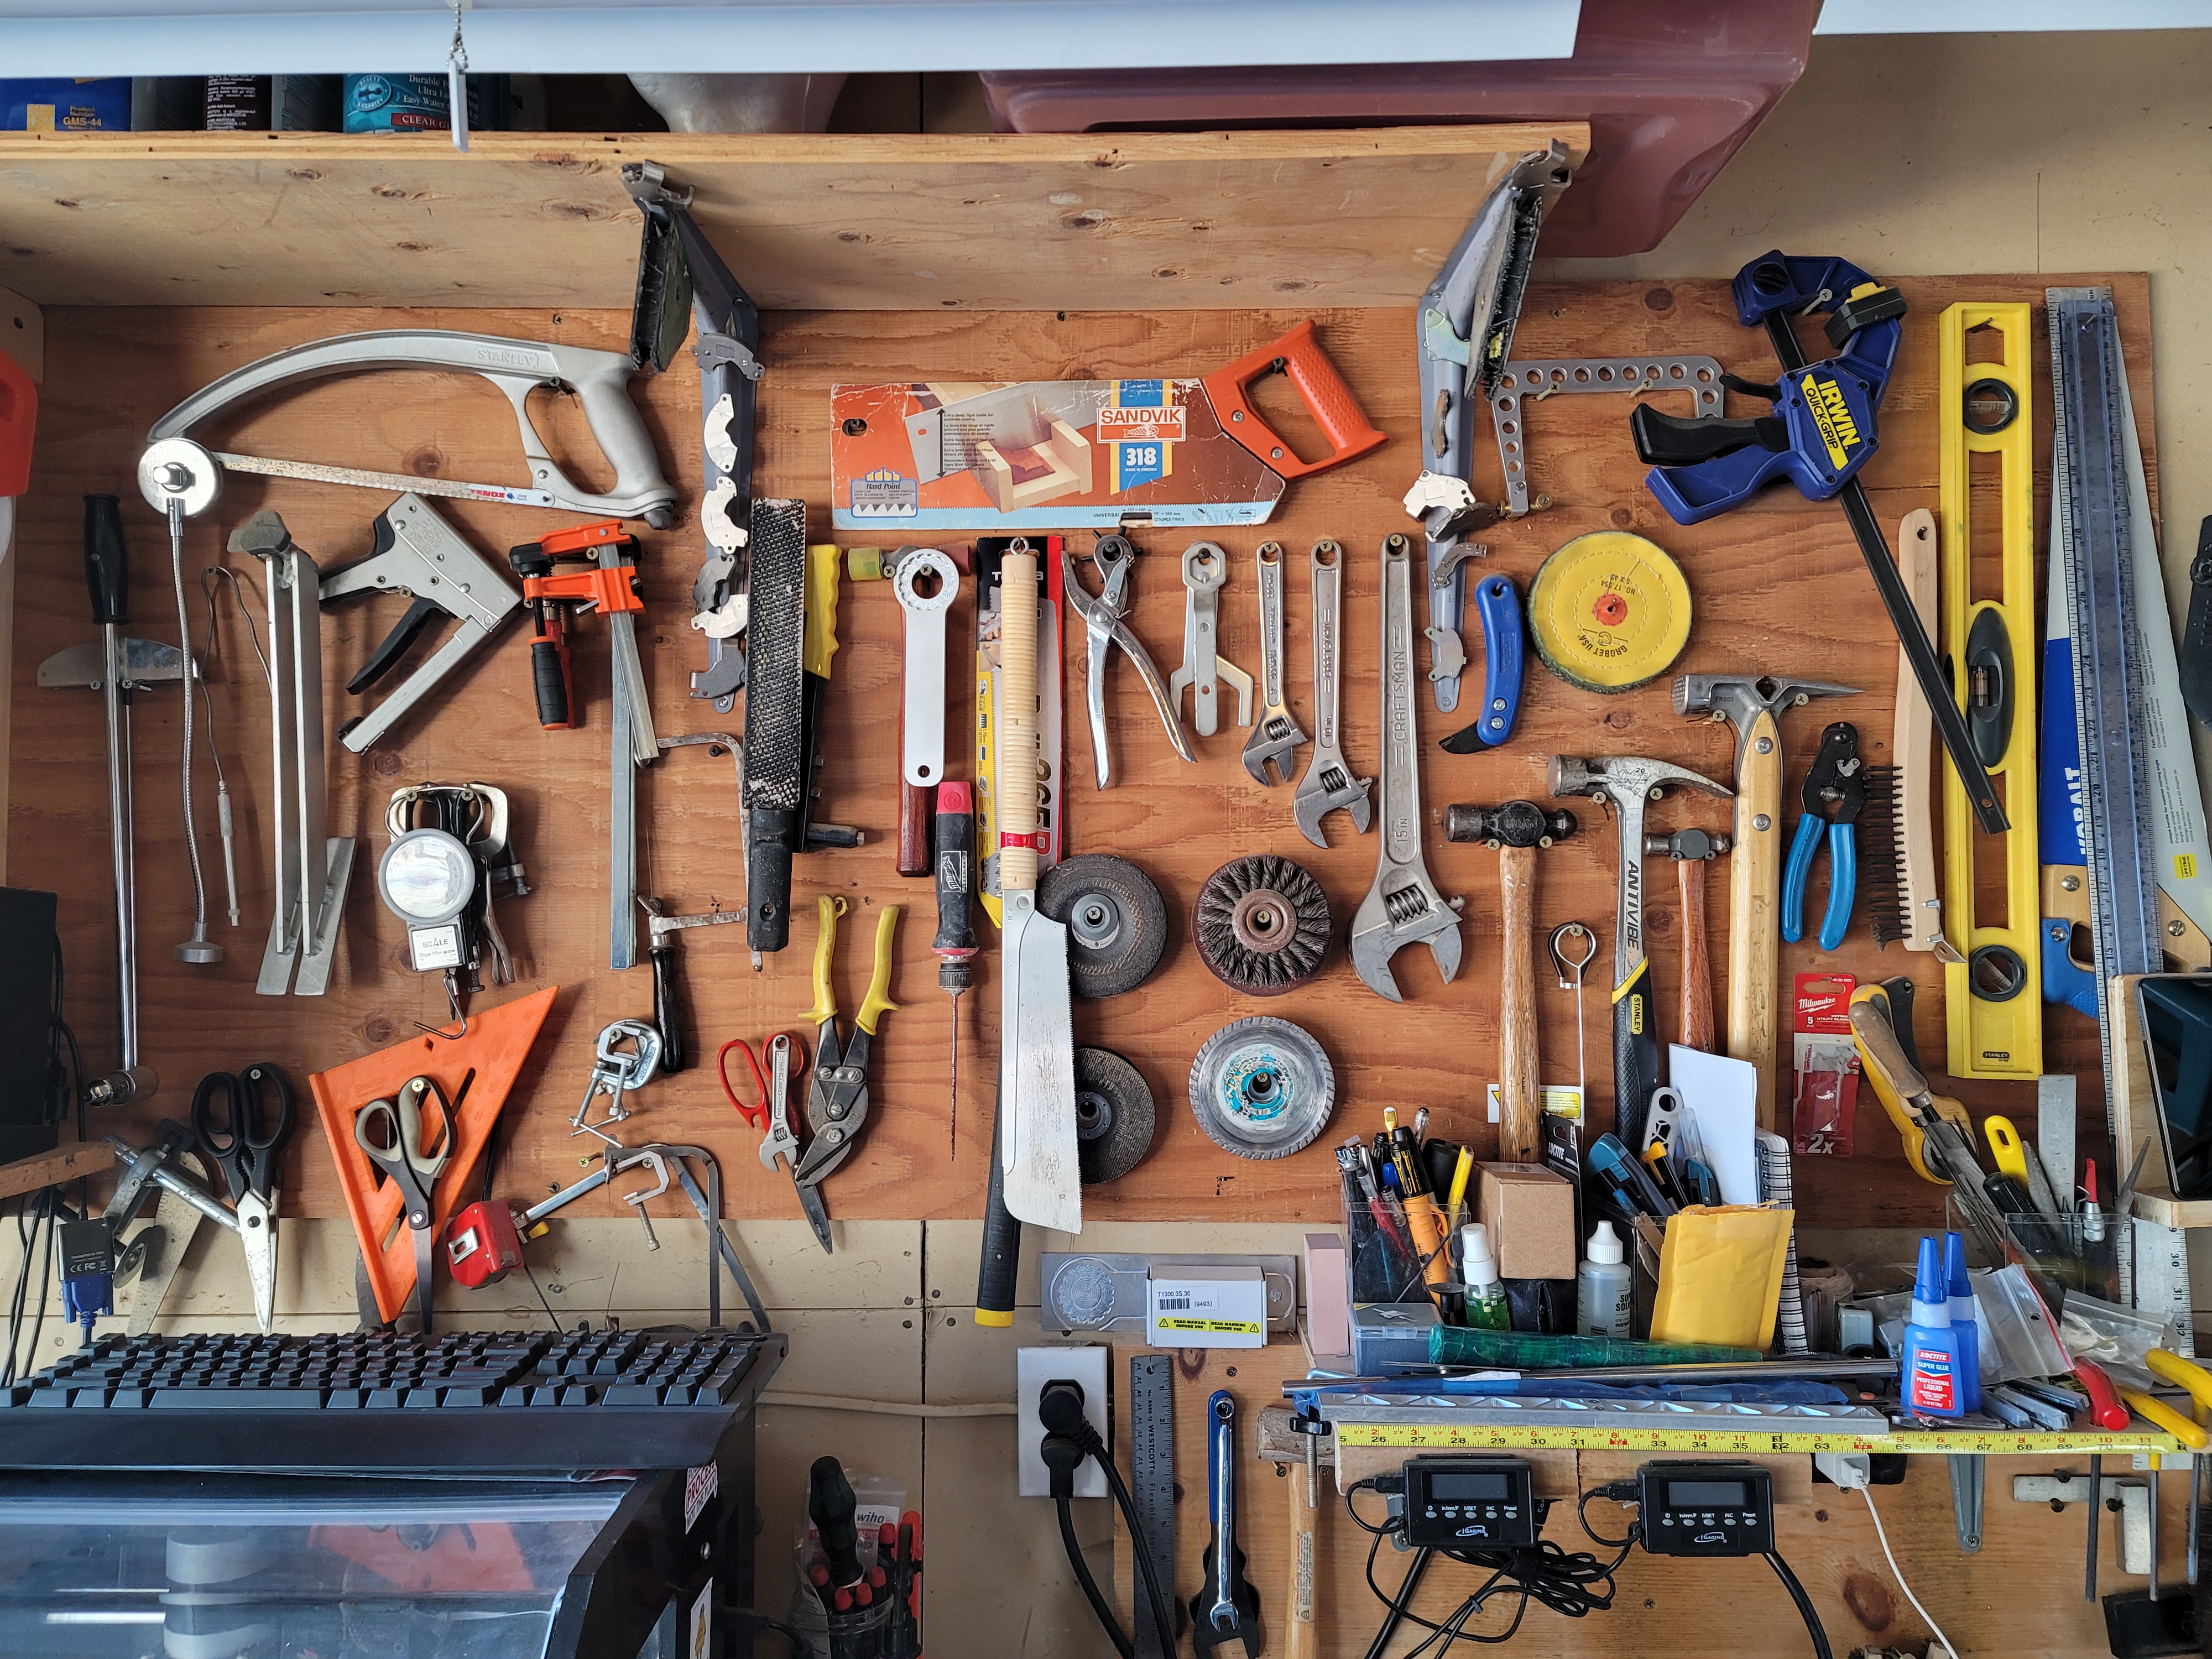
The home workshop
This is my happy place. The small garage workshop where I do all my hobby work. On the main workbench there is (from left to right): ultrasonic cleaner, large bench vise, vacuum former, fiber laser, watchmaker’s lathe, measuring tools, Nomad 3 CNC, Taig lathe, manual mill, belt sander, metal bandsaw, and drill press. Stored below are assorted power tools and supplies. On the wall are various frequently used hand tools.
On the end near the door is a jeweler’s bench, plus another workbench. There are lots of hand tools stored here, along with the microscope, soldering iron, power supply, hot air rework tool, resin printer, and precision welding equipment. Lots of small parts are stored overhead in labeled drawers.
The FDM printer and computer for doing design work are kept in the house. All of my jewelry work is done at a jeweler’s bench at my work.


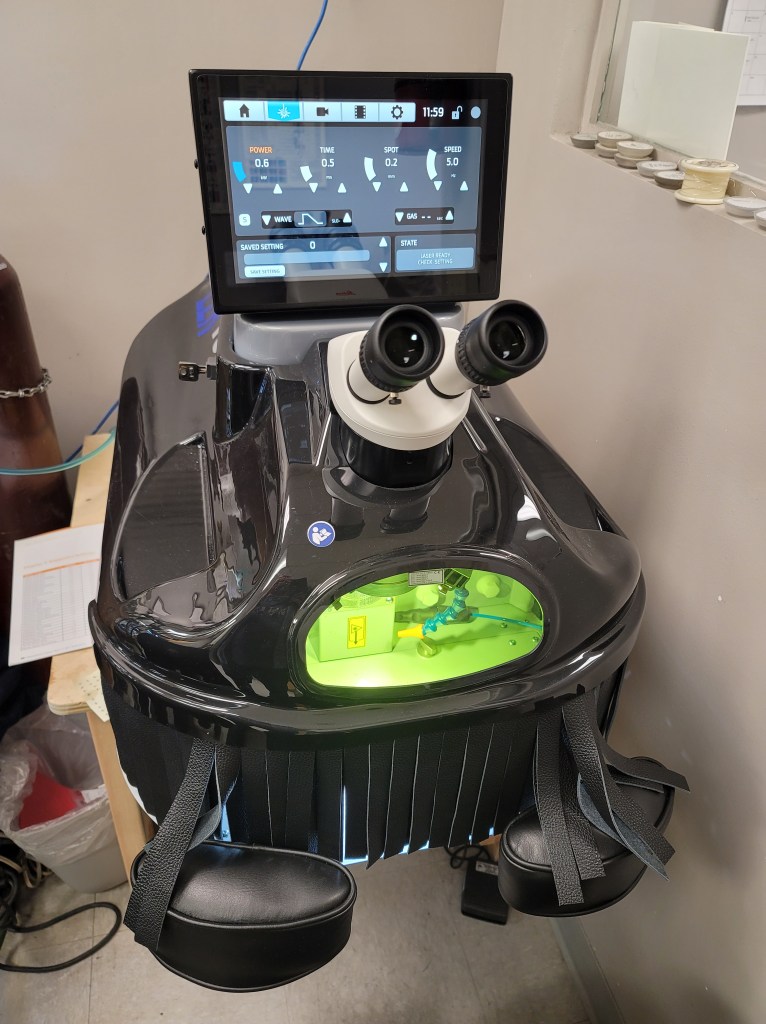
Estar Tech Mini 7 laser welder (2024)

My work recently decided to purchase an additional laser welder, and based on my happiness with the Estar fiber laser engraver I have in my home shop we decided on the Estar Tech Mini 7 JWE200 laser welder. This is a small 220V benchtop YAG laser welder with a power rating of 150J/200W, making it a very powerful laser in a very small package.
The laser is equipped with a 7″ touchscreen control, 10X stereo microscope, foot pedal, and comes with everything you need to get up and running. Setting the laser up is extremely easy and only takes a few minutes. Just attach the microscope, plug in the foot pedal, and then fill the water chamber with approximately 5 liters of distilled water. The laser has a built in water pump for filling, so you don’t have to mess around with a funnel trying to fill it- there is even a light on the back of the machine that tells you when the water chamber is full. There are two moveable wrist pads, which I found I really liked vs. other lasers with fixed wrist pads. There is also series of tutorial videos installed on the machine to help you get up and running. Warranty on the Xenon flash lamp is two years, and it comes with a spare flash lamp, which is really nice.

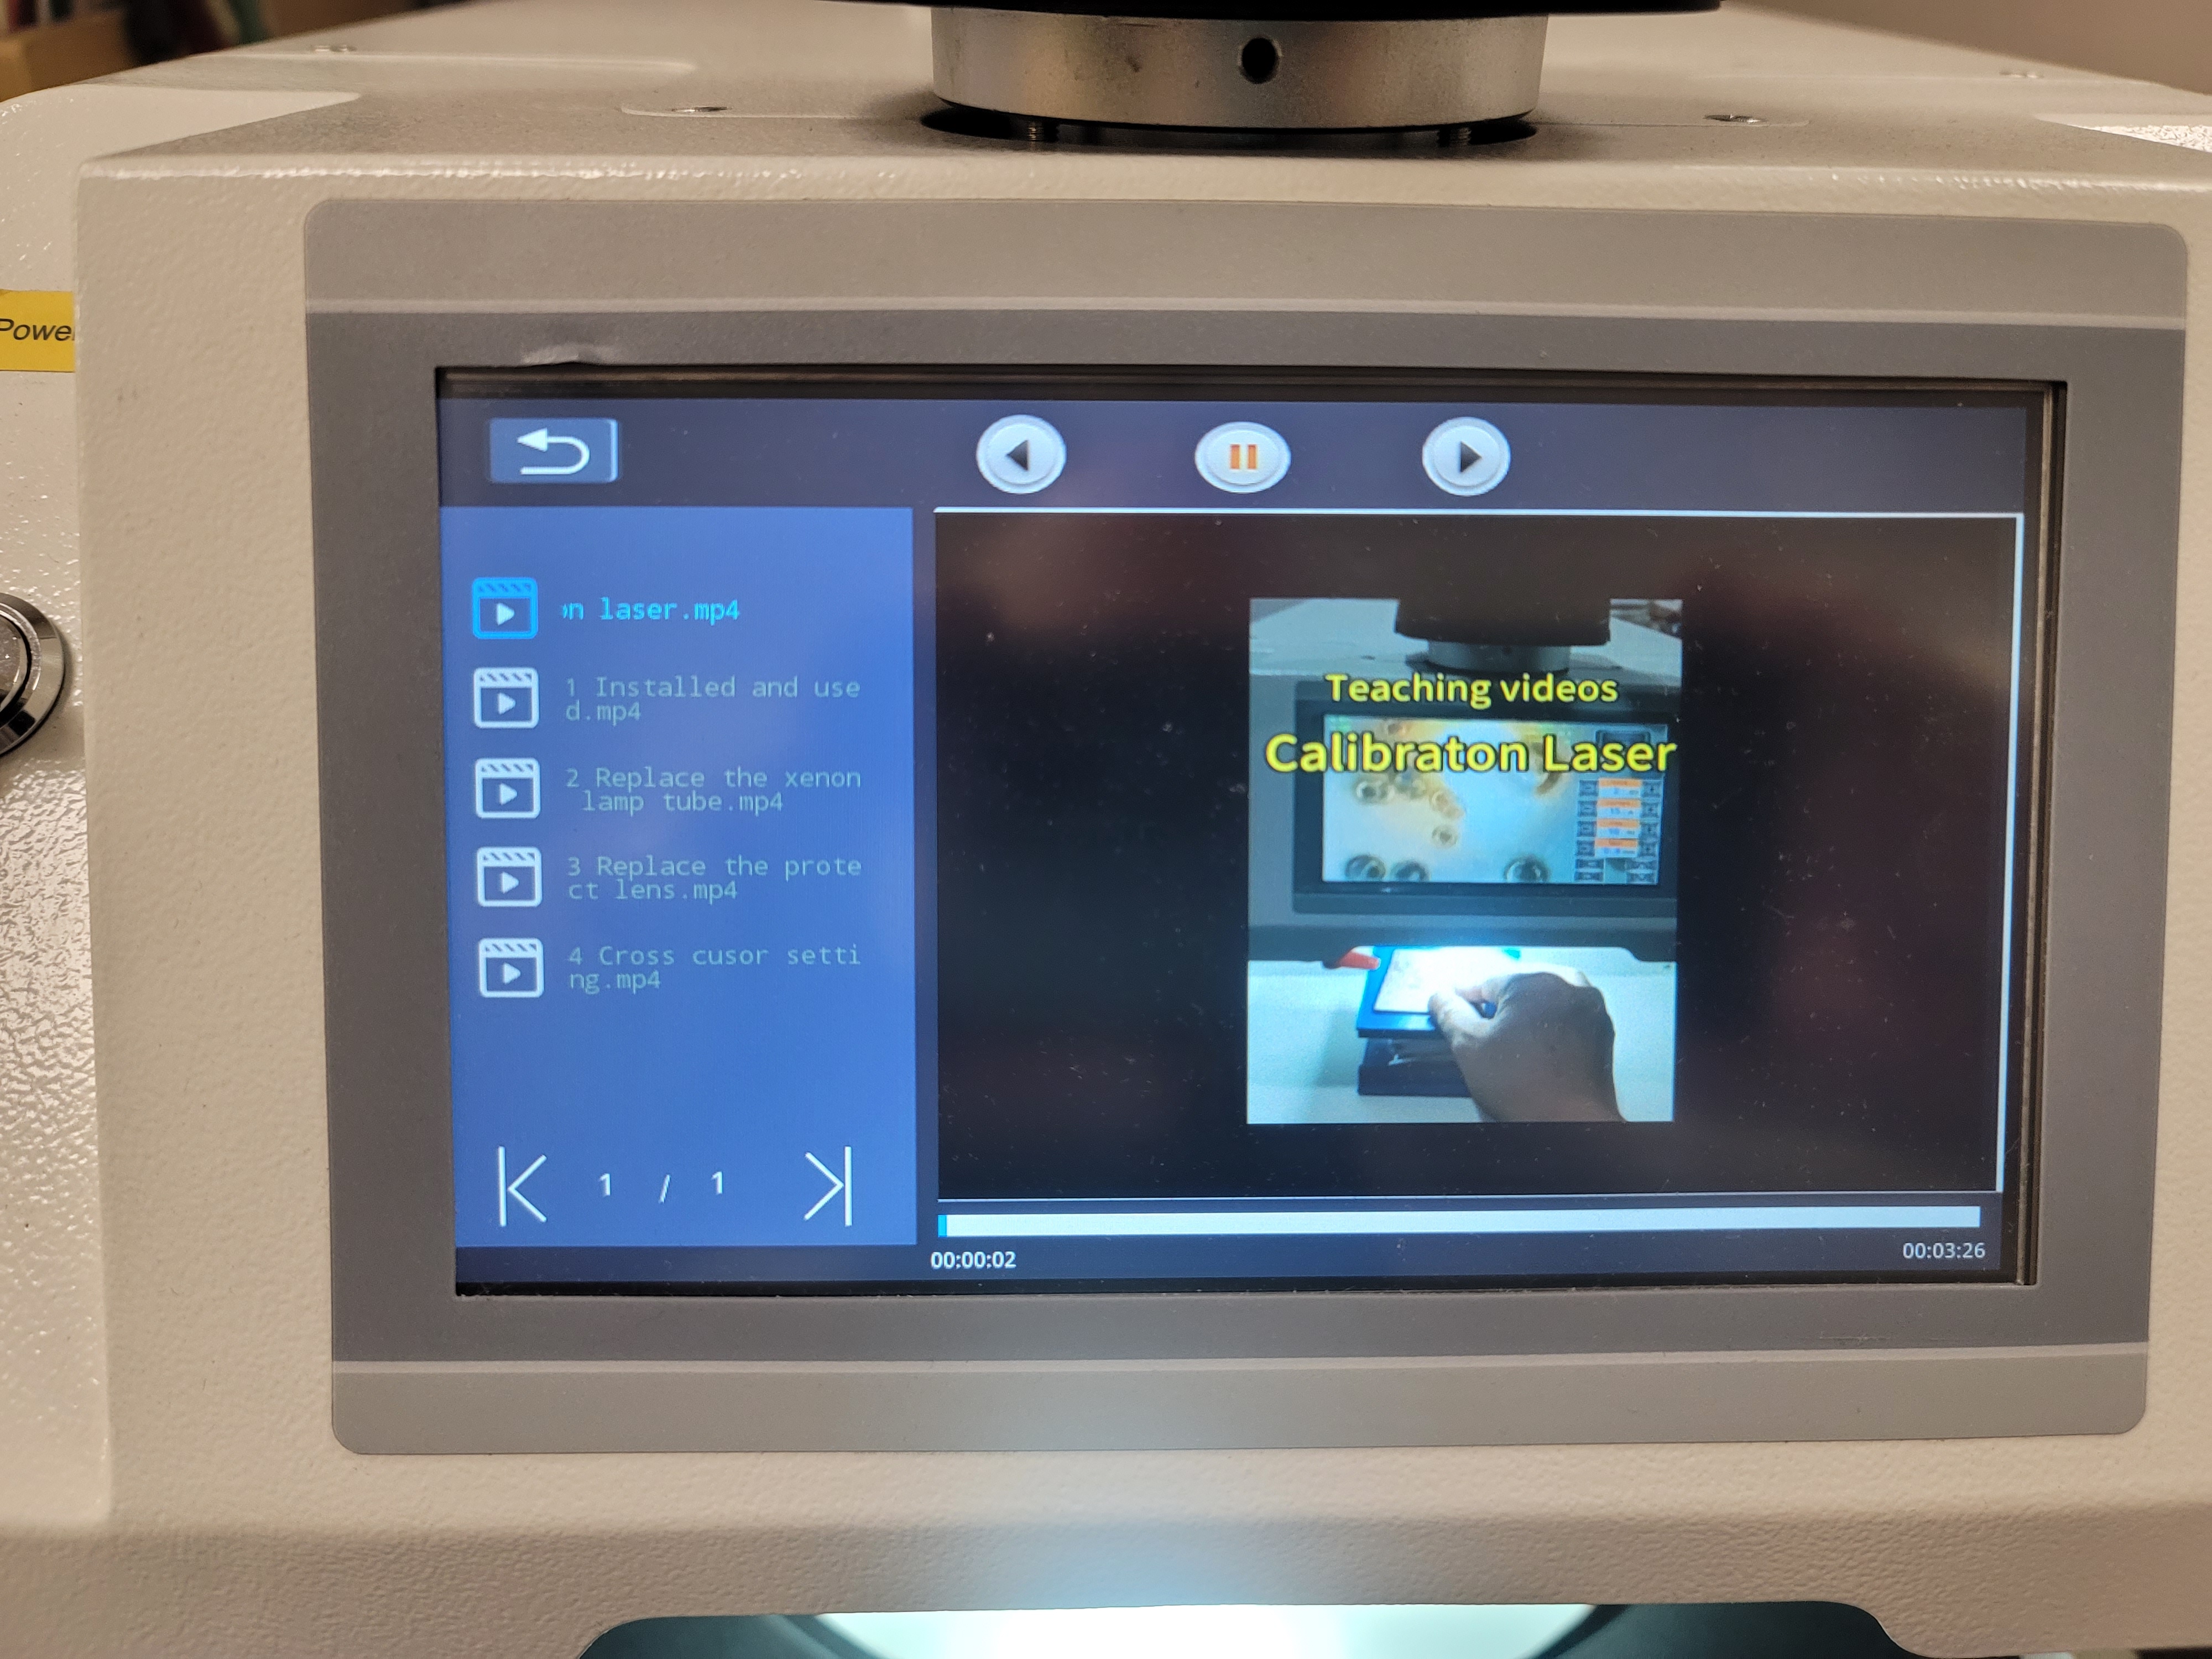
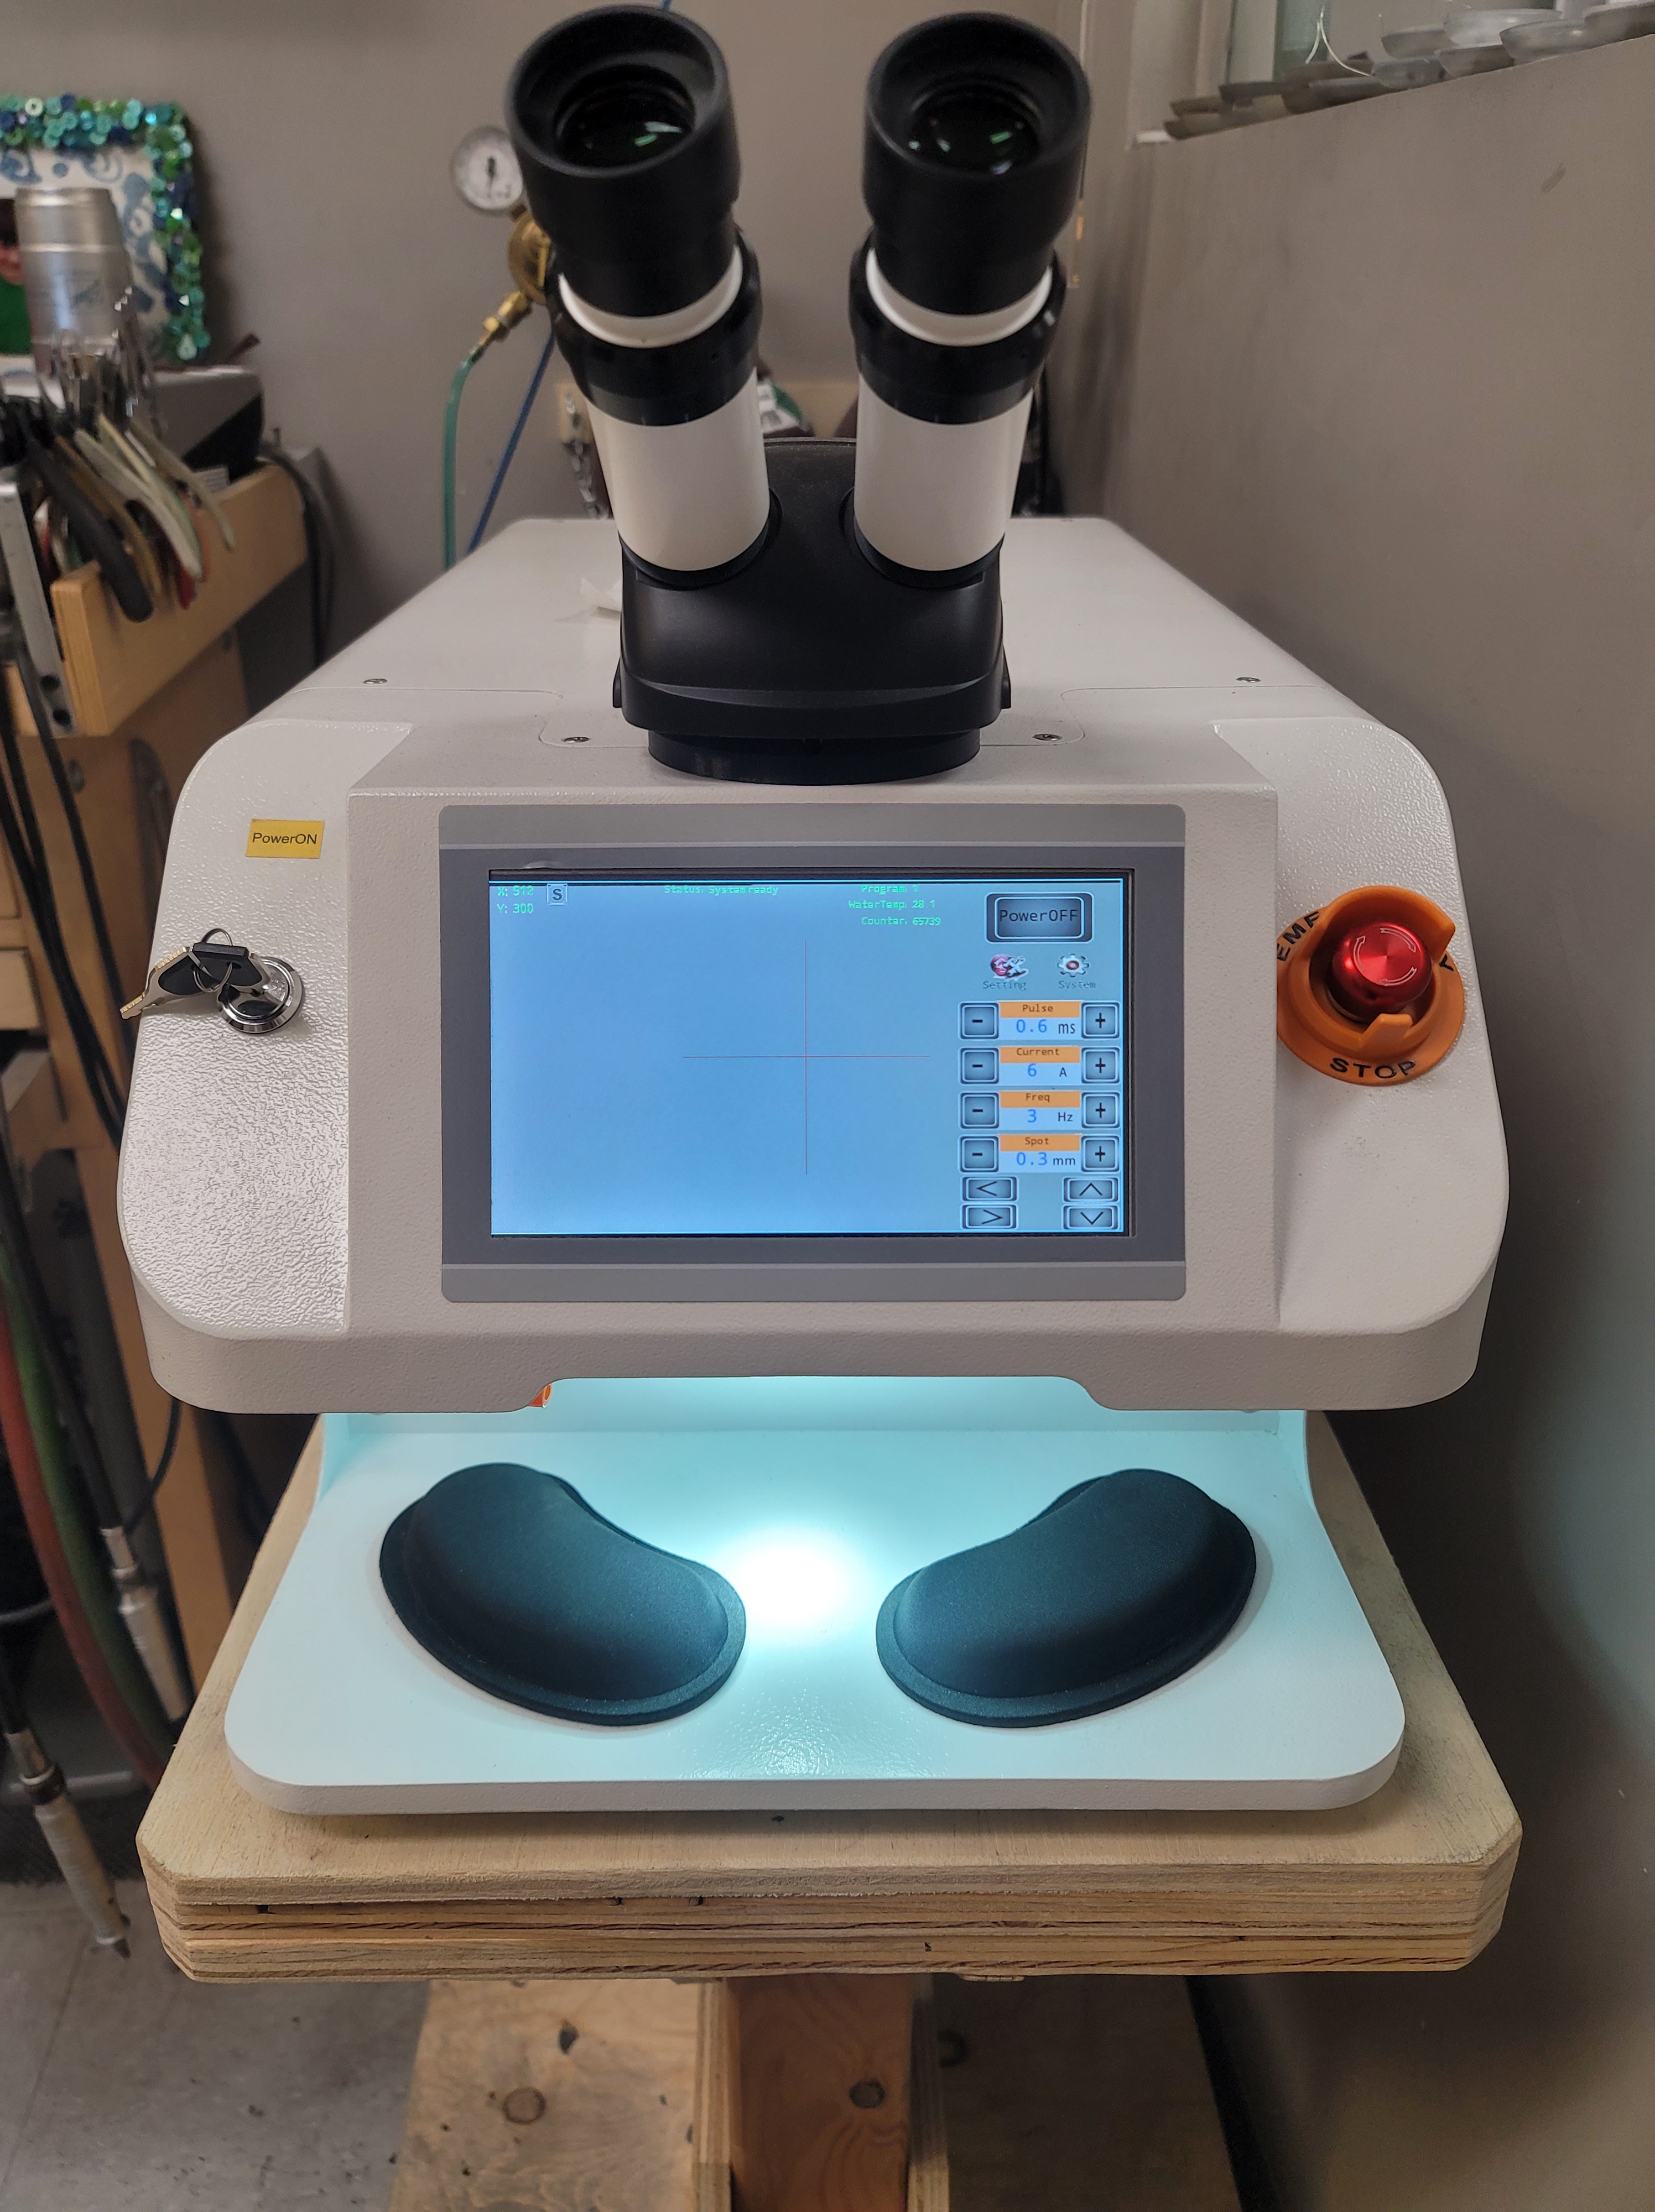
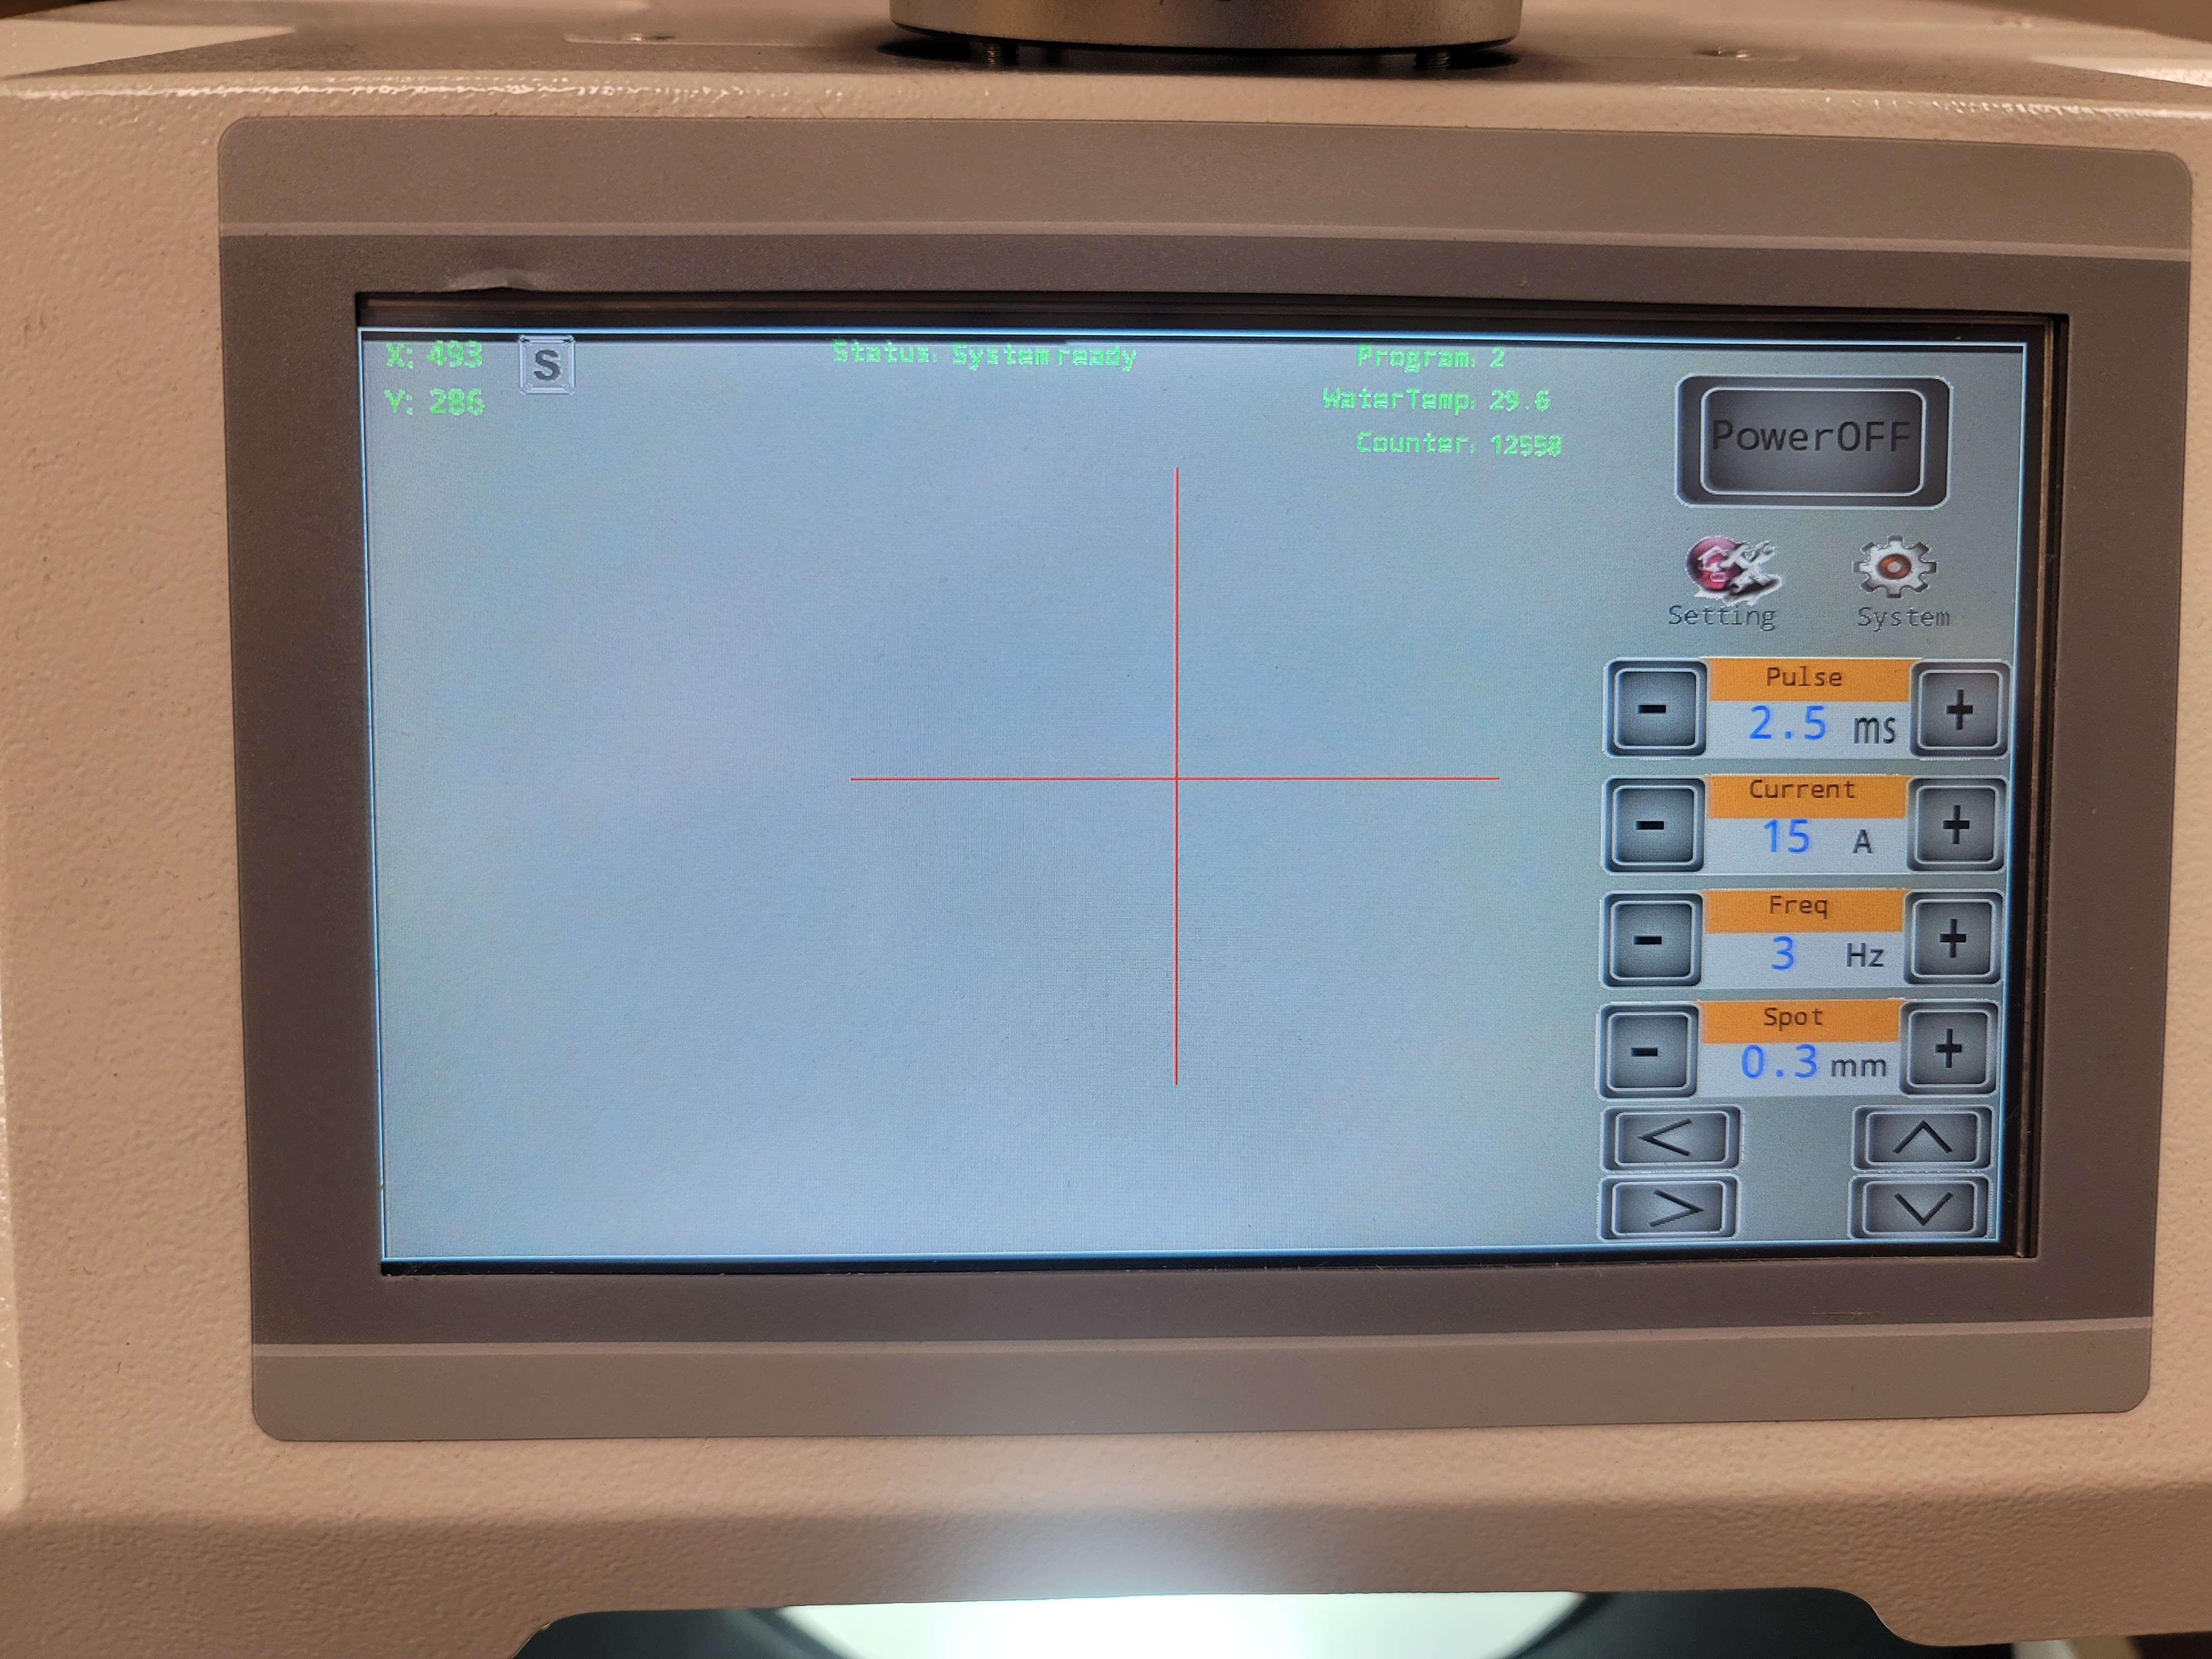
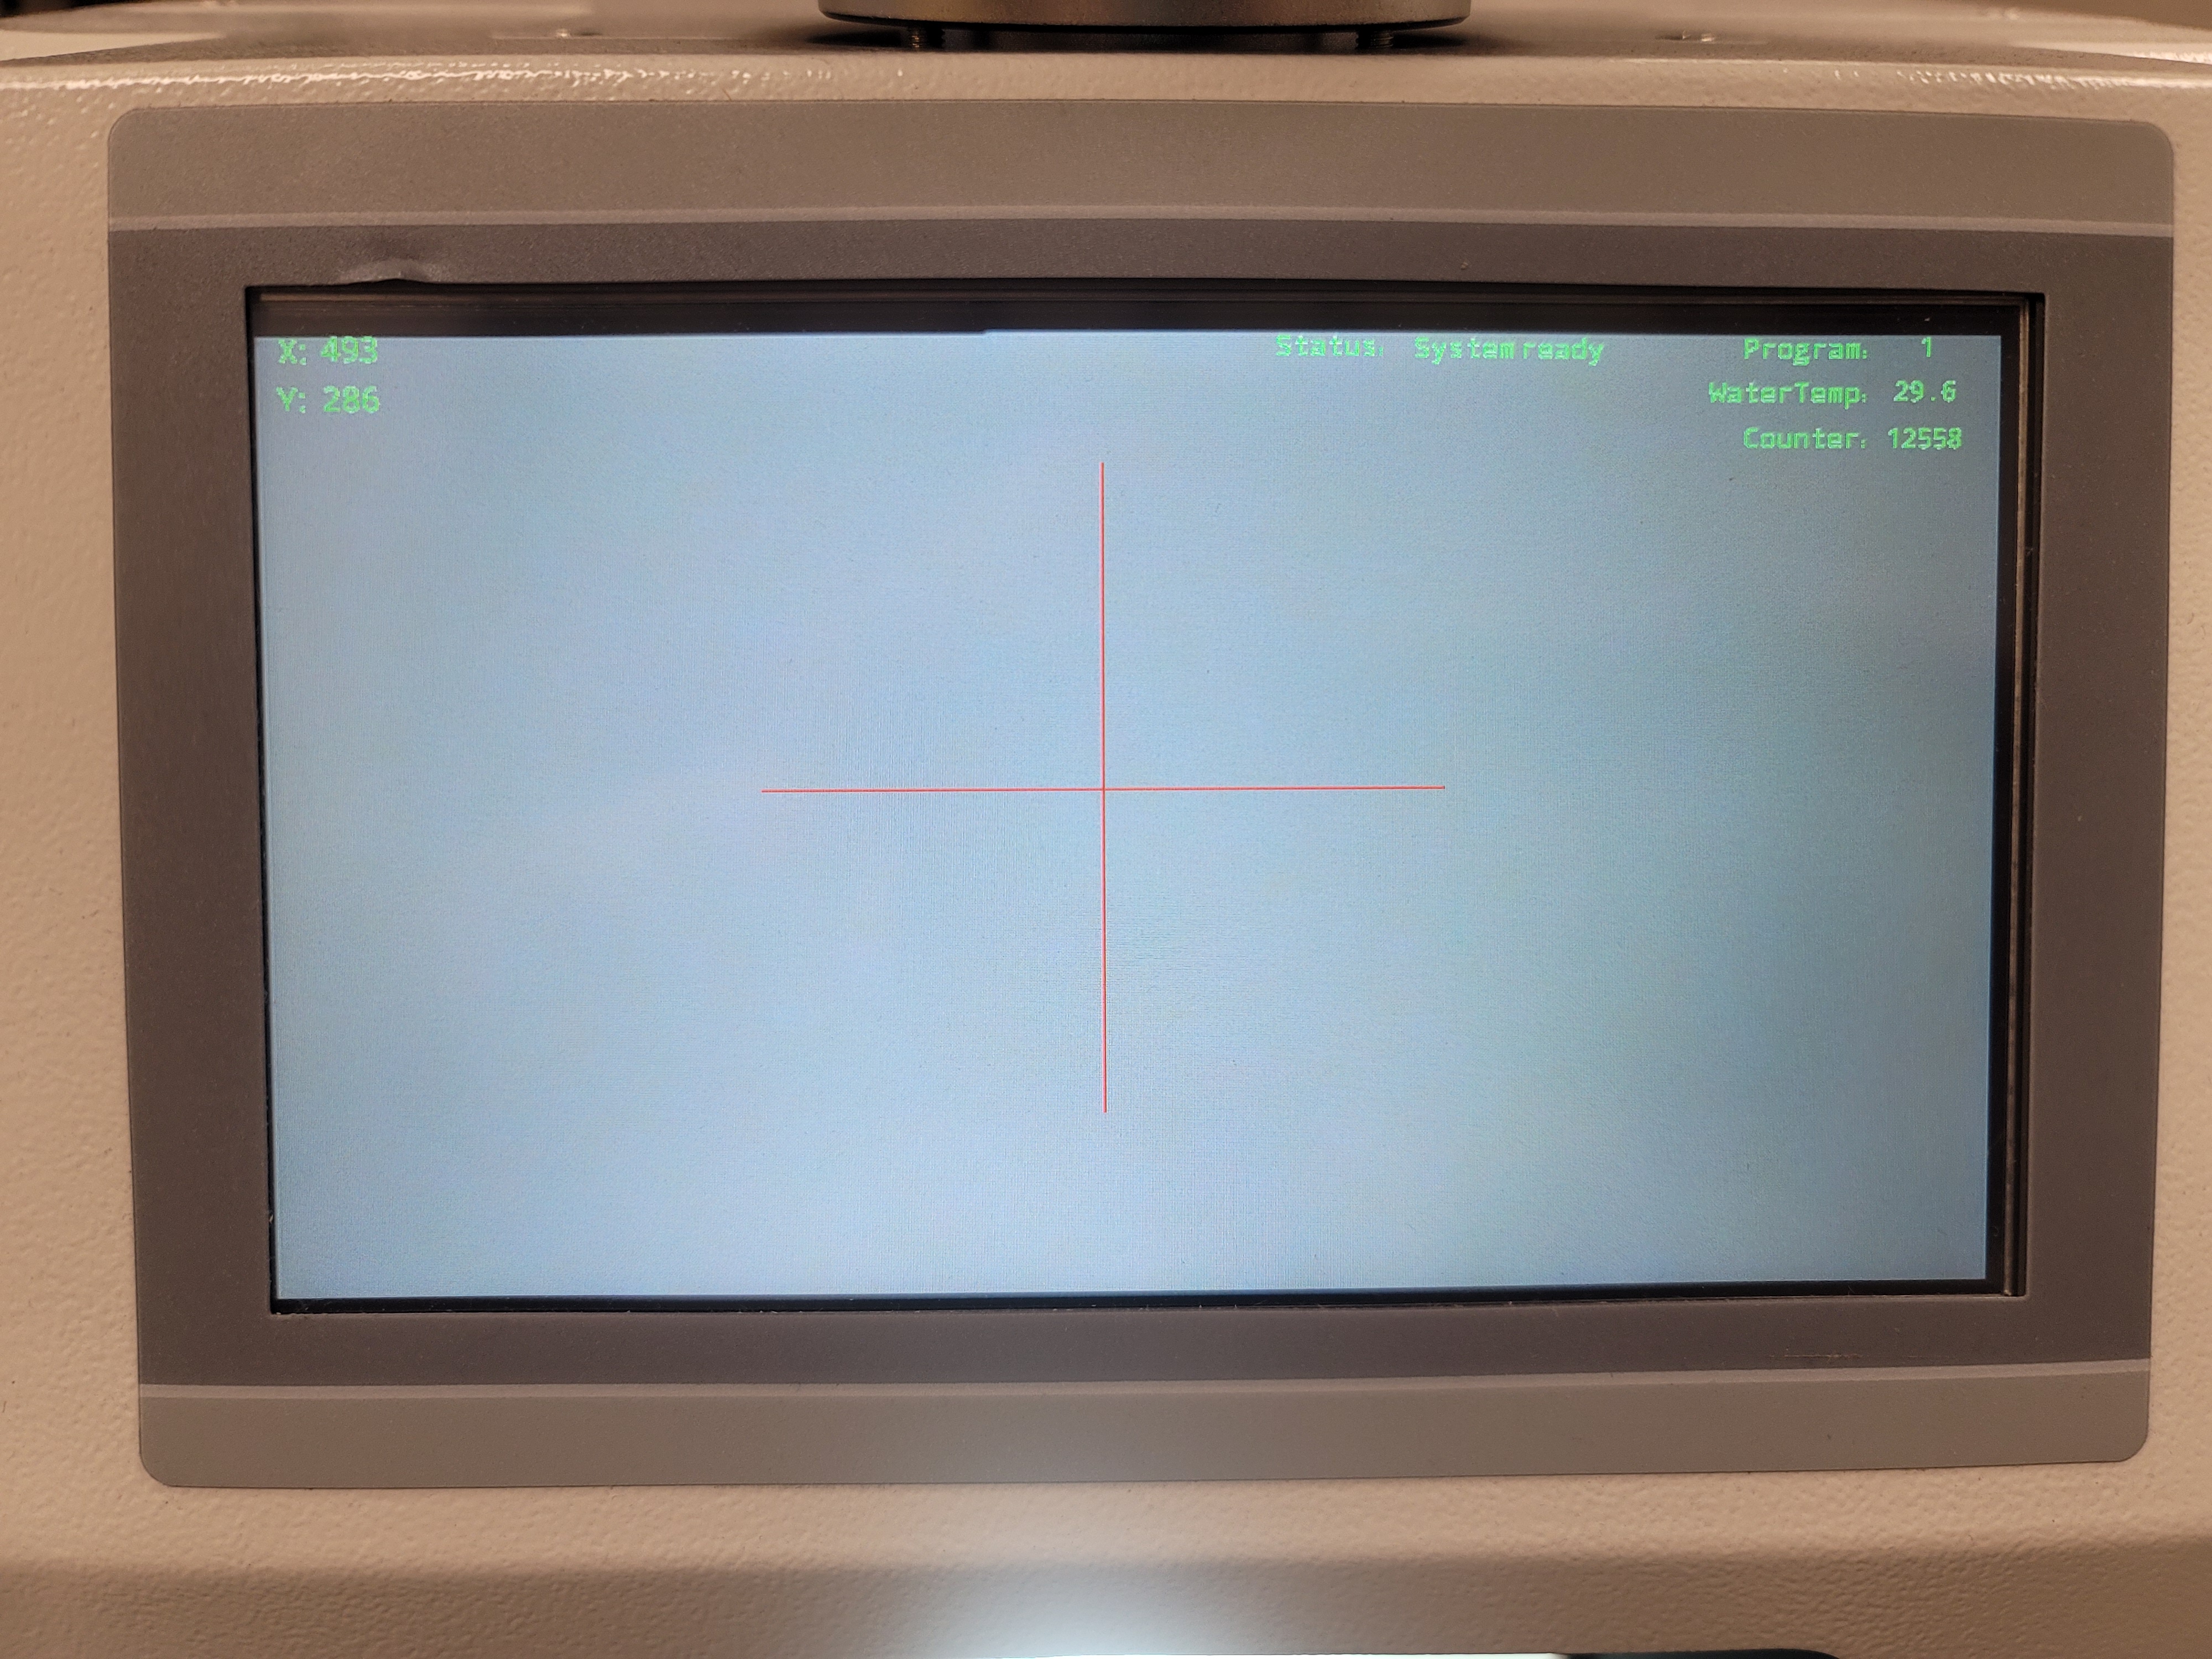
When powered on, the touchscreen displays all of the necessary information: pulse time, current (power) setting, frequency, and weld spot size. The display also shows water temperature (a really nice feature) as well as number of shots fired.
There are two buttons for system controls as well as welding settings. System controls allows you to change settings for the air assist, display reticle, and foot pedal. The settings button allows you to enter in preset welding settings for various metals. There is also a display that shows the entire system status to alert you if there is a problem. It’s all very intuitive and well thought out.
If you want to weld using the touchscreen instead of the microscope, you can just touch the screen to hide all of your power settings and only show the aiming reticle. There are buttons on the home screen that allow you to precisely position the aiming reticle so that it matches up exactly with the laser firing location- this is a really nice feature to have. You can also change the size and color of the aiming reticle in order to make it more visible with type of metal you are welding.


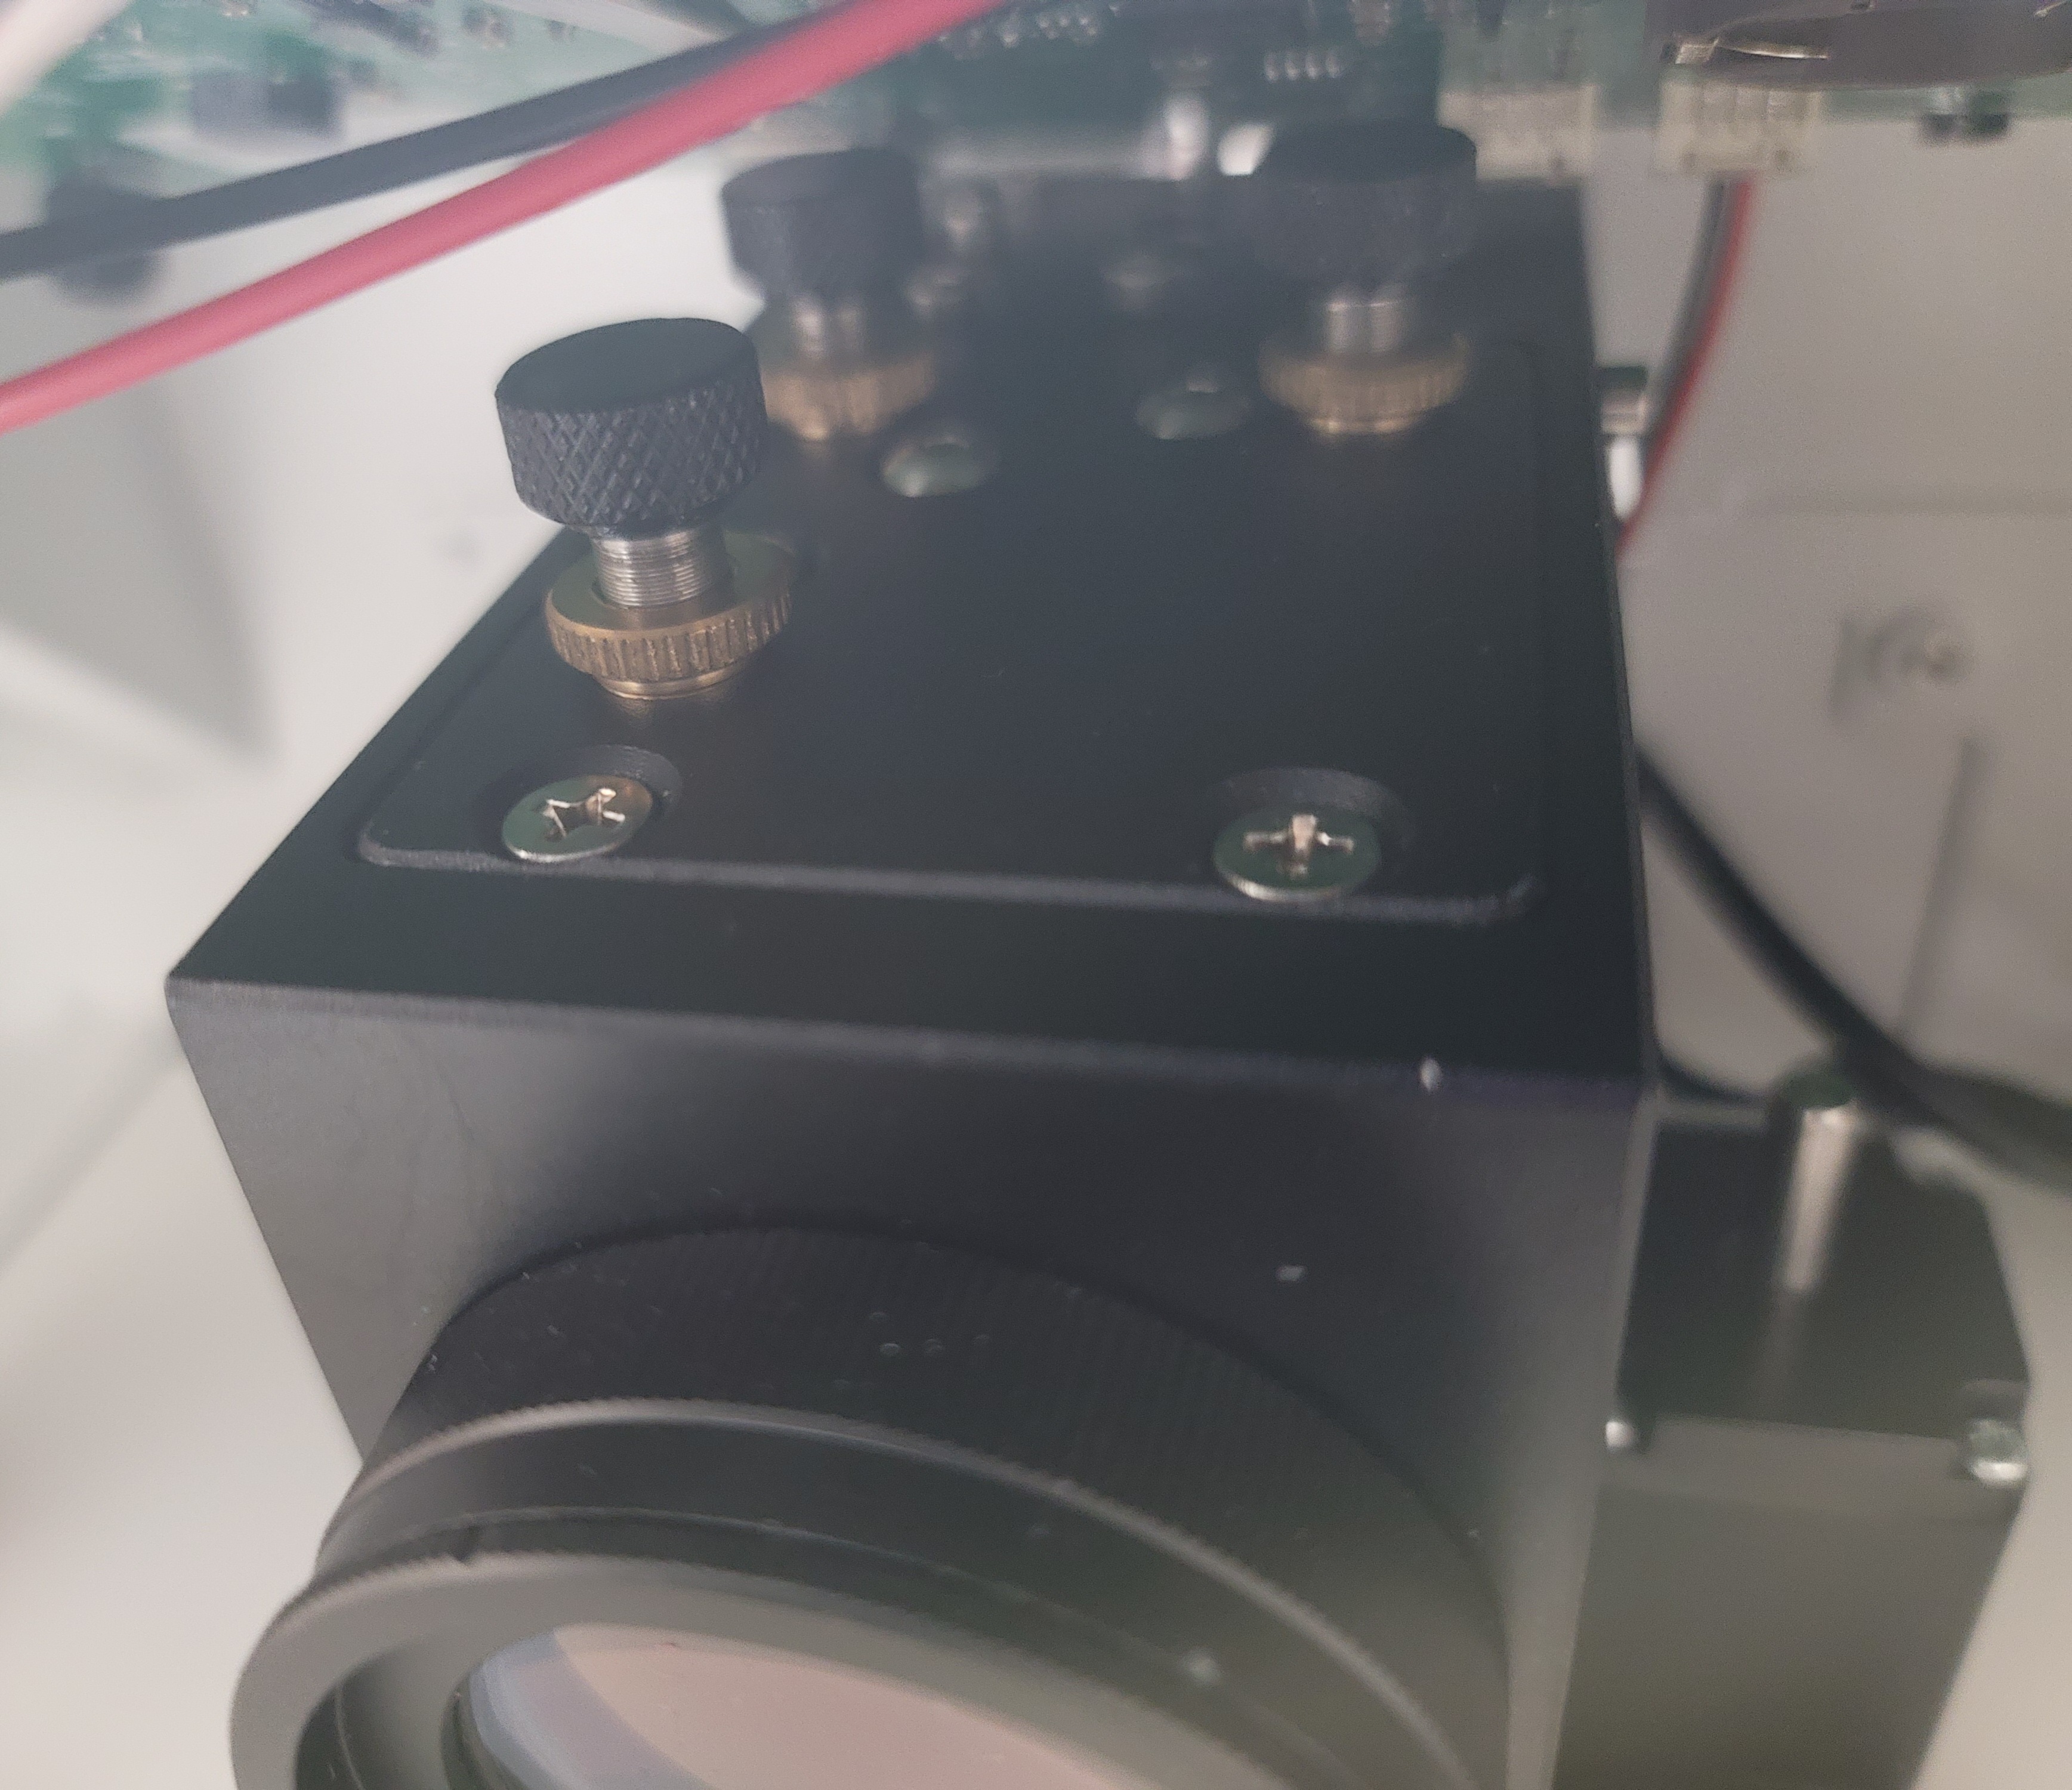
The laser has a flexible hose for argon shielding gas as well as a dimmable LED ring light to illuminate your work. I like that the LED ring light is a standard unit and that it is easily removeable/serviceable. If you remove the ring light and the metal panel above it, you will see that there are easily accessed thumbwheels that allow you to easily re aim the laser head, should it ever come out of alignment.


In use, the laser welds just like my other much more expensive laser, with identical weld quality. Weld penetration is outstanding, even when welding Sterling Silver, Platinum, 18K yellow Gold, and rose Gold. This machine has plenty of power and it’s really impressive to see a machine of this compact size weld like it does. I currently have around 100,000 fires on this machine and would immediately purchase another one without any reservation. I use it all day, every day, and haven’t yet found any shortcomings. The build quality is outstanding (the casing is entirely steel), it’s easy to use, and easy to adjust everything to your liking. The people at Estar Tech are also very pleasant to deal with, should you have any technical questions or need help setting it up.
Of course, every product isn’t perfect. The only downsides are the smaller welding chamber and that the cooling fans on the side of the machine are fairly loud ( I measured them at 74db.) The size of the welding chamber is limited by the size of the machine- but it’s still easily large enough for all of my jewelry work and even repairing glasses. The only other downside is if you don’t have a 220V outlet- the cure for this is a 110V/220V up/down transformer. You can buy a 5000 Watt model (the capacity of this welder is 4500 Watts) for just over $100 U.S. at home hardware centers.
I’ve been doing laser welding for over 18 years and this is my third laser welder. I am amazed that you can get a benchtop machine like this with this level of performance. When you factor in cost (we ordered directly from the manufacturer -they do not yet have a U.S. distributor- and paid just under $4K U.S. , including air freight and customs fees/taxes), outstanding welding performance, compact size, ease of use, and build quality, it really is a fantastic buy. It welds just as well as my larger laser welder, but at less than 1/5th the cost.
Highly recommended!
Check out Estar Tech for more information.
EstarTech EST-FP 20 mini fiber laser (2024)
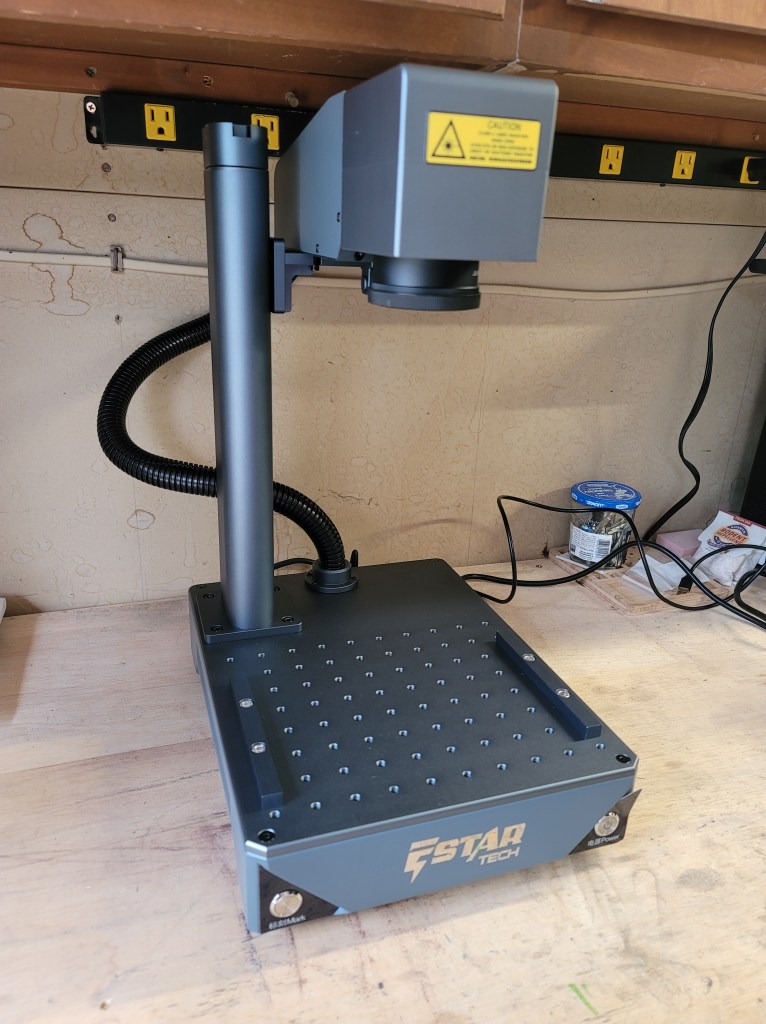
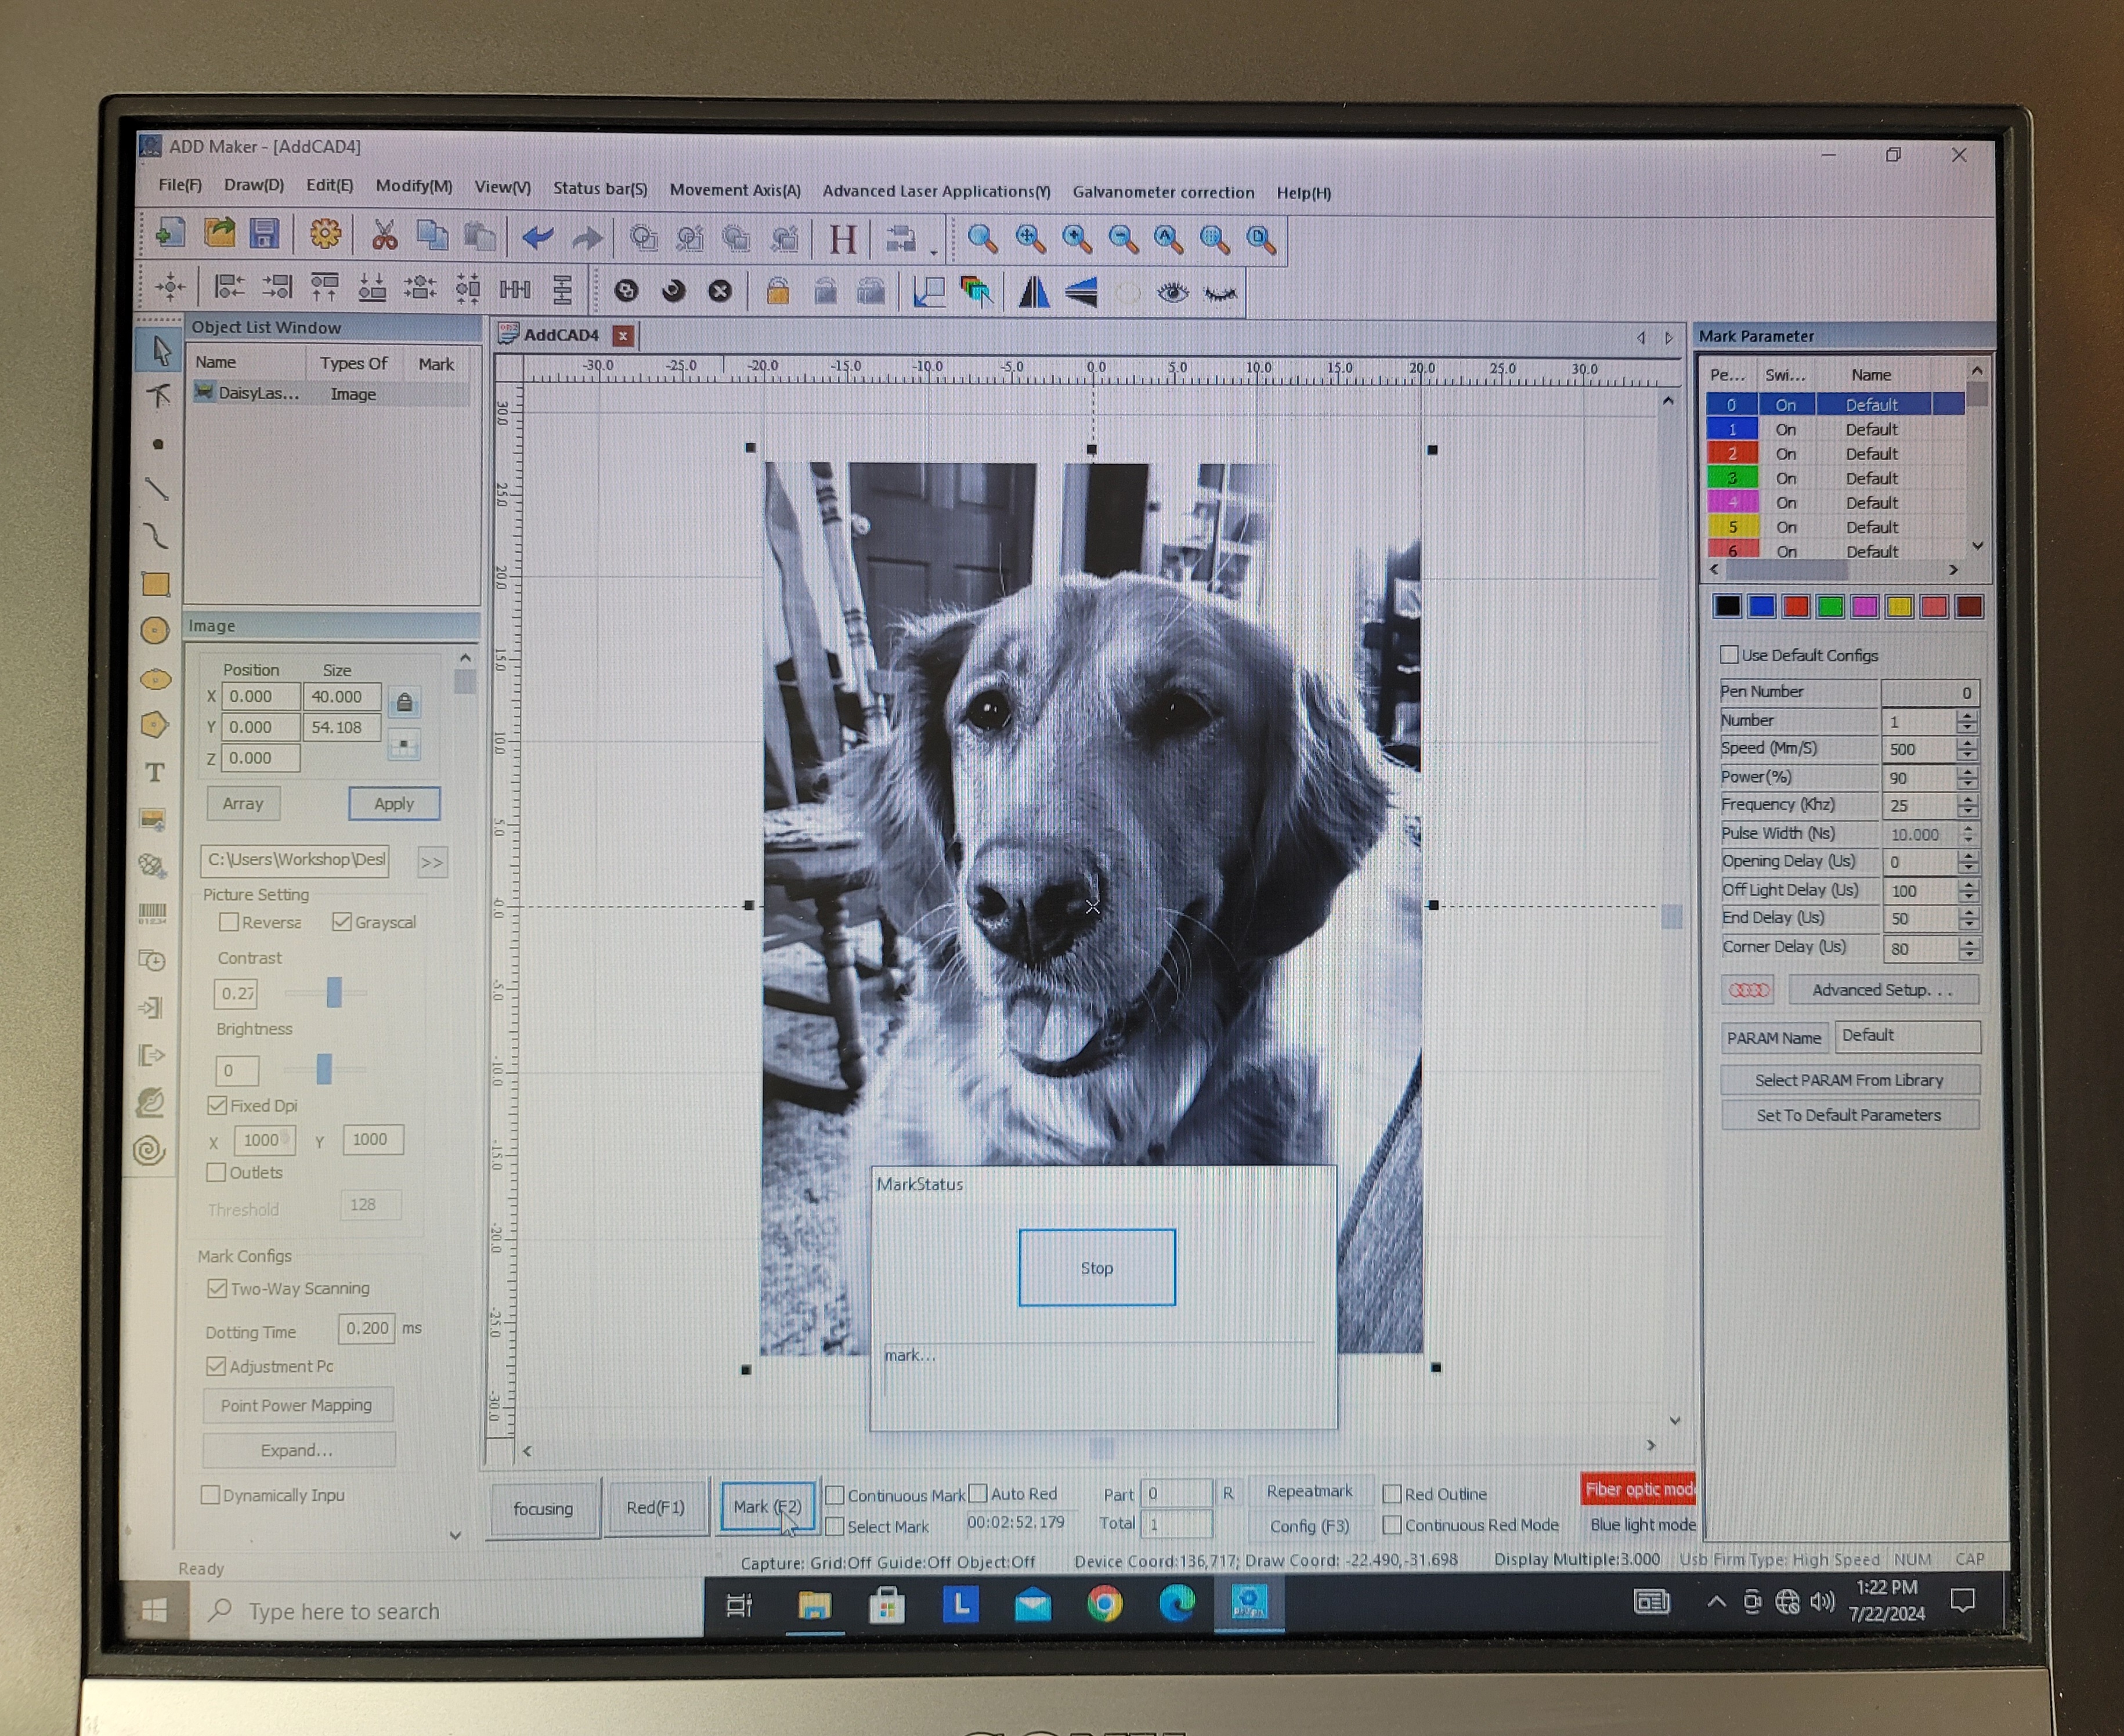
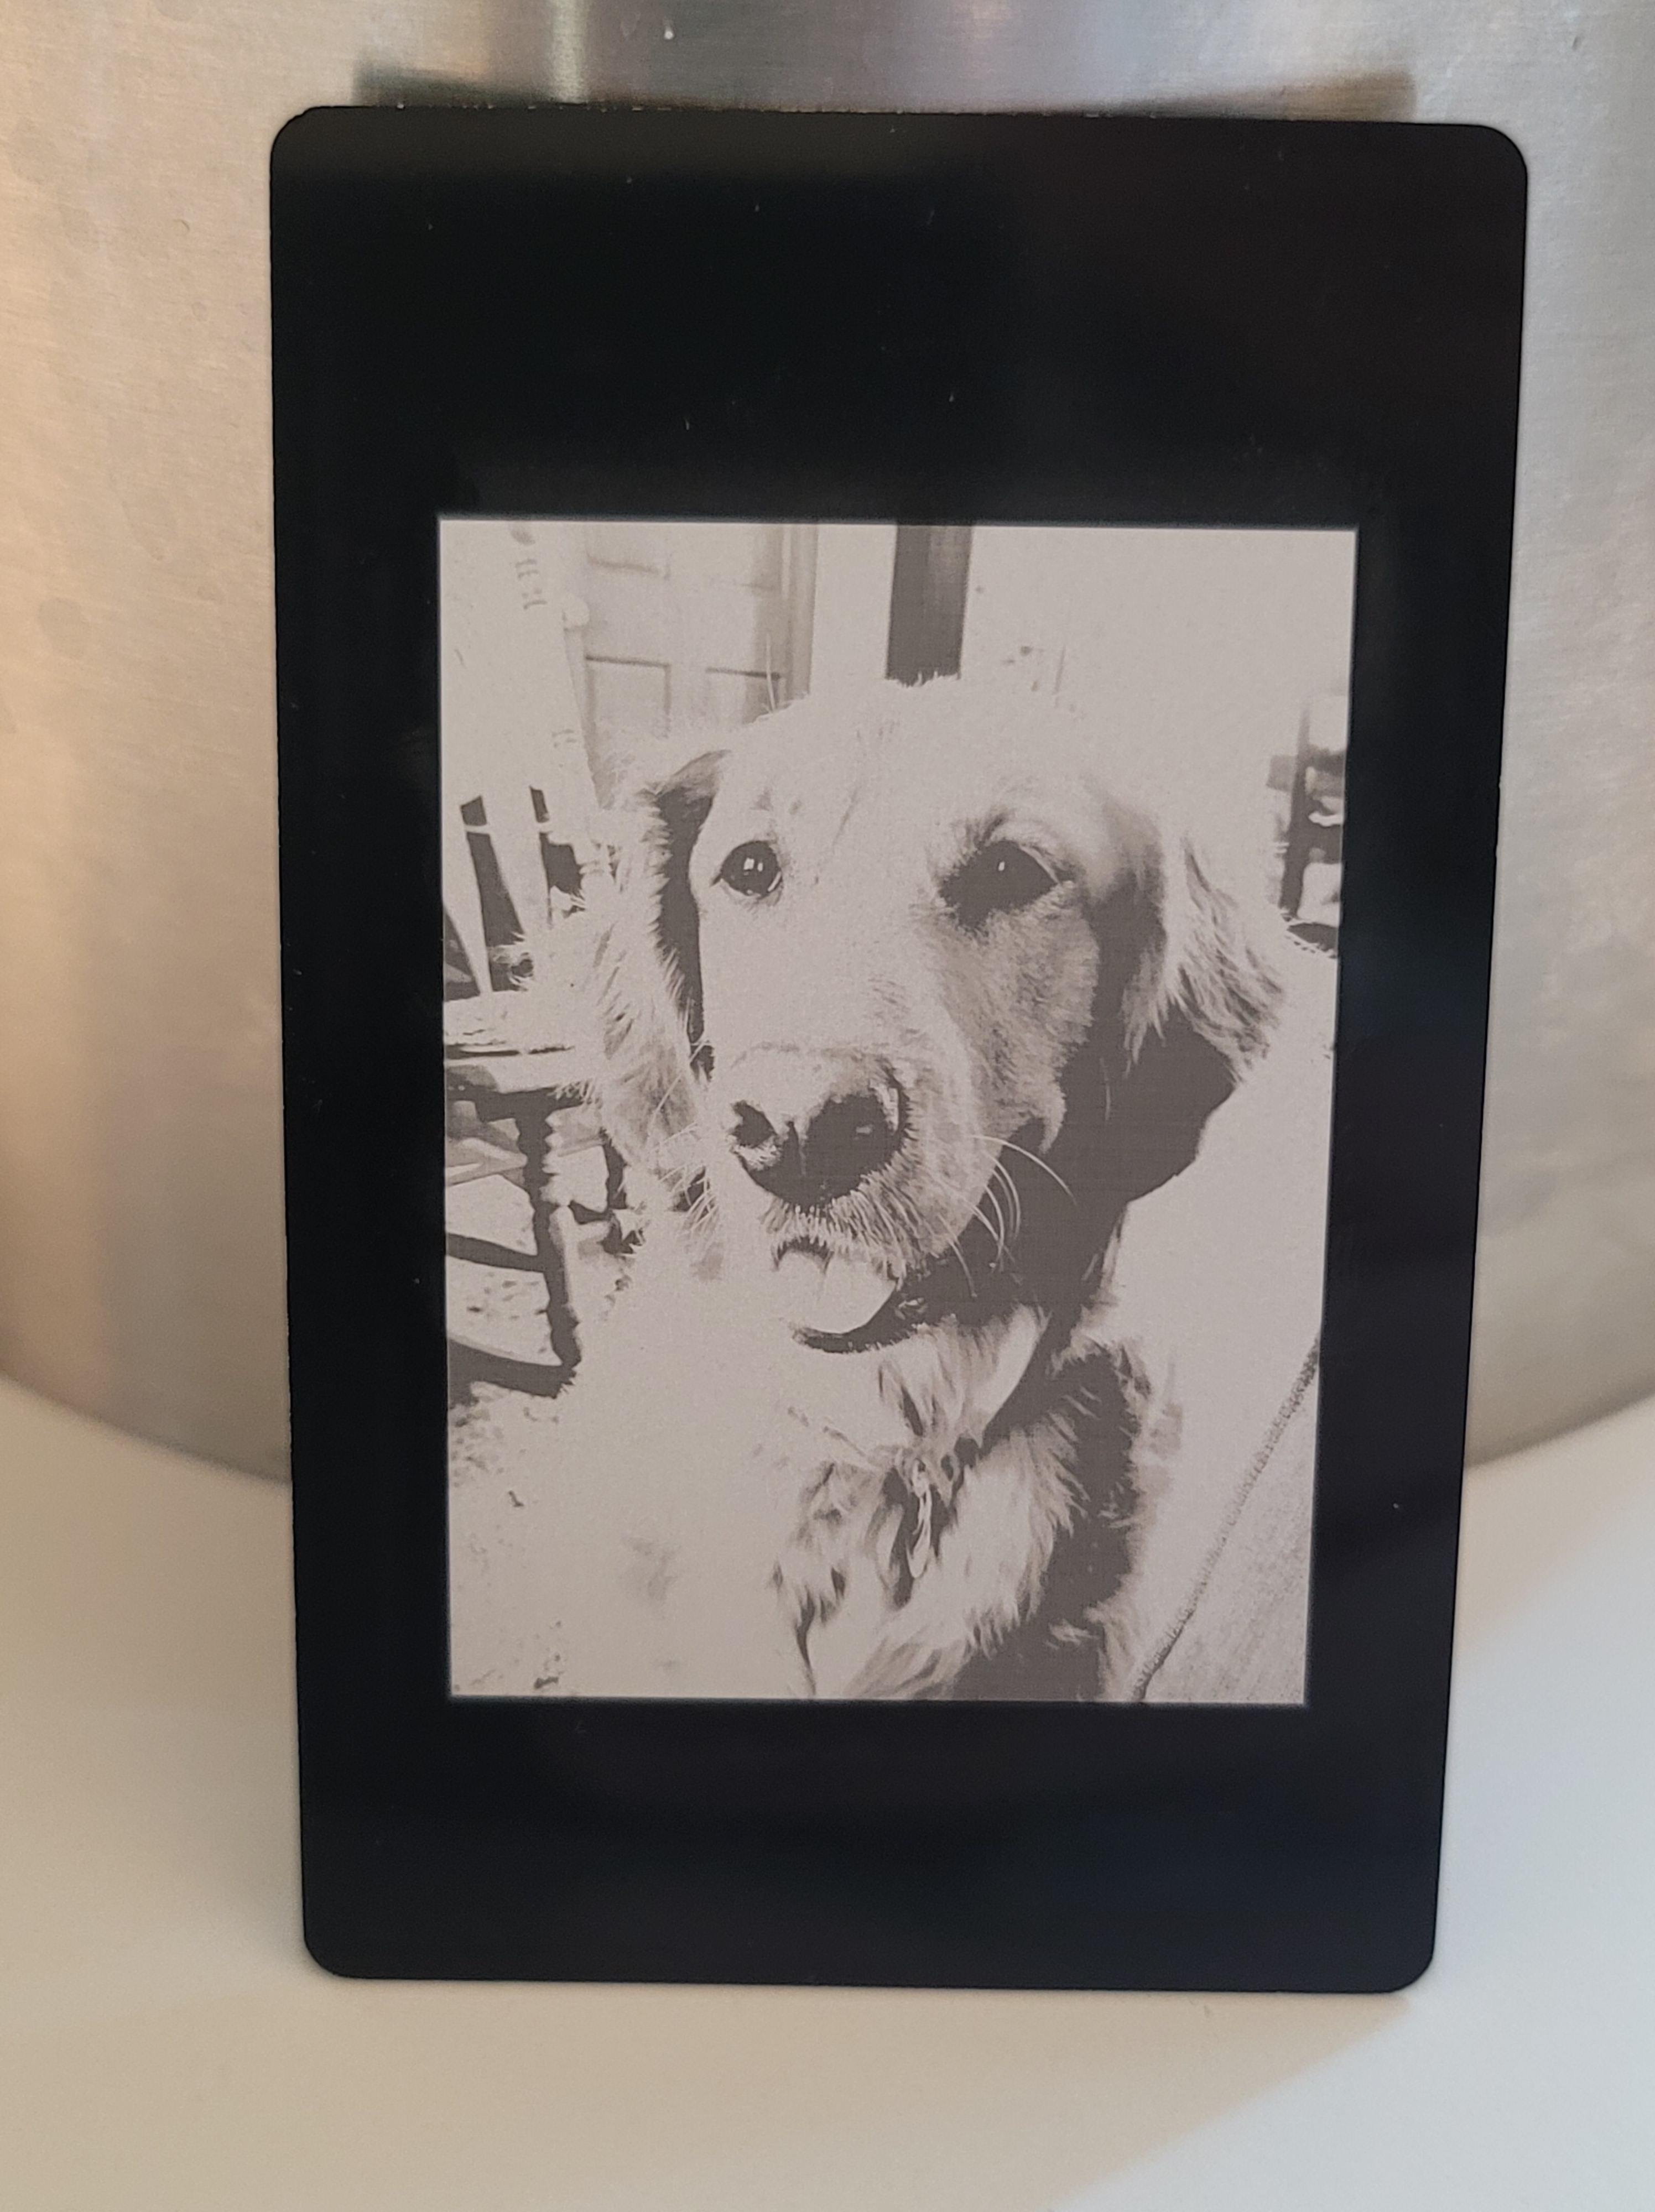
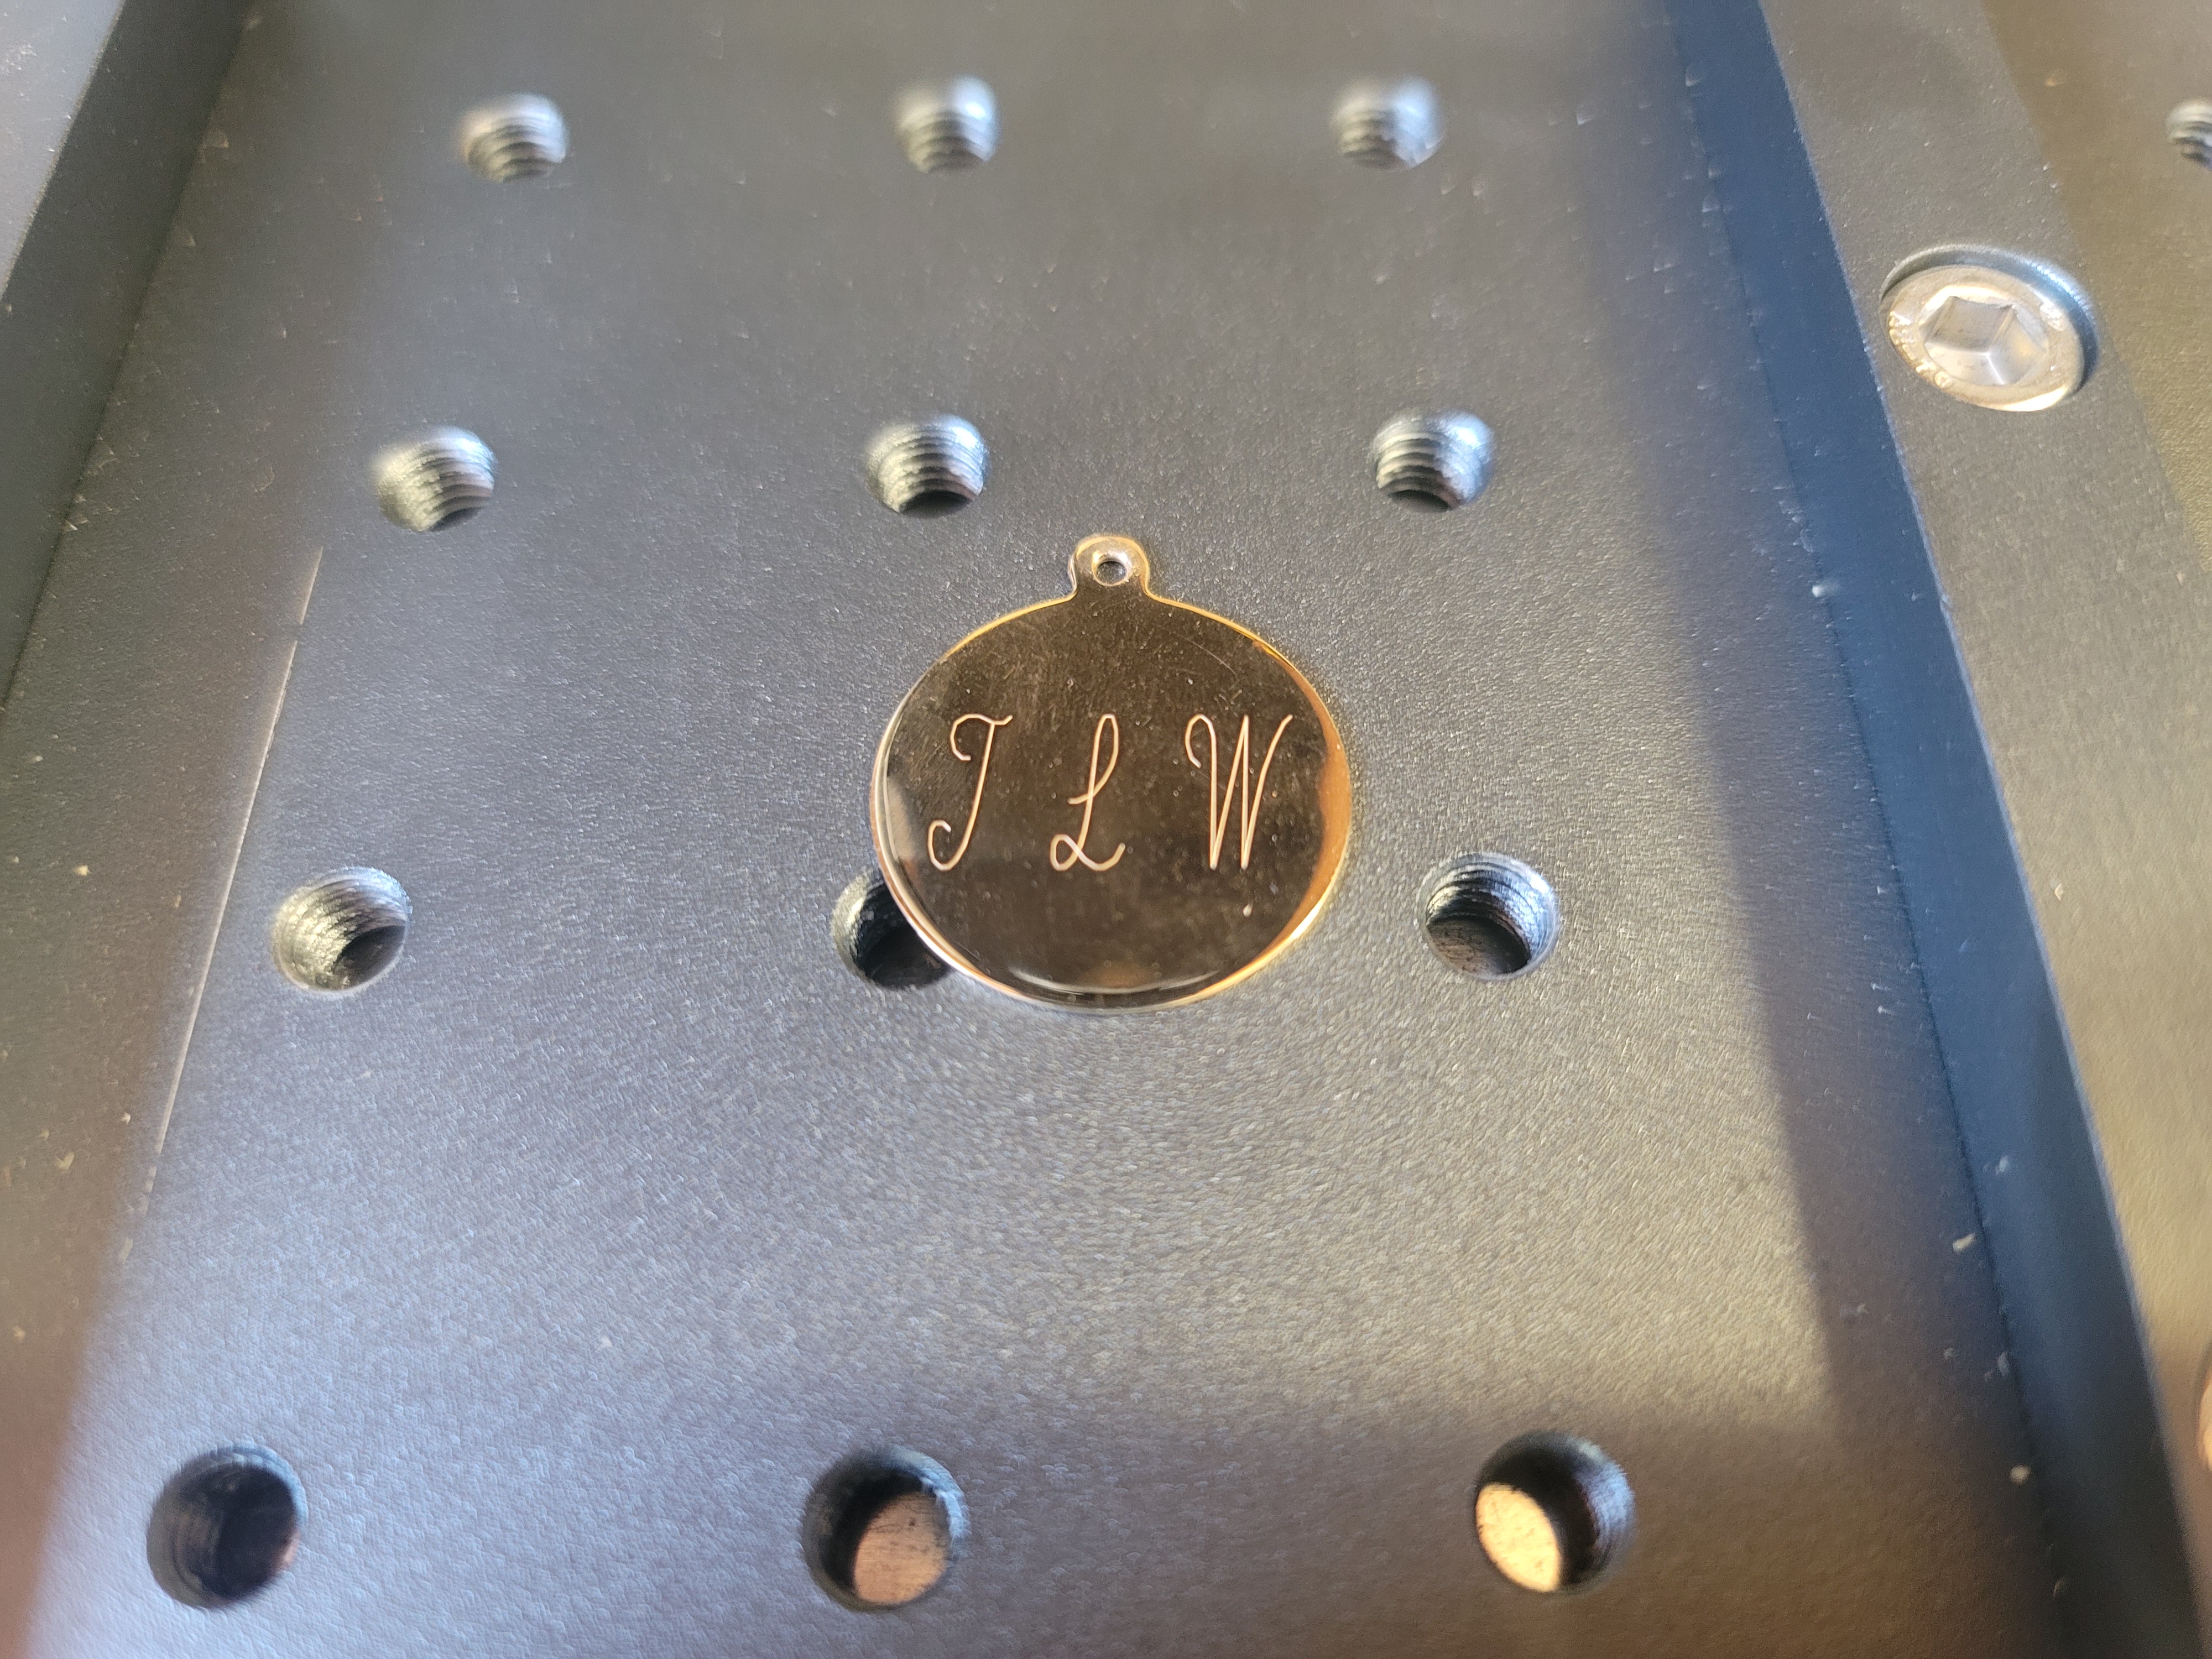
I had wanted a small desktop fiber laser for my home workshop for quite some time and when the opportunity presented itself to obtain this model I decided to take the plunge. This 20W galvo fiber laser is suitable for engraving metal and even cutting some thin metals (with multiple passes.) The work area is 100mm x 100mm.
The machine comes very well packaged, and upon pulling it out of the box it’s immediately apparent the build quality is very impressive. The entire construction aluminum and everything has a really nice quality feel to it. Assembly only takes a few minutes and is super simple- it involves just bolting on the post and laser head. There are two bars that attach to the bed of the machine with socket head cap screws- these bars allow you to either clamp your work down or raise it off the bed surface (important for cutting.)
I have the laser connected to a dedicated shop Windows PC that also runs my small benchtop CNC mill. The laser software is included on a flash drive and is simple to install. The ADD Mark software is fairly intuitive, and engraving text, vector art, and photos is very easy to do. I use both Inkscape and Affinity Designer for preparing my artwork. This machine uses a BSL controller, and I believe Lightburn is planning on releasing a version of their software that works with it in the future, if you want different software to run it (I have downloaded a beta of the compatible version but haven’t tried it yet.)
Focusing the laser head is done manually by turning a fold out handle on top of the laser head post. The laser will show a red focusing rectangle that contains the size of the image/art you want to engrave- all you do is turn the focusing knob until the red rectangle matches the size of the artwork on your computer screen (a ruler is included for measurement.) Once you hit the RUN button the laser will run. Note- always wear proper eye protection!
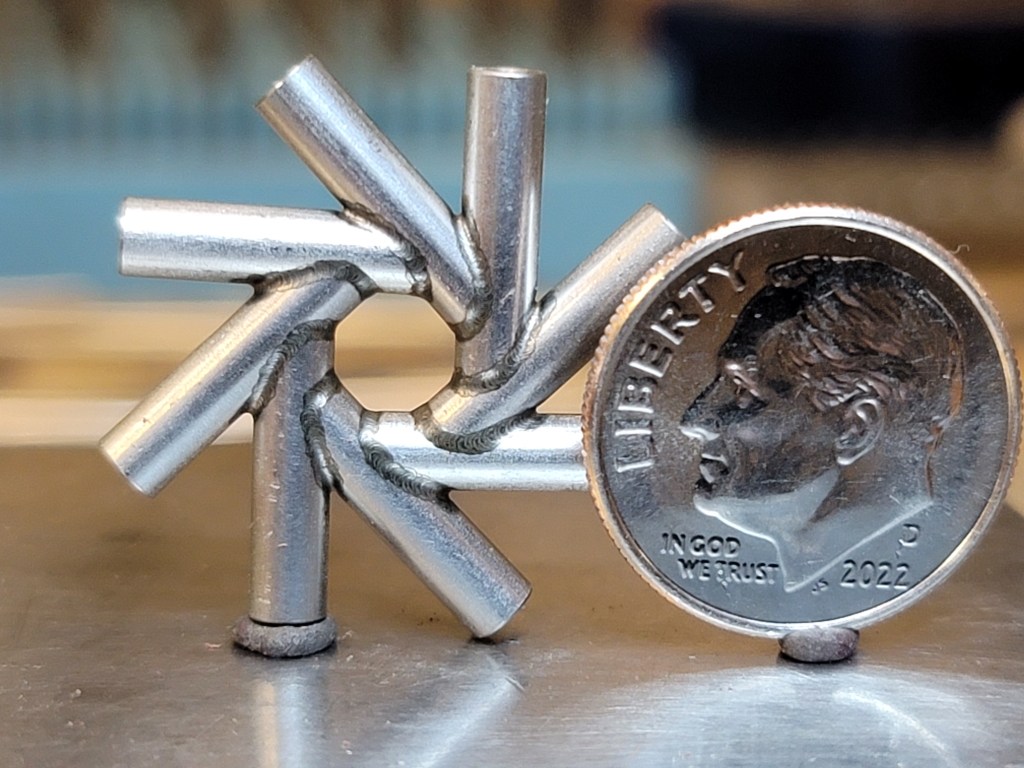
There are settings for power, frequency, number of run cycles, etc. It takes a bit of experimentation to get the exact desired effect you want. I had no trouble at all marking 14K yellow Gold, stainless steel, brass, and aluminum. I was even able to cut some detailed microscopic gears from .4mm thick brass. The detail is amazing and text engraves extremely sharp, even at very small sizes. Photos engrave beautifully on metal.


For a basic rundown on various fiber laser settings have a look at this page here.
I have owned a CO2 laser and the one thing I can tell you is this machine is crazy fast by comparison. A rotary attachment is also available but I have not used it. a 30W version is also available if you want a bit more power. Overall it is a joy to use and it’s added a whole new level of capability to my workshop. Purchase price at the time I got it is around $900 U.S. (plus air freight/customs/taxes) and for that kind of money it’s a very impressive machine. Upon seeing what it can do, one of my colleagues immediately ordered one for himself and he’s also extremely happy with it.
Highly recommended!
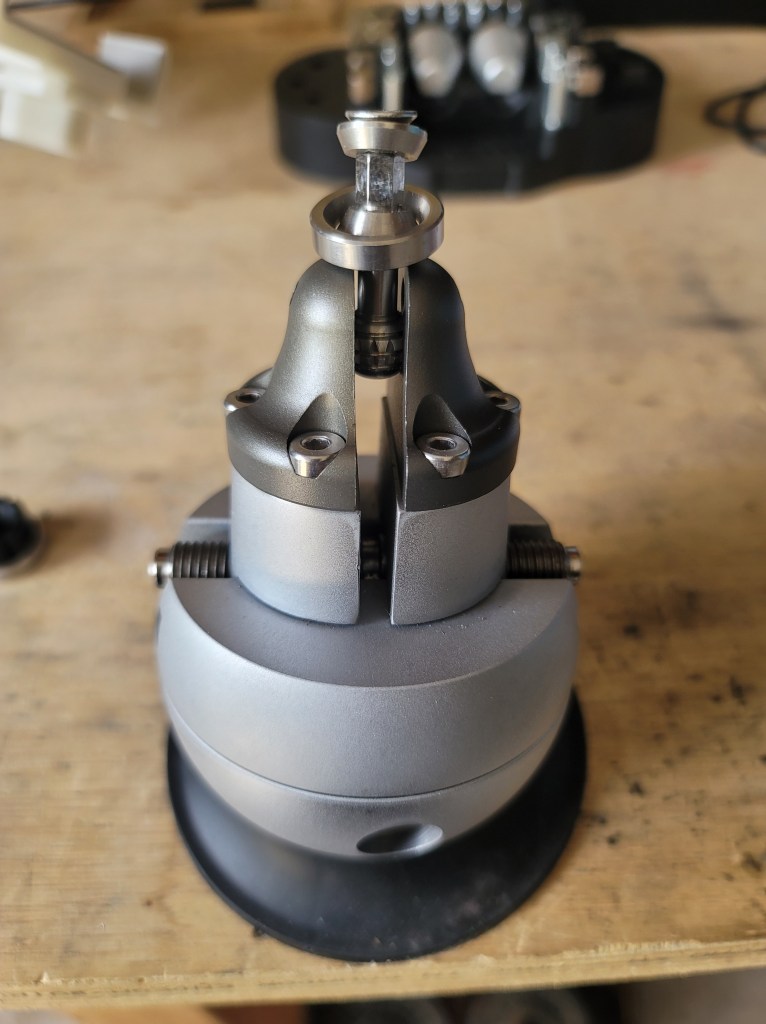
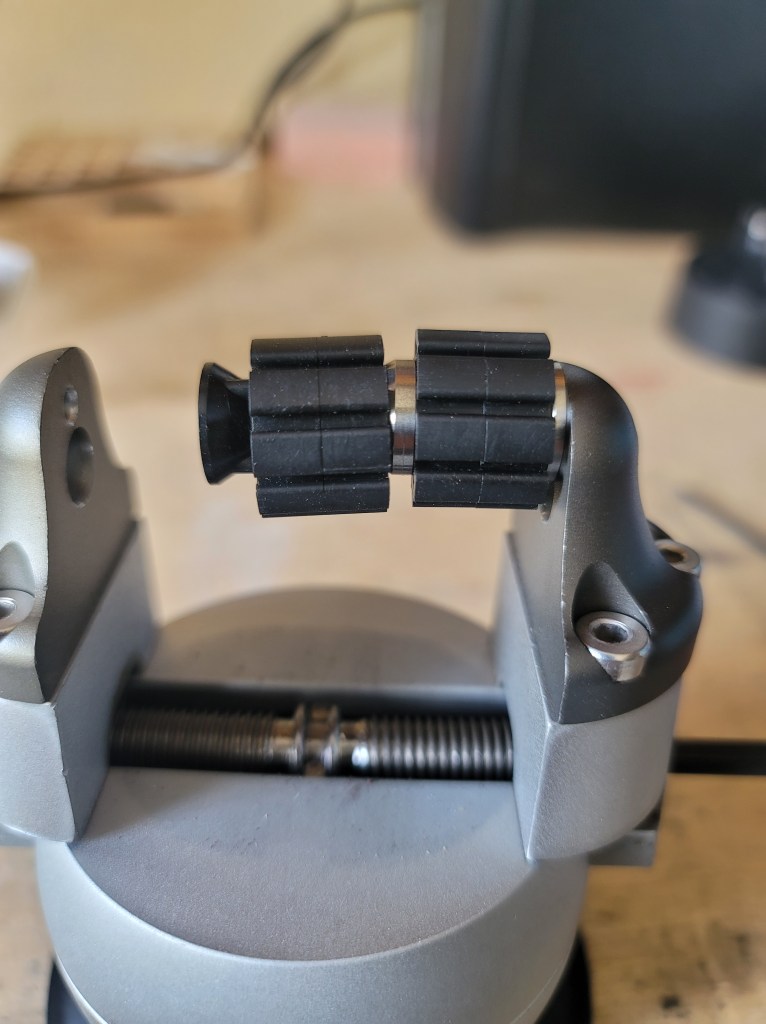
Vevor 3″ ball vise (2024)
Vevor recently sent me this little 3″ ball vise for review. As a professional jeweler, this is the kind of tool I use every single day. These vises are used for engraving and stone setting, but would also come in very handy for model makers or anyone else who needs a multi position vise for holding small objects.
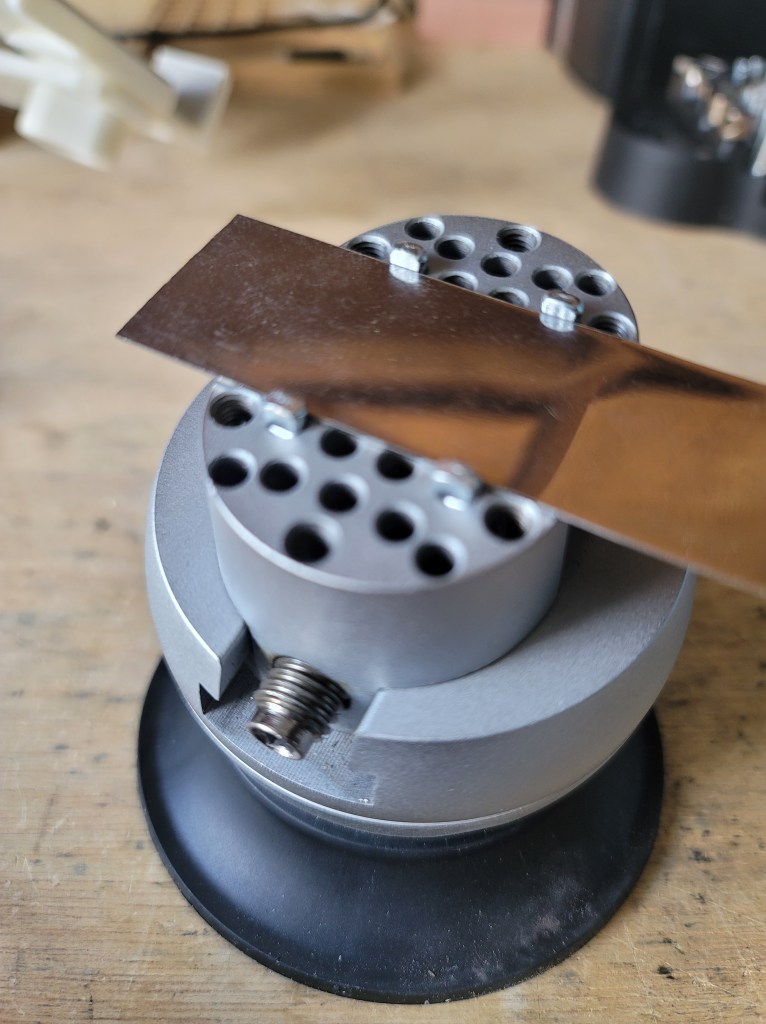
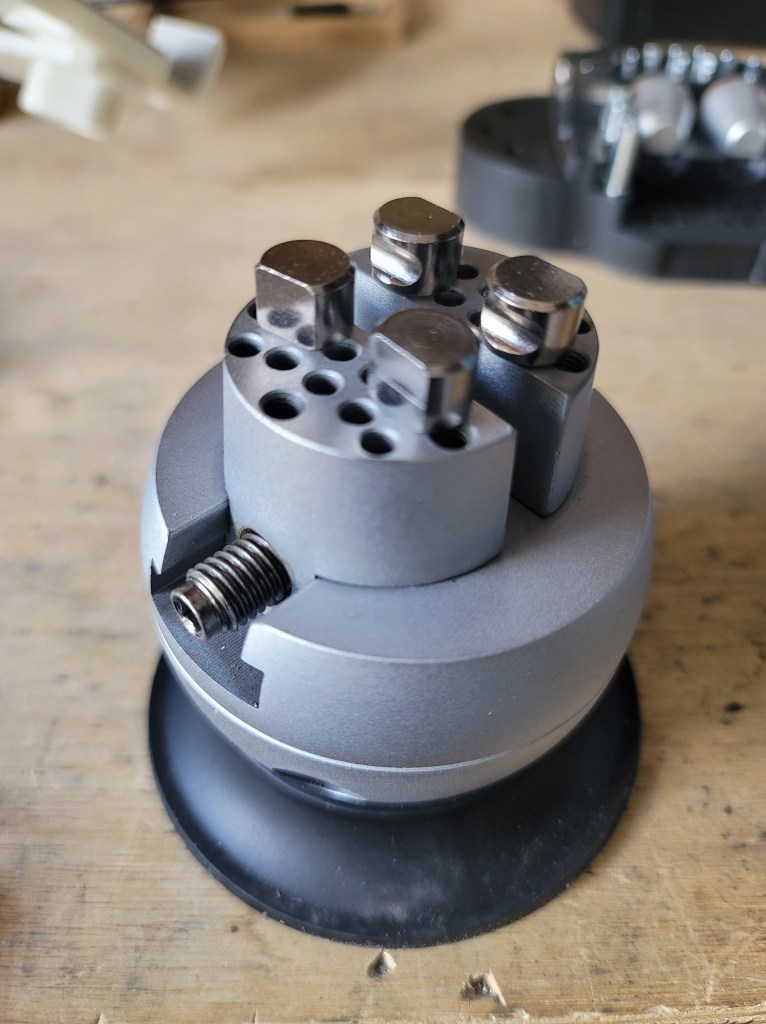
Upon opening the box, there is the ball vise, base plate, three different ring holding attachments, ring holding collets, wrenches, manual, and an assortment of holding attachments that fit in the vise pins. Mine also came with an extra base plate.

The ball vise itself is well made, with a nice blemish free surface, smooth rotating motion without any play, and the jaws clamp down securely with the jaws meeting nice and parallel. The upper half of the vise can rotate (very useful when engraving) or it can be locked in a fixed position. The vise jaws have a fair bit of play in them, but that disappears as soon as they are tightened down. The clamp to tighten down the vise rotation works perfectly and keeps the vise from rotating without having to apply too much force to the clamp screw.


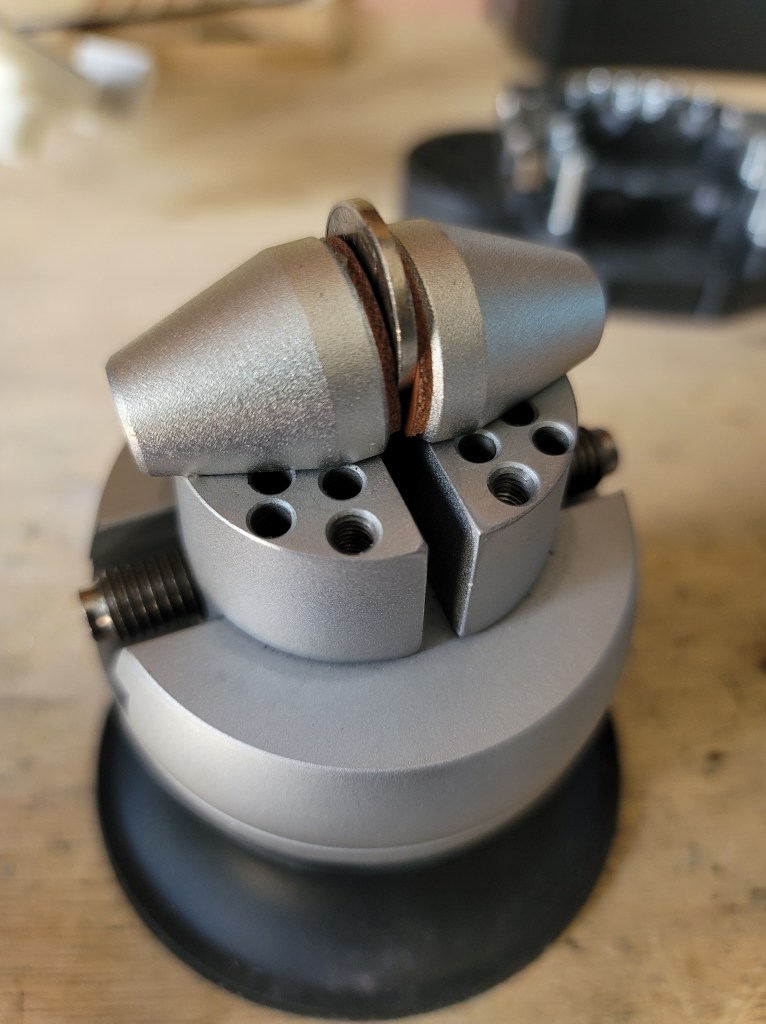
The vise comes with three different ring holding attachments- a moving ball type that can hold a ring in either vertical or horizontal position, a single width vertical holder, and a double width vertical holder. These all attach to the vise jaws using a hard anodized aluminum riser that is bolted to the vise jaws. All of these use expanding plastic collets to hold rings.
I’ve been using a similar type of expanding ring collet setup for decades and it works quite well. The beauty of this is that it allows you to securely hold a ring in any position imaginable for engraving or stone setting. Overall it’s an extremely versatile setup and if you’re a jeweler I highly recommend getting the vise with this attachment.


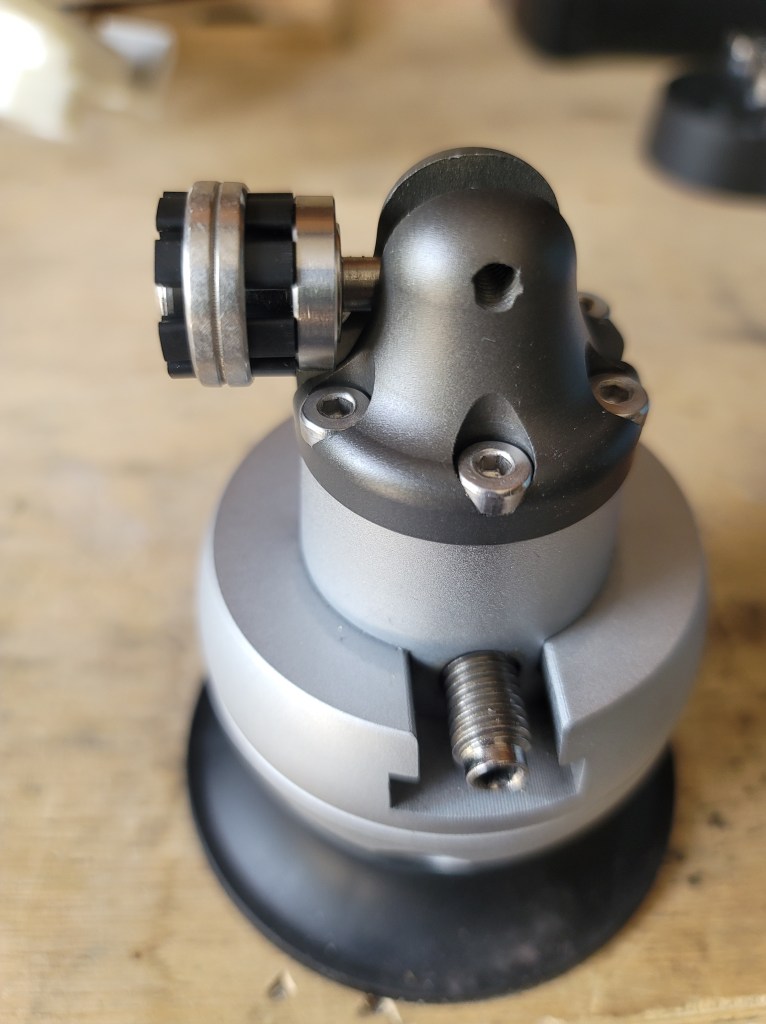

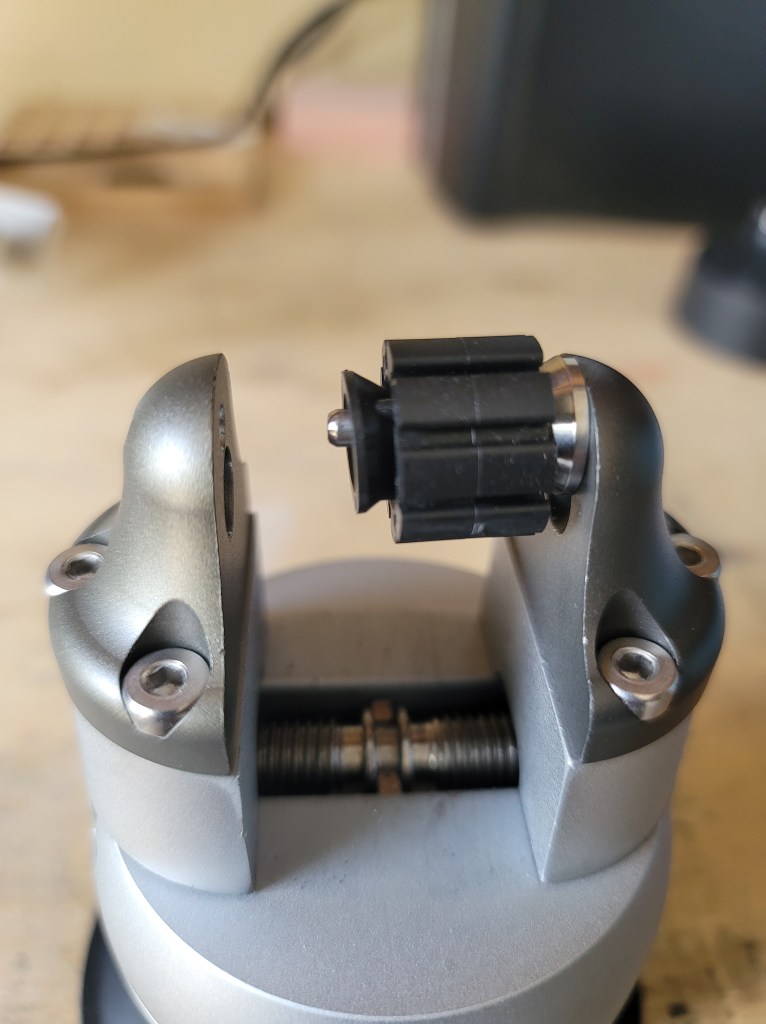

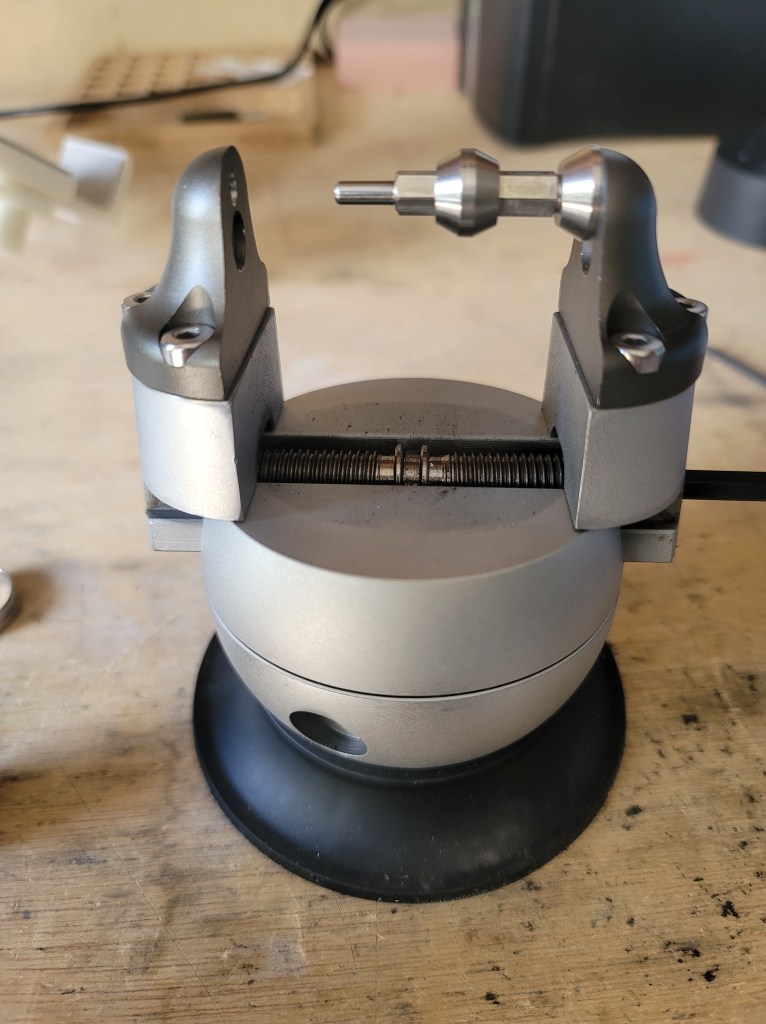


The remaining holding attachments are all secured to the vise jaws using the non threaded holes in the jaws. All of the pins fit in the holes securely with little play. There are plain steel pins, plastic coated pins, square pins, round pins (with both concave and flat sides), large flat pins with circular cutouts, and leather covered vise jaws. All of these attachments will allow you to hold everything from round bar, to flat material (both horizontal and vertical), to odd/unusual shaped items. It’s a very comprehensive setup. It can also hold a T shaped piece of aluminum with Thermo-Loc compound on it- very useful when setting stones in small bezel settings. If you have access to a 3d printer you could make all sorts of custom vise jaws to hold whatever you want.


One thing I recommend doing is putting a bit of anti slip rubber mat under the vise base, as it can slide around a bit when a lot of force is being applied to whatever the vise is holding. I did this when I was recently hand engraving a Platinum ring.


Overall this vise is a joy to use. It’s well made and does exactly what it was designed to do, and at a cost that is a fraction of similar models on the market. It’s nice to see good quality tools like this at a reasonable price that puts it within reach of people who are just learning stone setting and engraving. Having said that, if you’re wanting a ball vise for engraving using a hammer/chisel you’re better off with a larger model that has more mass, as this vise can move around a bit when using a chasing hammer.
Full disclosure- this vise was provided for review free of charge. The purchase links below are affiliate links, and any funds received go to support my work shown on this site.
3″ Ball vise with attachments (Canada) https://s.vevor.com/bfQ66D
3″ Ball vise with attachments (U.S.) https://s.vevor.com/bfQ66V
Use the code “MAKINGTOLEARN” to get an additional 5% off
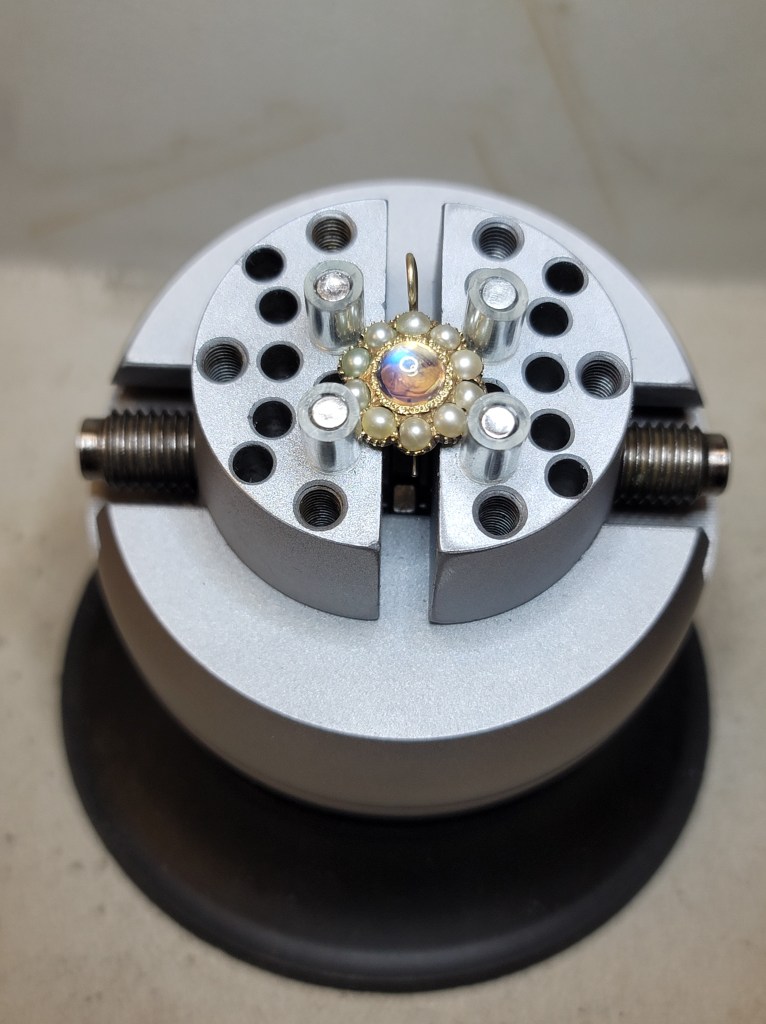
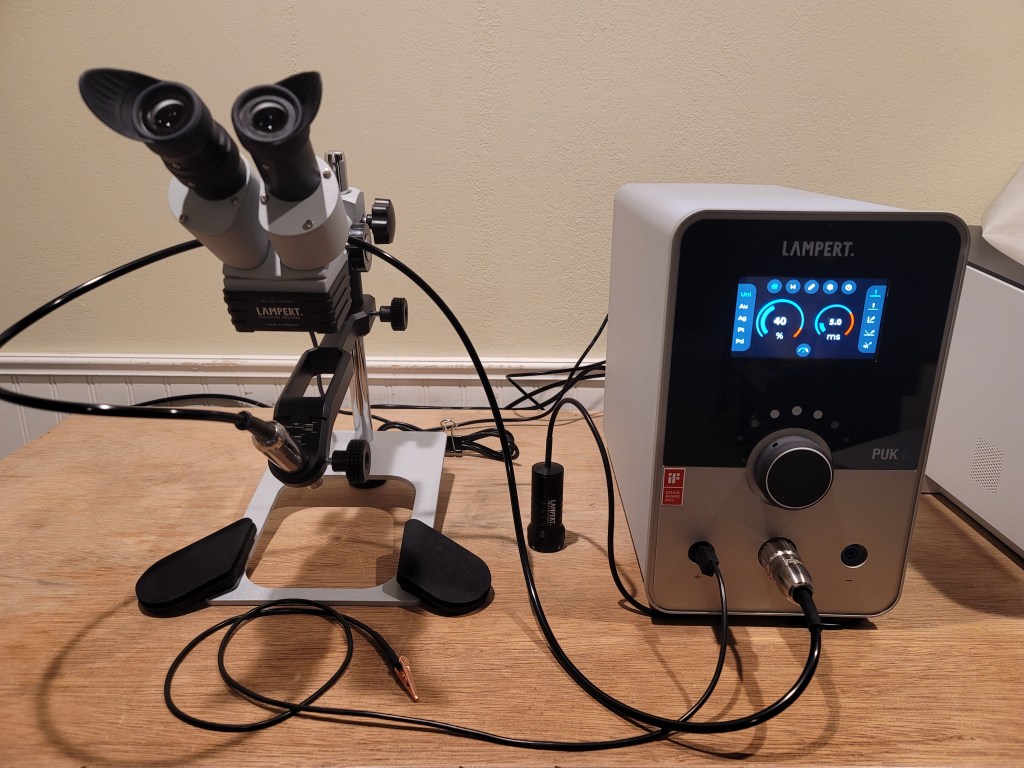
Lampert PUK 6 pulse welder (2024)
With a revised input control system, the best just got better
As someone who has been doing micro welding for around 18 years (I’m going on 26 years as a professional bench jeweler) the folks at Lampert asked me if I’d like to test out the new PUK 6 pulse welder and provide some honest feedback, as I have experience using the previous PUK 5.1 model. So of course I said yes.
Disclaimer: I do not work for Lampert. They did not pay me or offer me compensation in any way, shape, or form. I do not get to keep the welder. I unbox it, use it, then send it back to them. They have absolutely zero input with what I write here. It’s really nice when companies ask you to give honest opinions and feedback about their product.
Unboxing-


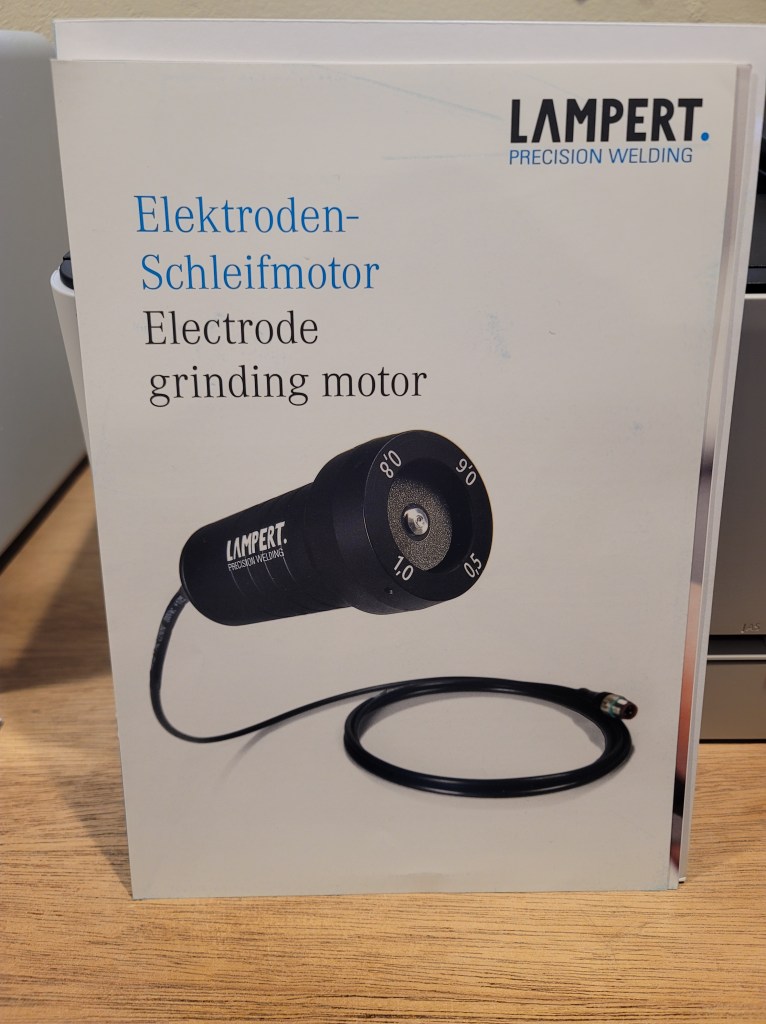
Upon opening the box, you will find the main power unit, microscope, argon flowmeter, electrode sharpener, and various accessories, such as different size electrodes, microscope cover, spare electrode grinding disc, practice material, and ground wire. Also included is excellent documentation regarding use of the welder and microscope, as well as additional available accessories. I really like having actual paper manuals vs. the current trend of online manuals so this is nice.


One other thing you will find in the packaging is the total absence of foam padding or styrofoam. Everything is in separate boxes with cardboard spacers to keep everything secure and protected during shipping. Very nice.
Getting the welder set up-
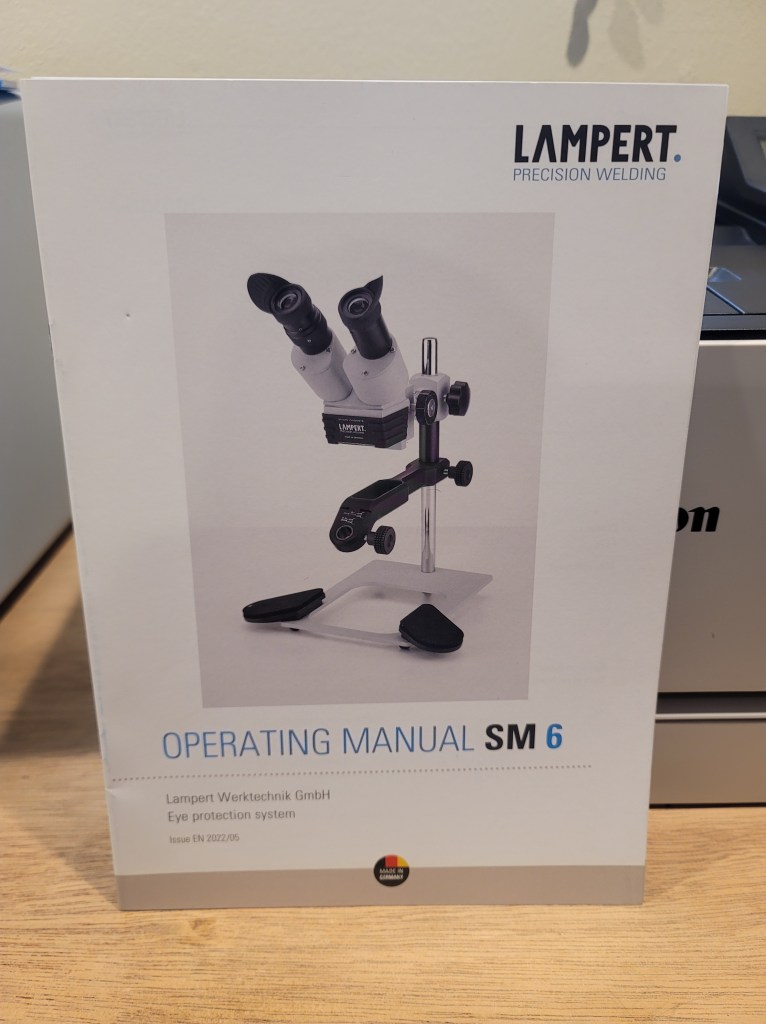
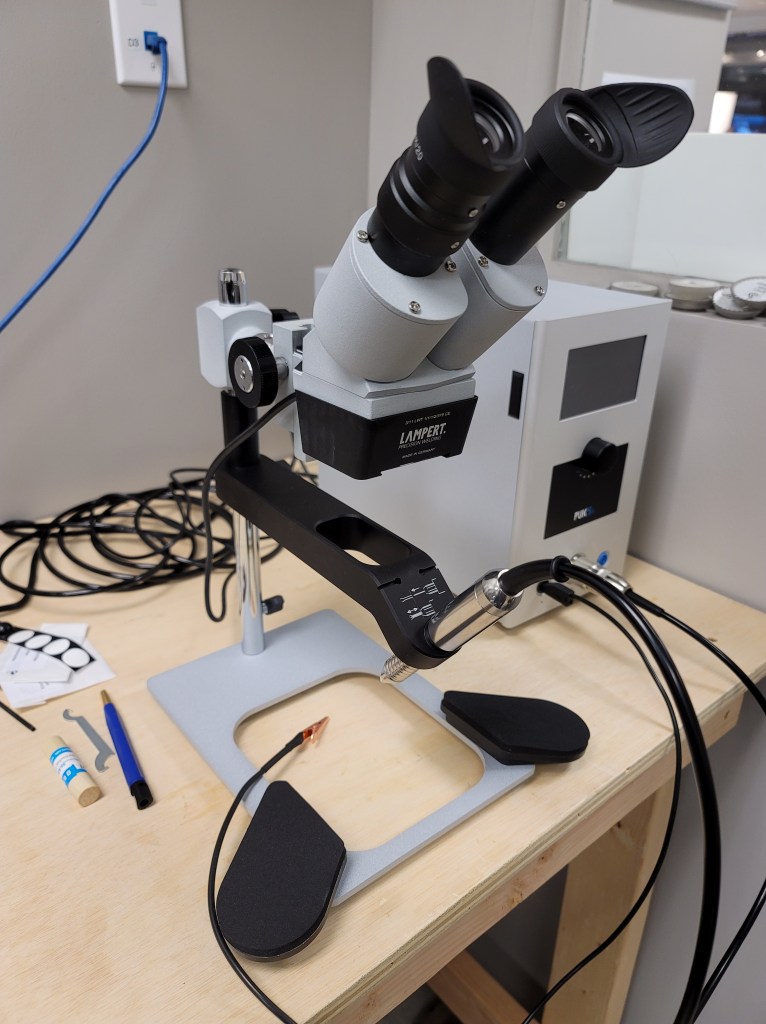
Once everything is unpacked it is immediately apparent that everything is extremely well built. The quality and finish is honestly as good as it gets. It’s obvious that Lampert has taken a lot of pride in producing this machine and it shows. The base power unit is quite heavy and the microscope stand is very solid and easy to adjust.
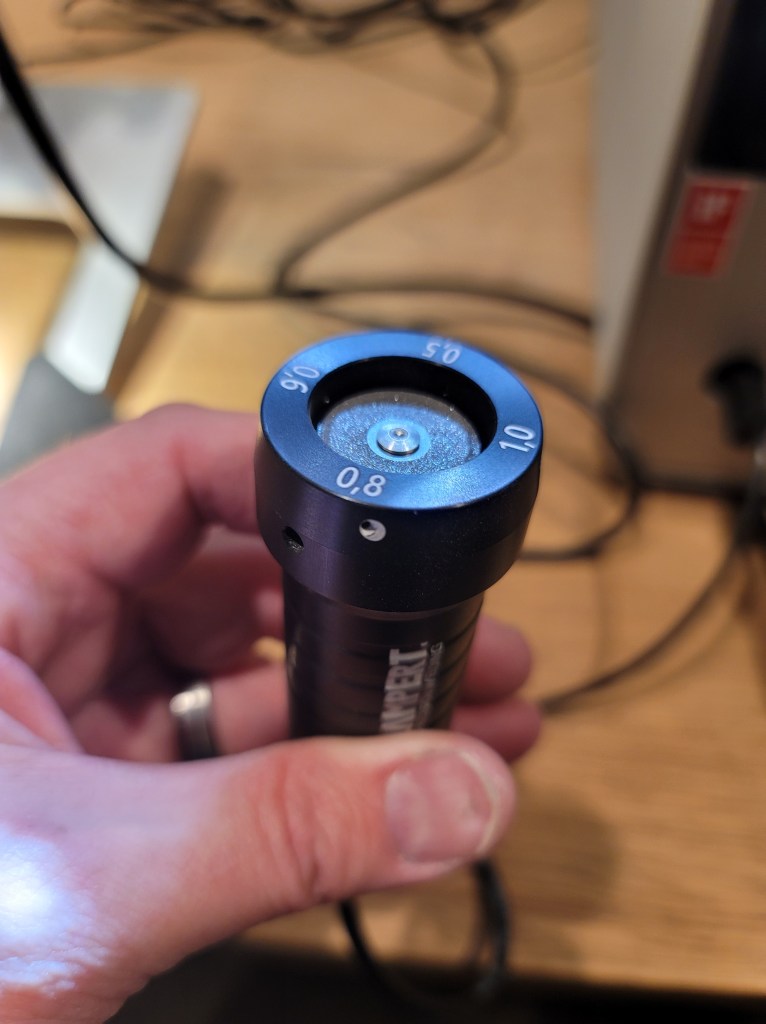
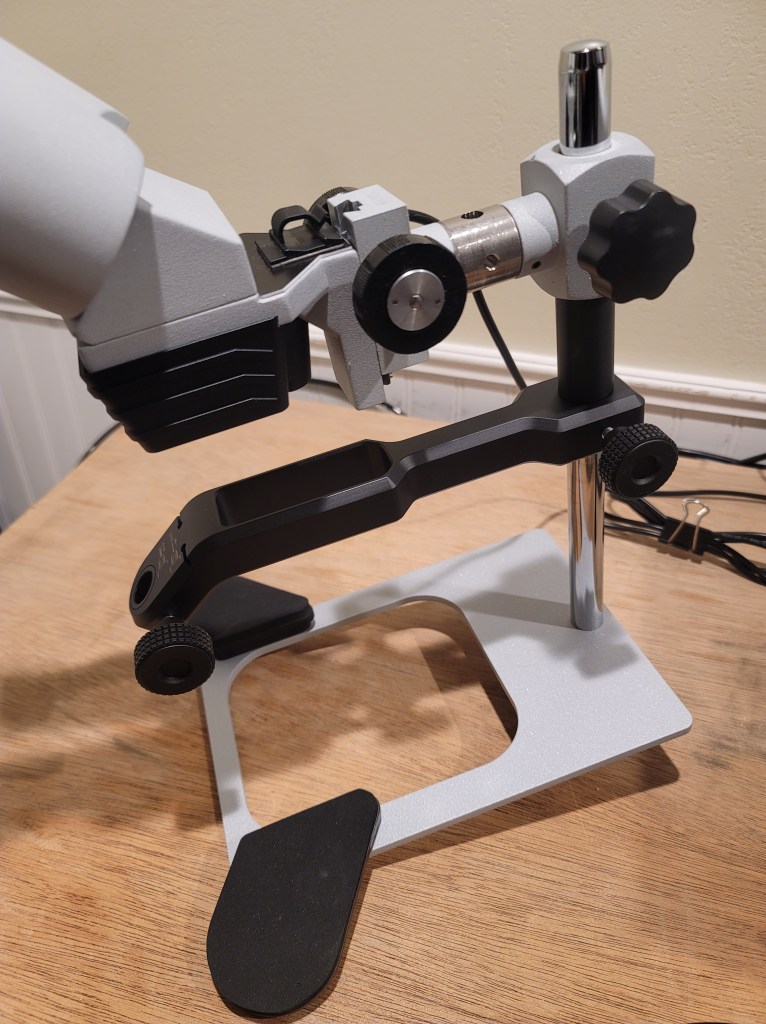
The microscope is basically unchanged from the previous PUK 5.1 model- nice wide field of view, sharp optics, adjustable eyepieces, electronic shutter, and 10X magnification (15X eyepieces are available but I’ve honestly never felt the need for them in daily use as a jeweler.) The stand has been changed slightly with a new, narrower handpiece arm and an improved adjustable height swivel foot that allows you to tilt the microscope fore and aft. The electrode length slots on the handpiece arm make setting the proper electrode length extremely fast and easy.
I should mention that I do prefer the layout of this type microscope with the handpiece/electrode facing toward the work, rather than having the electrode facing toward the user. The reason is that it’s much easier to see the exact electrode placement relative to the work. In terms of precision and delicate welding this makes a world of difference in use.


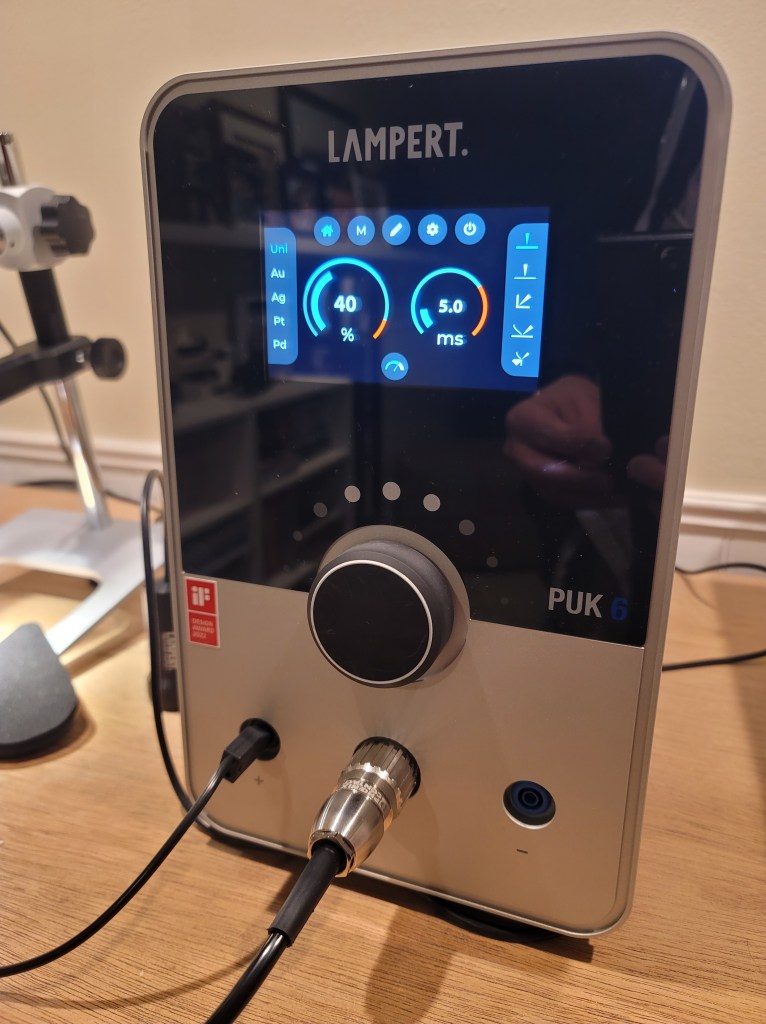
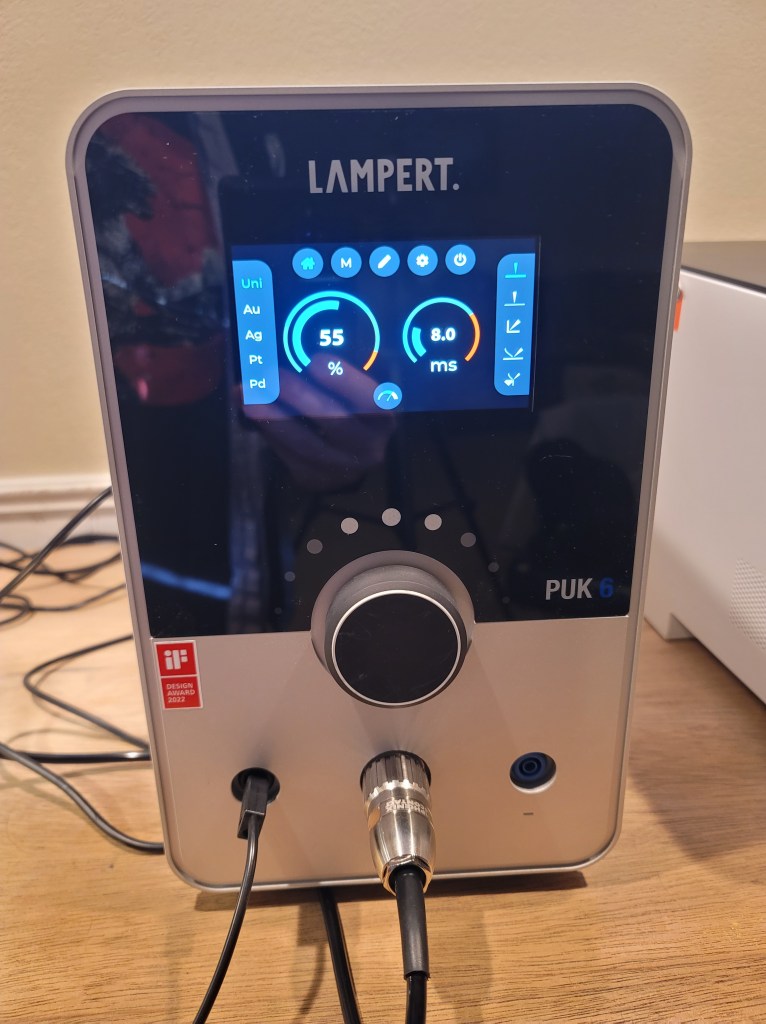
The new base unit is where all the magic happens. On the front there is a new multifunction tilt/scroll wheel and a new larger display. The display is very bright and the text is razor sharp and easy to read. On the back of the base unit there are connectors for argon, microscope, electrode grinder, optional foot switch, and USB port for software updates. The base unit is slightly larger than the previous PUK 5.1 model (if I were to replace my PUK 5.1 at my work I would have to move it to a new location due to the increased height of the PUK 6.) The power switch is on the backside of the base unit (this is for practical electrical reasons as it’s best practice to terminate noisy mains input power right where it enters) so if you’re like me and have the base unit placed in a cubby area it may be best to power the unit on using a good quality switched power strip that is more easily accessible.

The included argon flowmeter is unchanged and it’s very high quality- zero complaints there. Overall these PUK welders are very efficient with their use of argon. The handpiece is also unchanged from the PUK 5.1 and it works great- just pop the ceramic tipped electrode cover off to change the electrode and then snap it back on. Swapping electrodes takes seconds and no tools are required. There are two different size collets for electrodes ranging in size from .5mm up to 1mm diameter.

The welder in use-
I’ve been using the PUK 5.1 for a couple of years now and all I can say is that the new PUK 6 with the multifunction tilt/scroll wheel and larger display makes a world of difference in daily use.
Rocking the wheel to the left (red arrow) lets you scroll through the material presets menu. There are settings for Gold, Silver, Platinum, Palladium, Bronze, Stainless steel, Titanium, Tin, Brass, Copper, as well as a “universal” setting. When you select one of these settings, the welding power and pulse duration are immediately shown in the main display area. Now when you rotate the multifunction wheel you will see the welding power increase/decrease (yellow arrow). Push the wheel and it immediately changes to give you control over the welding pulse duration (green arrow). Push the wheel again and it goes back to control over the welding power. Blue and red level indicators give you an immediate view of desired setting ranges for each material. This is a huge improvement over the previous PUK 5.1 smaller touchscreen, where you had to touch the screen to select power or duration, then immediately turn the knob to the desired setting. If you didn’t operate it fast enough it would timeout and revert back to the power setting.
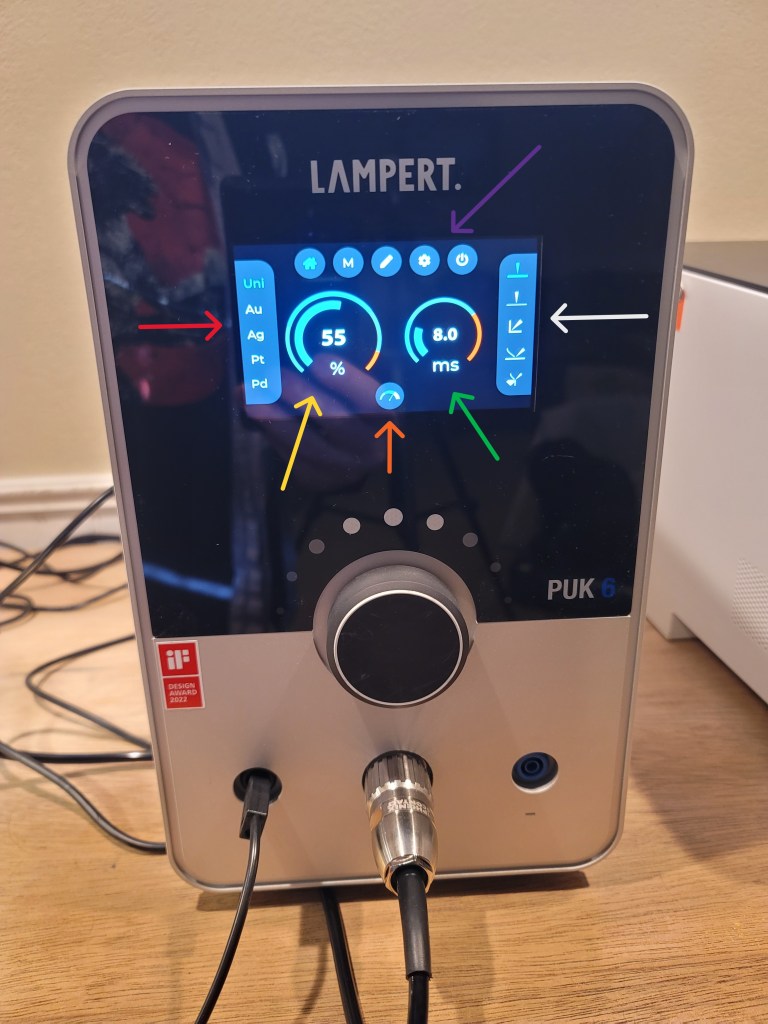
Rocking the wheel to the right (white arrow) lets you scroll through the welding types menu– thick material (.3mm and up), thin material (less than .3mm), welding in sharp angles/tight joints, adding filler wire, and retipping on stone settings (which is hugely useful for bench jewelers.) So now, you can very quickly and easily select material, select welding process, and adjust power/pulse duration. It’s all right there in front of you, clear as day, on one screen. Bravo.
Rocking the wheel downward (orange arrow) lets you adjust the welding speed with three presets. The lowest speed is when you want to put the least amount of heat into the workpiece to help minimize distortion on very thin material. The fastest speed is when you want to put more heat into the workpiece- this is very useful when welding material like heavier gauge Sterling Silver. Overall this method of being able to quickly adjust welding speed is super nice. I’ve also noticed that the welding speed of the PUK 6 is quite a bit faster than the previous 5.1 model.
Rocking the wheel upward (purple arrow) lets you scroll between the home screen, micro mode, fixation welding, settings menu, and standby power. I haven’t used fixation mode as it requires a foot pedal and does not use the handpiece, but rather directly welds two pieces of metal clamped together.
The settings menu lets you adjust the brightness of the microscope LED light (red arrow– in 25% increments), turn the argon gas flow on/off (yellow arrow– useful for setting accurate argon flow during welding), test the microscope electronic shutter (purple arrow), turn the welding process start beeping sound on/off (white arrow), and perform system updates (green arrow).

The big ones here are micro mode and standby mode. When you enter micro mode (red arrow below) the screen switches to a super fine control of weld power and pulse duration with very small steps as you rotate the multifunction wheel. This is fantastic for extremely precise control of welding very delicate work and thin metals and is a big improvement over the previous 5.1 model. Standby mode (second image) allows you essentially put the welder to sleep for a short period of time when it’s not in use- but when it wakes up your previous settings have been saved, which is super nice.


The takeaway from all of this is that during welding it performs very much like the previous PUK 5.1 model, except it’s significantly faster and has a finer level of control in micro mode. The changes in the multifunction scroll/tilt wheel and menu screen make it an absolute joy to use.
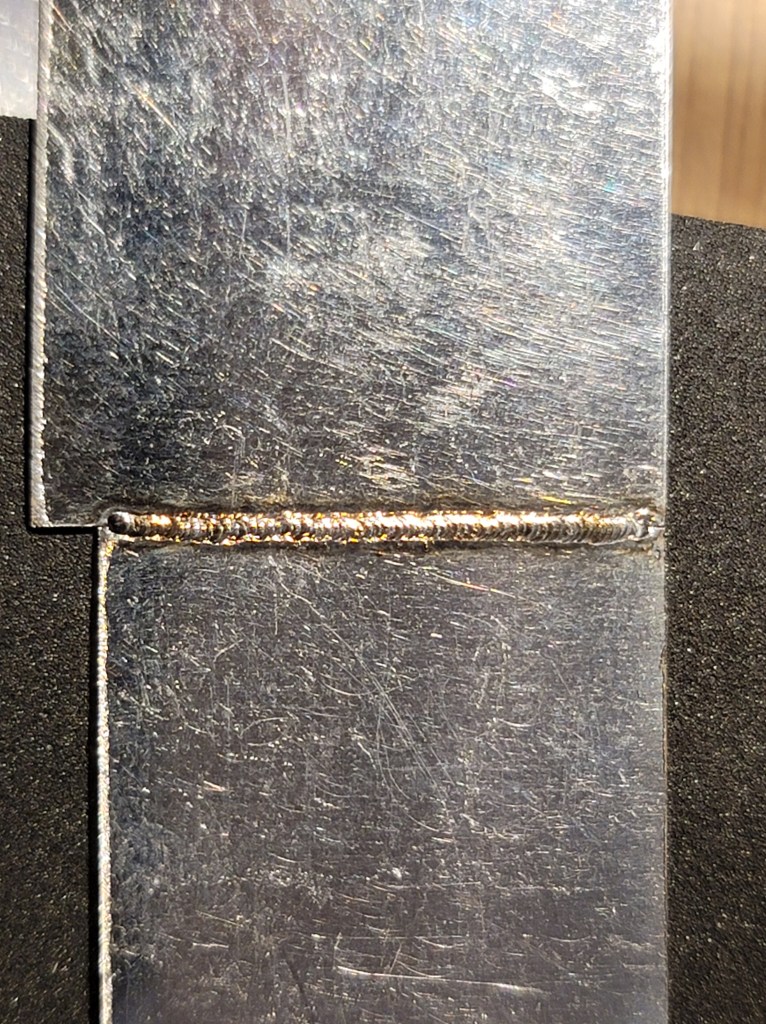
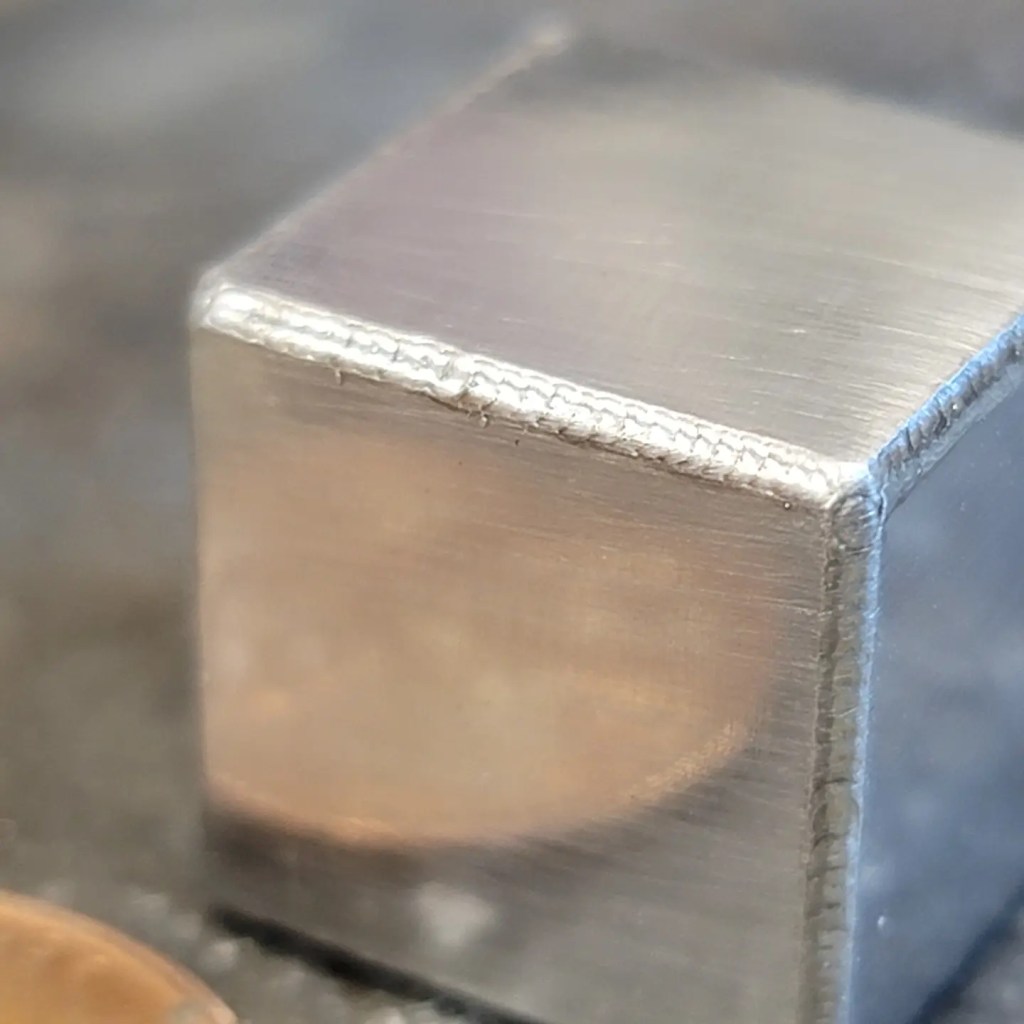
Test weld of .2mm thick stainless steel sheet-
Sample weld on thin (.6mm) stainless steel sheet-
Cost/comparison-
Of course everyone asks two questions: “What is the cost?” and “How does this compare to a laser welder?” The reality is that they are very different technologies so a direct comparison is difficult. You cannot compare the listed power output of a pulse welder to the listed power output of a laser simply because they do not work the same way. One welds using electrical current and the other welds using a coherent beam of light. While they can be used for similar work, how they weld and the way in which you use them for particular jobs is vastly different. What I can say for certain (as someone who has both a PUK welder and a high end laser) I would much rather have both the PUK 6 (at just under $6k US) and a lower end laser (say $4k to $10k) than spend the same amount (or significantly more- my 180 Joule laser was $22k) on just a higher end laser- the main reason being that there’s a lot of jobs the PUK can handle that a laser cannot. For welding extremely thin material, doing delicate work, welding Silver, and retipping settings (especially on colored stones) the PUK welder has no equal. For more info read the Pulse welder or laser welder? section below.
Pros and cons-
Pro-
New control interface and large screen is awesome
Improved welding performance
Faster welding
Improved micro mode
Standby mode
Improved microscope stand
Welding menu presets are more accurate to usage
Included electrode grinder is fantastic
Cons-
While the new beautiful screen has a very wide viewing angle is also has a fair bit of glare- an anti glare screen would be really nice
New main unit is slightly physically larger than previous model
Power switch is still on the back (the new Standby mode makes this much less of an issue)
I’d like a bit longer cable from the control unit to the handpiece
Cost increase of several hundred dollars over the previous PUK 5.1 -having said that, the included electrode grinder and features are easily worth it
None of these cons are at all significant. Overall I’d have to say Lampert really hit a home run with the PUK 6. It’s improved in every way from it’s predecessor, especially where it counts the most- welding performance and ease of use. The build quality is absolutely first rate and it’s a joy to use.
Check out https://www.lampert.info/en/products/jewelry/puk-6/ for more information.
Pulse welder or laser welder?
A few people have asked me what the difference is when working with a pulse welder vs a laser welder and which is a better buy?
I’ve been using a laser welder for over 15 years (Ztech 180 joule and now a Sunstone LZR 180) and have been using a Lampert PUK 5.1 pulse TIG welder for about two years now. Each machine has its benefits and comparative drawbacks.
Lampert PUK 5.1 pulse welder- (2021)
The pulse welder has a very thin electrode that welds metal together when it makes contact with metal. As soon as the electrode makes contact with your work piece argon will flow out of the electrode nozzle (which shields the molten weld puddle) and then the welder will give an audible signal (which can be turned off) before the electrode welds. The electrode on the Lampert PUK welder retracts in the handpiece as the weld arc is formed, which keeps it from sticking to the work.
There are multiple settings on the base unit for type of weld pulse, pulse power, pulse duration, weld frequency, preset menus for various types of metals, etc. All in all, it is an extremely versatile and easy to use machine. You can do everything from welding precious metals to tack welding as well as weld metals like brass and stainless steel. With the PUK welder weld penetration is outstanding, even on extremely thin material. I can weld stainless steel sheet as thin as .0005″ thick without blowing through it- imagine being able to weld broken watch hands back together.
It is absolutely the best machine for welding silver alloys primarily due to the outstanding weld penetration. You can do everything from sizing rings to retipping prongs on sensitive stones (a job that can be extremely risky with a laser- colored stones really want to absorb the laser beam energy.) Wherever you put the needle-like electrode is EXACTLY where the weld goes. Unlike a laser, you don’t ever have to worry about optics being out of alignment. Because you can see the electrode tip through the microscope and you know exactly where the weld is going to go I find the pulse welder to cause me much less eye strain over time compared to the laser welder. One of the drawbacks to the PUK welder is that you always need to weld parent metal- it’s really not well suited to welding joints that have been previously soldered unless you can get rid of the majority of solder by mechanical means.
The only consumables with the pulse welder are argon gas and electrodes. After a number of welds the electrodes need to be reground using a supplied diamond coated wheel (which is super easy to do.)
Sunstone Orion Laser welder- (2022)
The laser welder is a very different beast compared to the PUK welder. With the laser you hold your work inside the weld chamber and aim using a crosshair where you want the laser to weld. Because the laser uses a coherent beam of light to weld the metal, its effectiveness can vary based on the reflective nature of the metal as well as how the alloy absorbs the beam/heat. Silver can require a fair bit of power and with lower power lasers it is very common for people to use a Sharpie marker to darken the weld area before welding. Lasers are limited in their cooling capacity due to the size of the water tank, so when welding at high power levels for a good length of time it is possible to cause the laser to overheat and you will need to let it cool down before further use.
The biggest benefit with the laser is its ability to access difficult areas- if you can see it, you can weld it. This makes the laser an outstanding tool for working inside/underneath rings where it can be very difficult to gain access with the PUK pulse welder electrode. The laser tends to be a fair bit faster in use than the PUK welder when adding a significant amount of filler wire in order to build up a surface.
The Sunstone Orion LZR 180 is a significant upgrade over the older Ztech LWD4 laser I used for 15 years. Weld penetration is excellent by comparison (still not as good as the PUK welder) and the various settings are easily accessed through the touch screen interface. You can even use the touchscreen as a viewscreen during welding. The full length front curtain makes positioning your hands really easy compared to welders that have individual holes in the side of the weld chamber. It is also much smaller and lighter than the old Ztech laser, uses 110V power (vs. 220V on the Ztech) and the stand has a motorized height adjustment (with memory settings) for different users. Overall it is a joy to use. I could teach anyone how to use this welder in an hour.
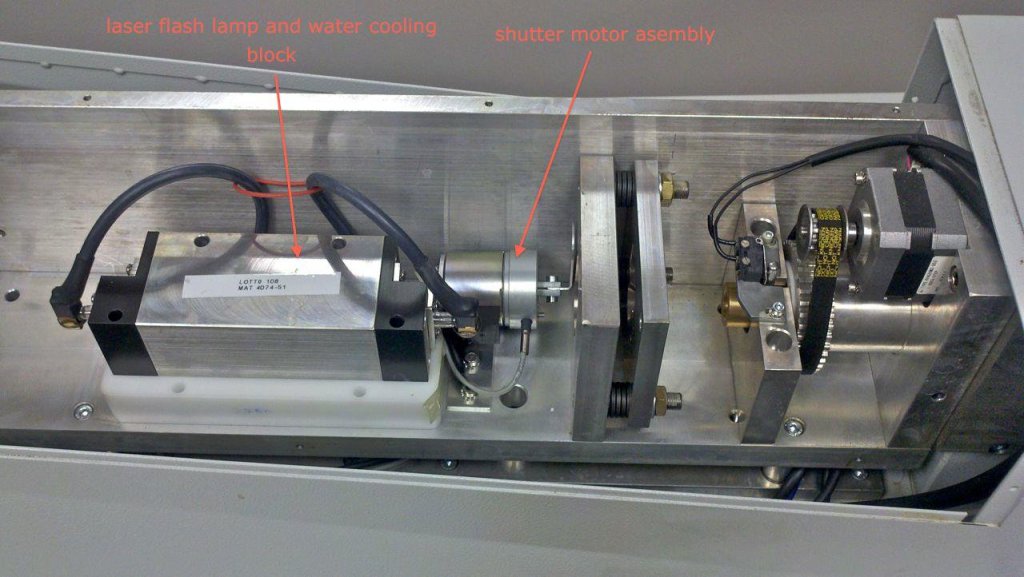
The laser doesn’t use as much argon as the pulse welder nor does it need electrodes that need to be ground/replaced. The laser does have a flash lamp that needs to be replaced after a few million fires- in our shop this tends to be around every three years and the flash lamps are several hundred dollars.
With a laser, if the machine gets bumped the optics can go out of alignment and it’s necessary to check the alignment of the laser beam and aiming reticle before welding. If adjustment is necessary it can be done via two adjustment screws on the lens assembly inside the welding chamber. It’s not hard to adjust the alignment, but it can be a bit time consuming. It’s important to check the alignment on a regular basis to make sure the weld beam is exactly on the aiming reticle.
So which do you buy?
Well that depends on what you want to do with it.
If you want to tack weld parts together for assembly using a torch, weld jump rings closed, work a lot with silver alloys, repair costume jewelry, and do some retipping and complicated repairs where you have to weld right next to a stone- save yourself thousands of dollars and get the Lampert PUK welder. In terms of precision welding with outstanding weld penetration the PUK welder has no equal. It can do 95% of what a laser can do (and a few things that a laser cannot do) at a fraction of the cost (under $5k for the PUK 5 vs around $22k plus for the LZR180) and it takes up far less space in the shop.
The consumables cost is essentially a wash with these two machines (be aware that some lasers can have very high consumables cost in terms of flash lamps and filters, etc. so always ask before buying.) Both of these machines have excellent 10x optics with electronic shutters to protect your eyes during welding.
If you do a lot of repairs on vintage precious metal jewelry (think lots of contaminated solder joints) and often have to weld inside rings and weld hard to access areas the laser welder is the way to go- and that is really the single greatest reason to buy one.
If you’re like me and you do several thousand repair jobs a year on a wide variety of jewelry then both machines pay for themselves pretty quickly.
Both of these machines are outstanding- they’re both extremely well made and I’ve found both Lampert and Sunstone to have outstanding customer service.
My recommendation is buy a pulse welder first- then if it doesn’t meet all of your needs add a laser later.
Welding samples-


Revo 540 milling machine
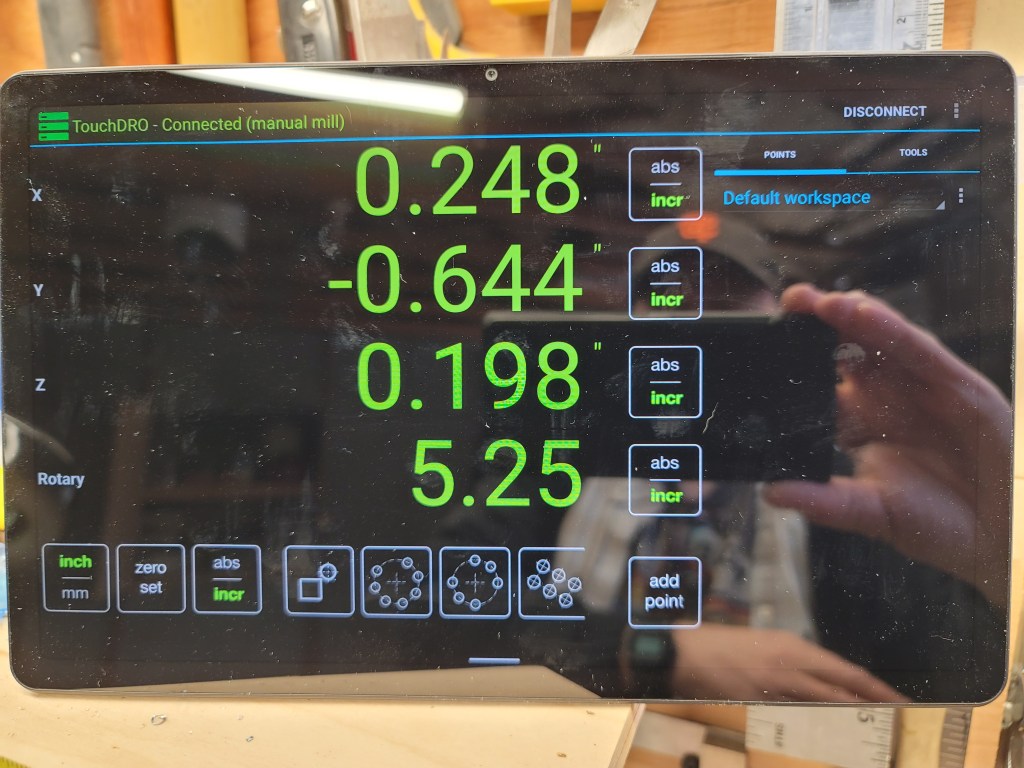
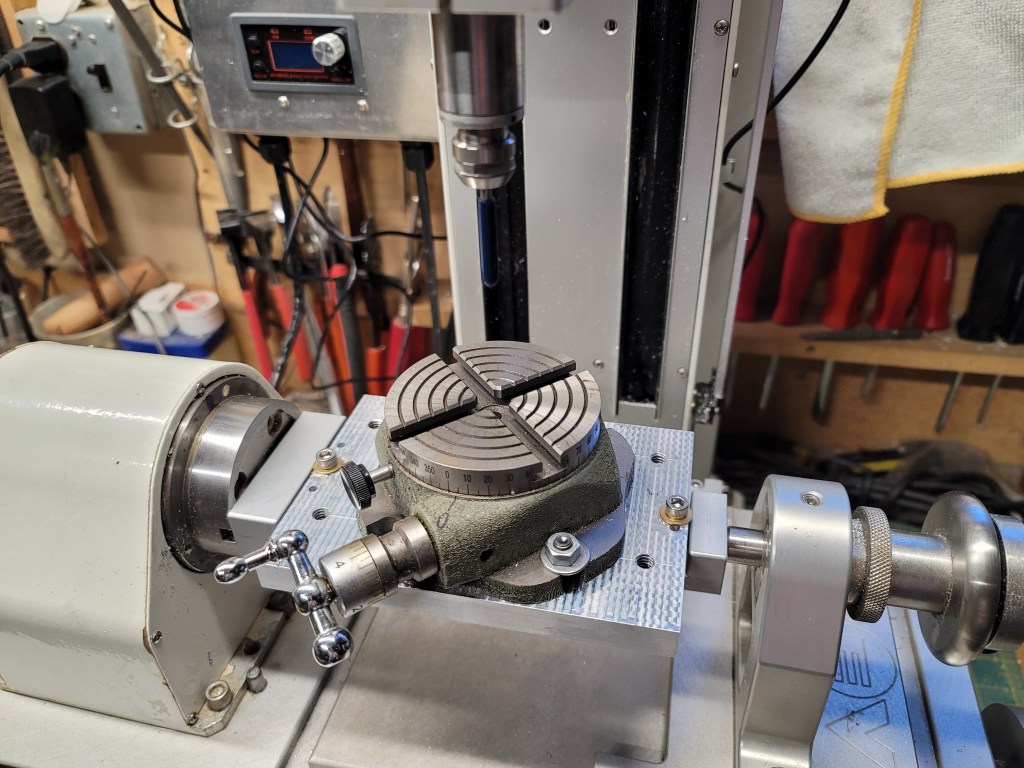
I was given an old Revo 540B cnc mill from my work that we hadn’t used in years (I just couldn’t say no.) Since I already had the Nomad I decided to remove the antiquated electronics and turn it into a 3+2 manual mill with power feed on the X and rotary axis, as that would be more useful to me. I also fit a Saunders fixture plate/vise for compatibility with the Nomad, along with a TouchDRO readout (which involved fitting a suitable rotary encoder to the 4th axis.)
While it’s certainly no Bridgeport, the machine is well built with fully supported rails/ballscrews and a nice little high speed NSK spindle. With good quality Datron endmills it’s quite capable of making very nice parts in Aluminum and is a big improvement over my old micro benchtop mills.


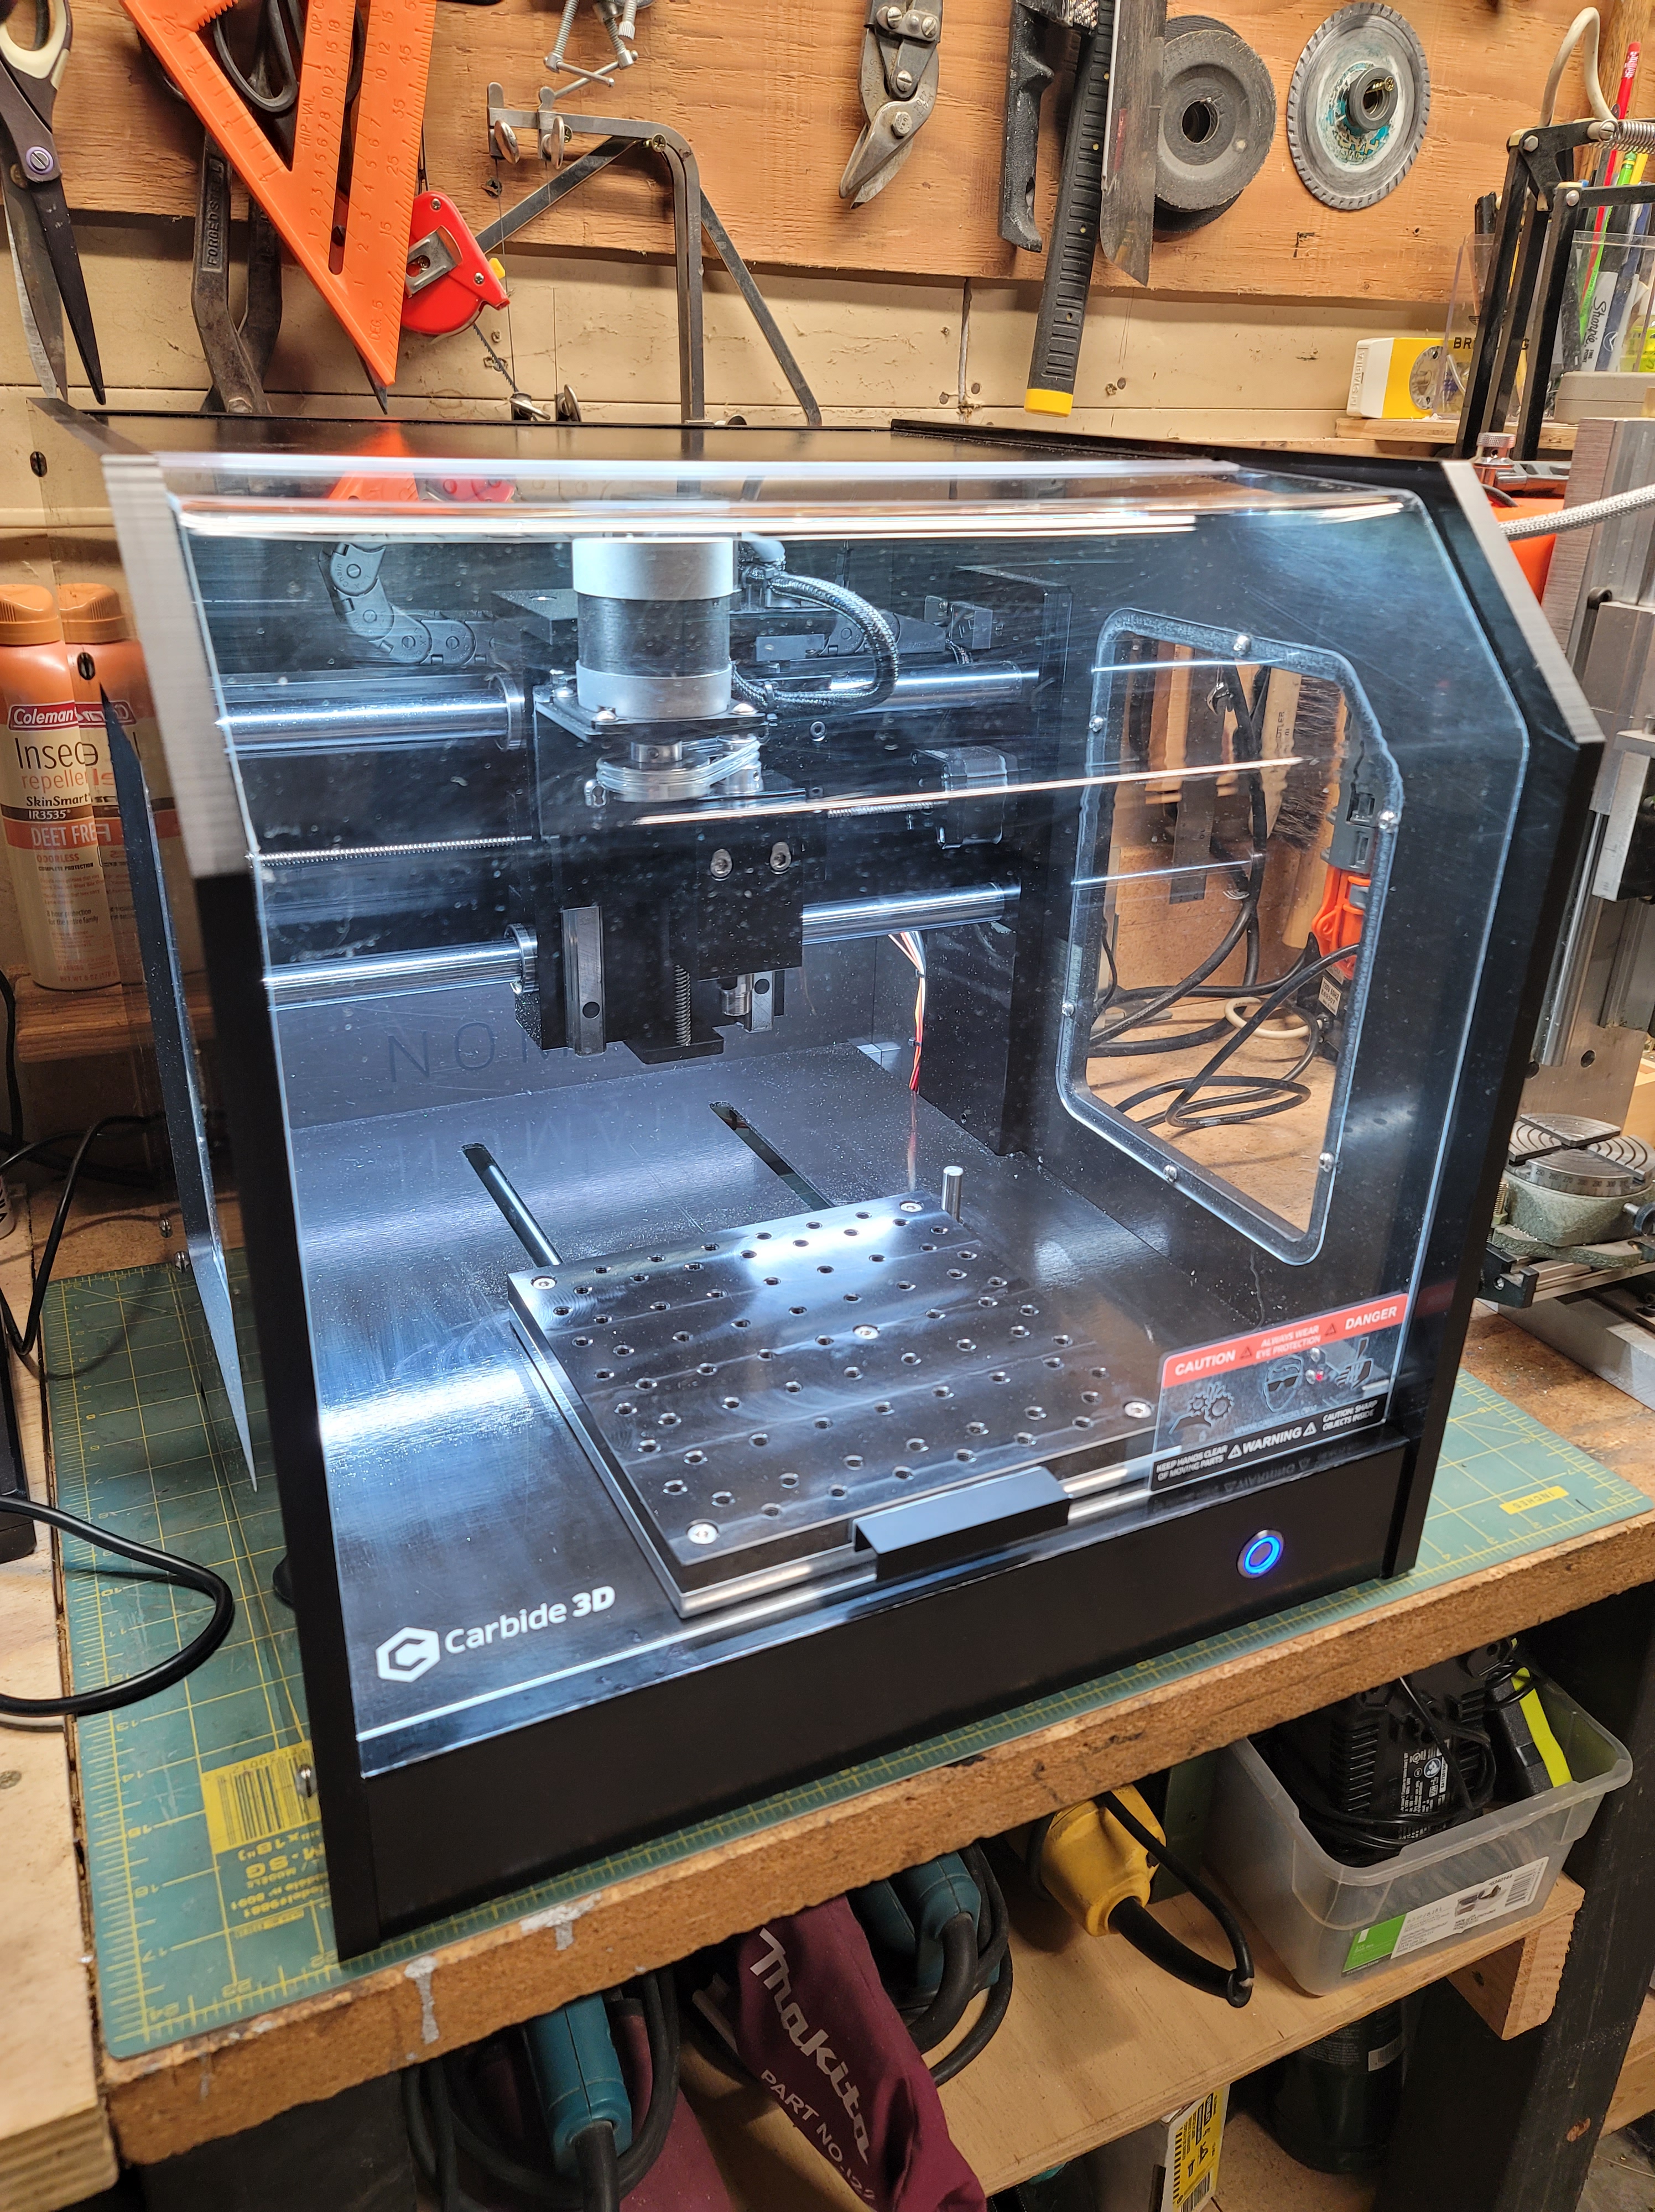
Carbide 3d Nomad3 CNC
I love the little Nomad3 CNC. This one is a special backed out version. It’s an incredibly useful machine with a great working envelope for its benchtop size. The Carbide Create software that comes with it is incredibly easy to use and is quite versatile (it also accepts standard Gcode so you can generate toolpaths using Fusion360 or Meshcam.) I also purchased a subscription for ProvenCut for calculating speeds and feeds, which I highly recommend. I outfitted it with a tooling plate/low profile vise setup from Saunders Machine Works, which a great system.
.

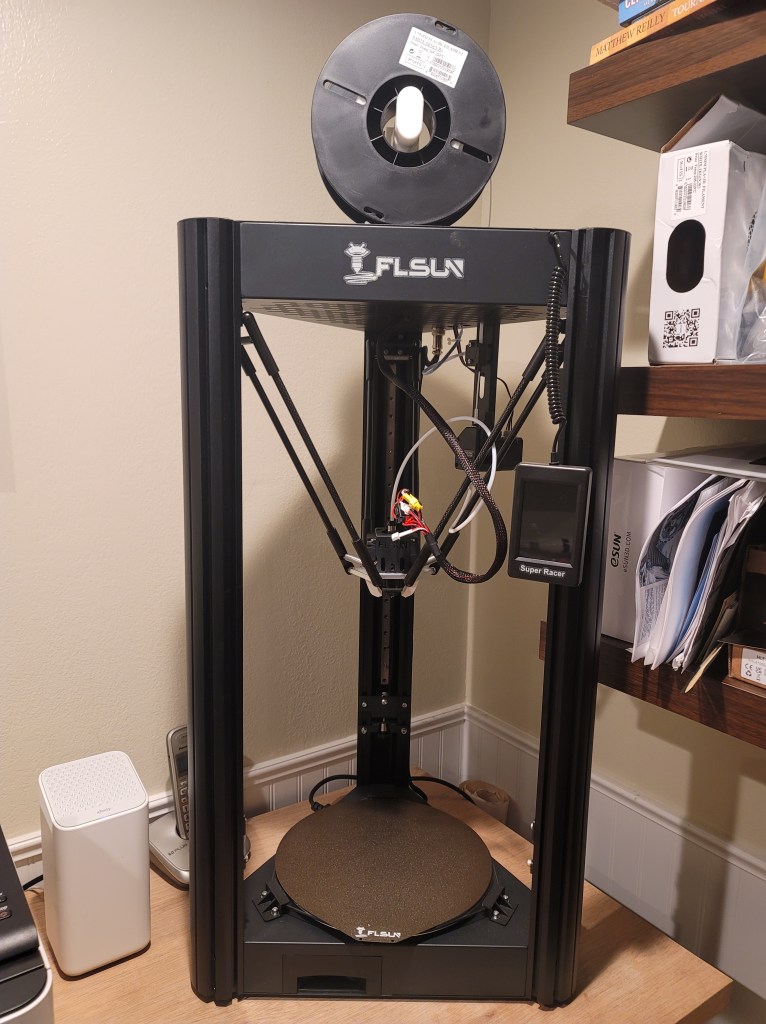
FLSun SuperRacer 3D printer
I recently purchased this printer as an upgrade from my old Printrbot Simple Metal. It’s significantly faster than my old printer and much quieter. The control screen is excellent too. Other than printing longer fan ducts, I’ve done no modifications to it and it’s a brilliant machine. I did print a Voron M4 extruder for it, just in case the factory extruder dies (which is apparently quite common.) Zero complaints with this machine so far. Highly recommended.
Another micro mill
This tiny mill was built from a mix of parts that were given to me, along with some Aluminum plate stock I had in the shop. The spindle was self made on my lathe using an ER11 collet extension. It performed quite well for its tiny size and was very quick to build. I ended up giving it away to a college engineering student who lives up the street from me (he and my oldest son have been friends since they were very little.)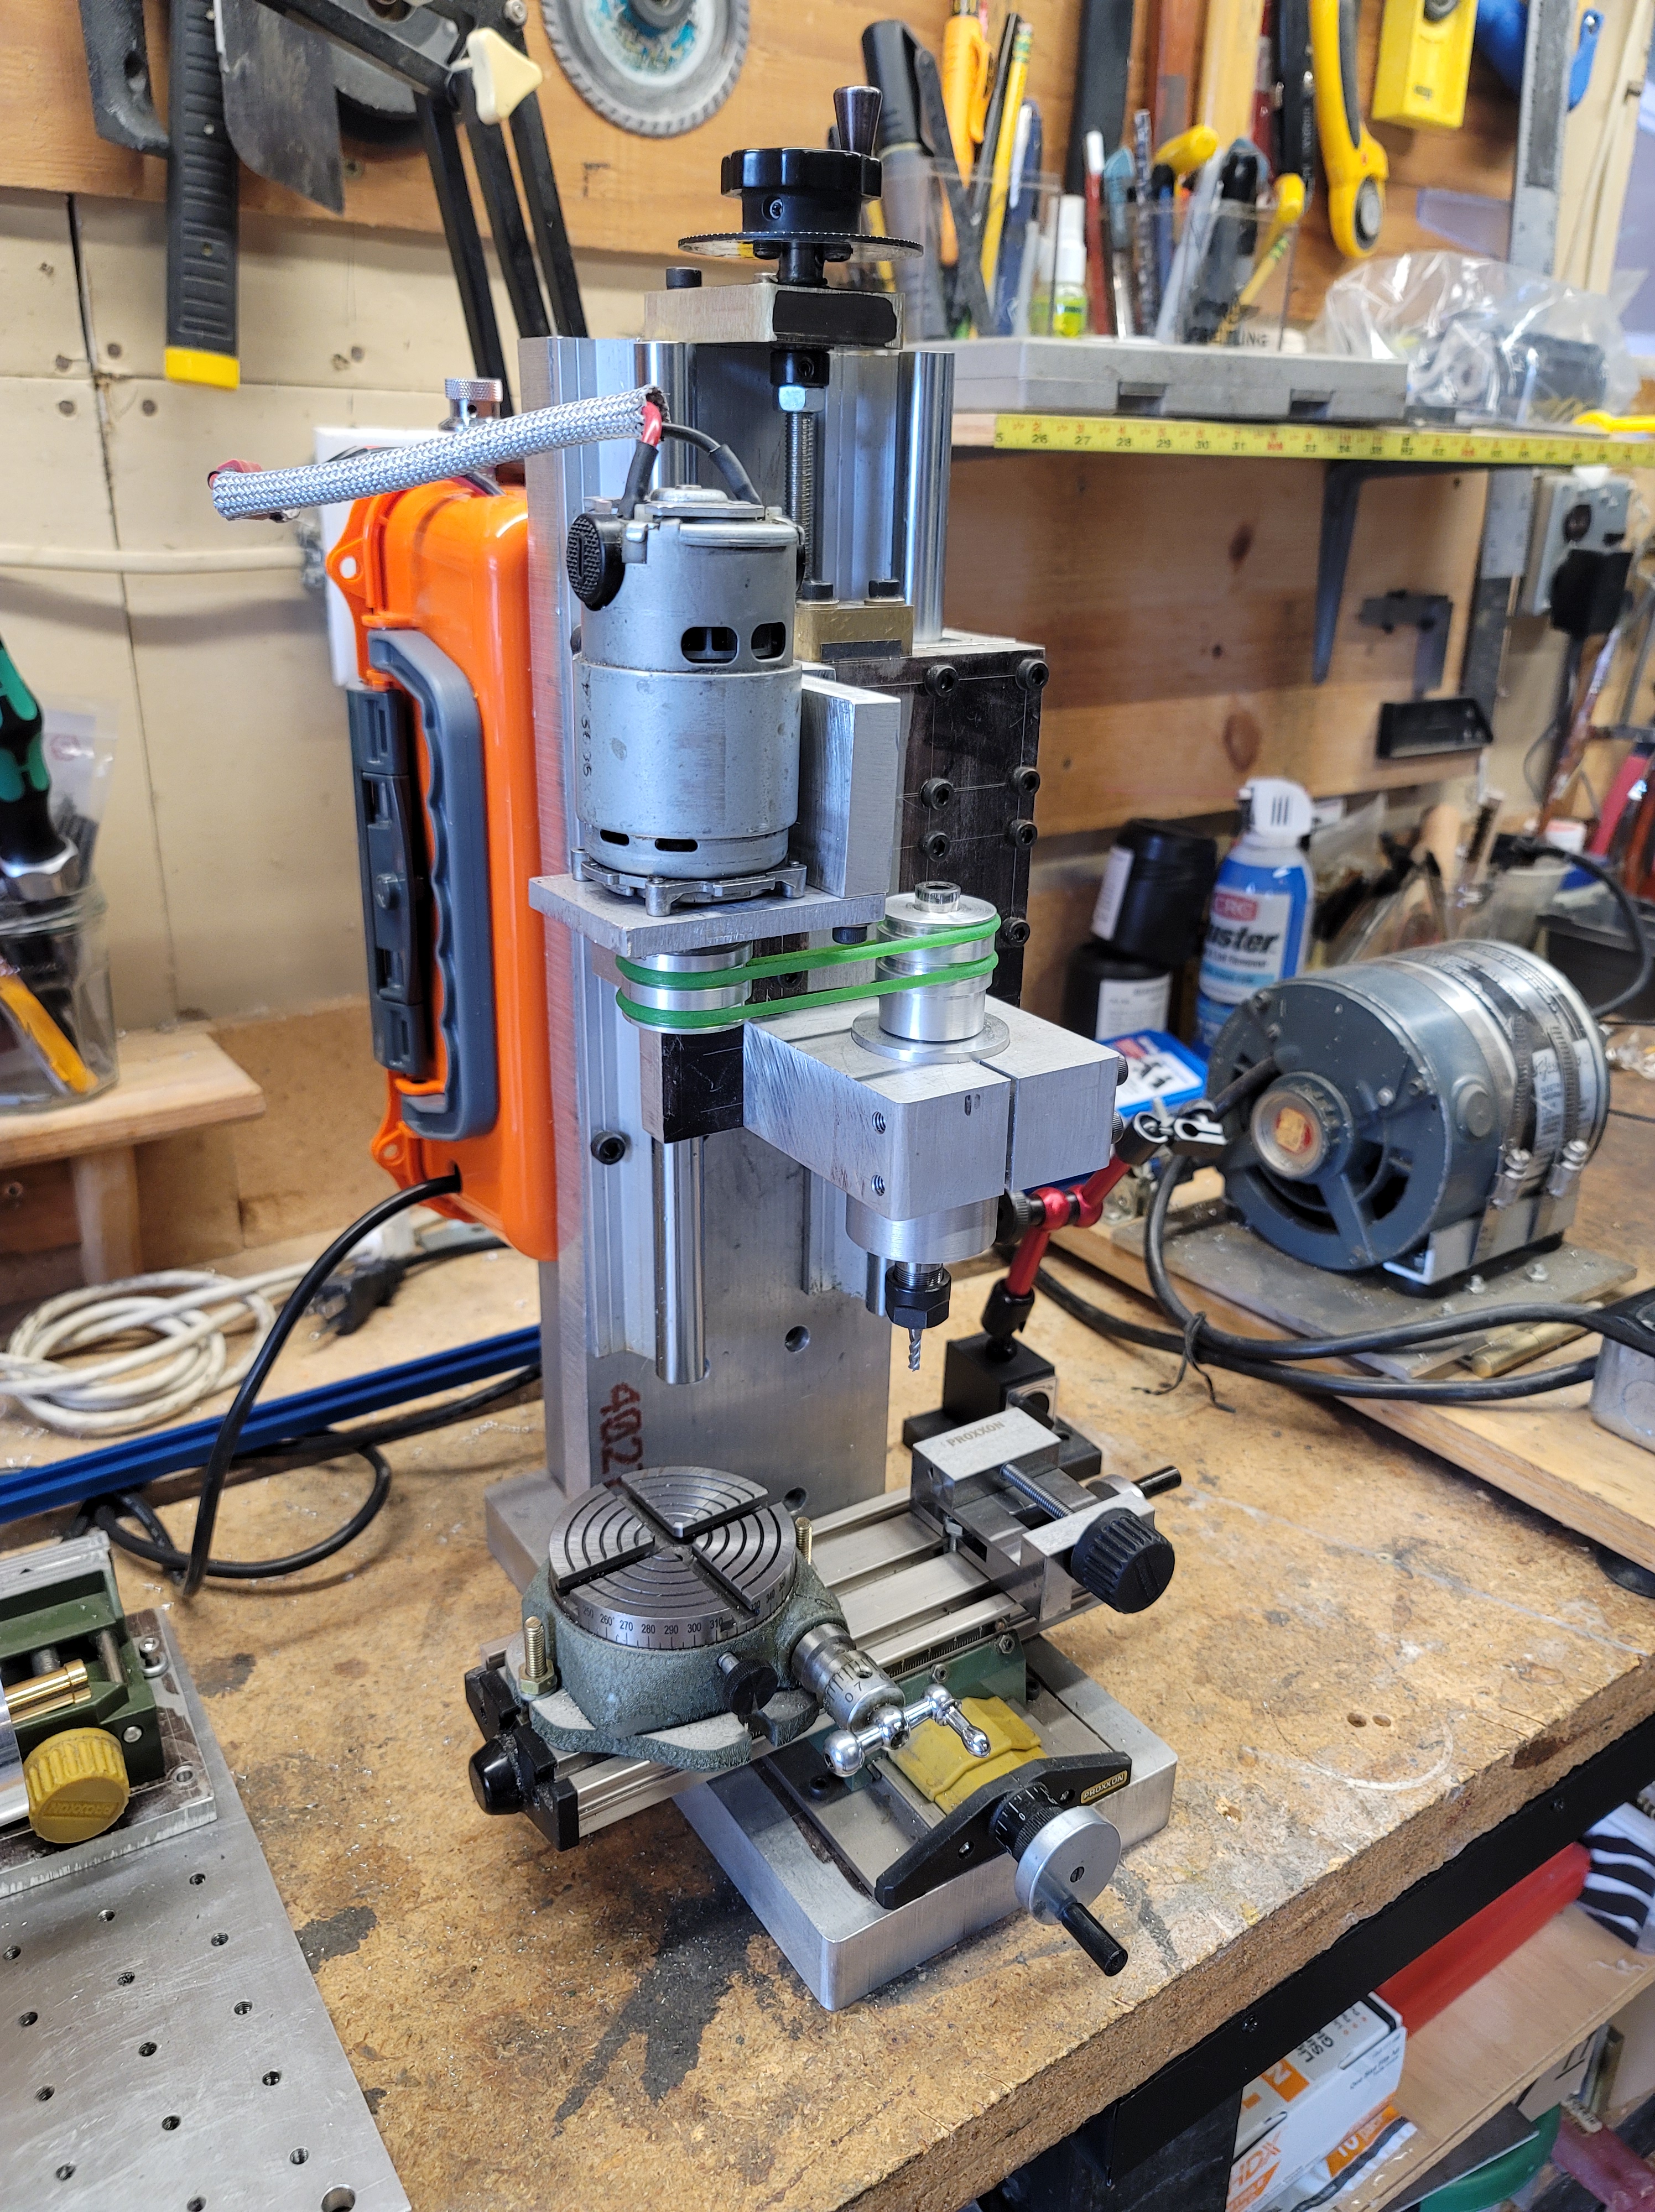
Elegoo Mars 3 resin printer
I was recently given an Elegoo Mars 3 resin printer by a good friend and it’s a really impressive little printer. My work has a FormLabs Form2 SLA printer and the print quality of the Mars 3 easily matches it. So far I’ve only used water soluble resin but I’m really curious to try some of the tough engineering resins.


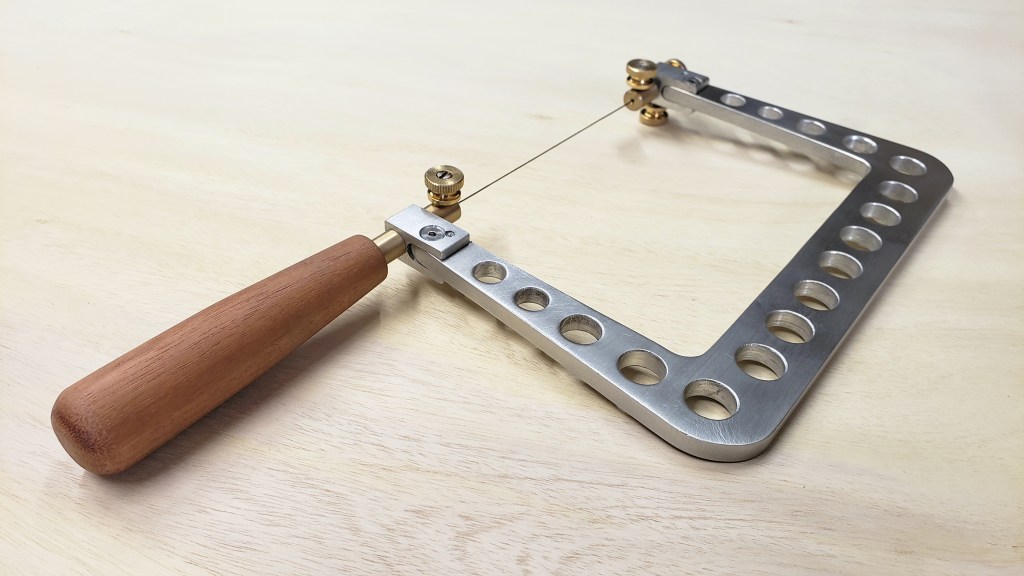
Handmade jeweler’s saw
So I made myself a new saw. It’s inevitable that while working on a project I discover that I need to make tools. Super pleased with how this turned out! Full tutorial is up on Instructables.


Micro benchtop milling machine
I’ve really needed a small benchtop mill for some time now so I decided to build one myself. There’s a full writeup on Instructables.

Portable bandsaw stand
I have a portable bandsaw that I absolutely love- it’s one of my favorite and most useful tools. Cutting small pieces of metal with any degree of precision can be difficult however. What I needed was a stand to turn it into a benchtop saw.
This is a super simple low cost stand that is very easy to make and can be built in an afternoon.
Tutorial on Instructables.

Converting old tools to lithium power
I have several old cordless power tools and they’re all in good working condition. The trouble is the batteries all need to be replaced and the batteries are obscenely expensive. I have a really hard time paying for batteries that cost almost as much as the tool and I didn’t want to discard perfectly good tools.
One other issue I had with my old batteries as that every time I went to use them the batteries were dead as the NiMH batteries would self discharge rather quickly, especially in cold weather.
Most modern cordless tools use Lithium batteries and I happen to use LiPo battery packs all the time for other projects so I figured I’d convert my old cordless tools to Lithium power using inexpensive LiPo battery packs.
This is a really simple conversion and the cost is a fraction of what power tool manufacturer replacement batteries cost.
Tutorial on Instructables.

Advice on soldering irons
Made a video about how to choose a soldering iron.
Sparkfun 303D hot air rework station
A hot air station allows you to flow solder over a large area so you can do things like pull muti pin connectors and circuit chips off a board- something that is extremely difficult to do with a traditional soldering iron. With this unit I was able to remove multiple circuit chips and connectors off an old computer motherboard in minutes without damaging any of the parts or the board. A hot air tool also allows you to solder tricky little surface mount components when building your own boards. Sometimes SMT chips will have leads positioned underneath the chip, which makes them pretty much impossible to solder onto a board with a traditional soldering iron- with this rework station it’s a piece of cake. Having a hot air station also makes quick work of heat shrink on connectors.
This station has a readout for the temp and the temp and airflow are adjustable. It heats up really fast and has an auto cool down cycle after you turn it off. I was also surprised by how quiet it is- I expected it to be a fair bit louder and it only gets loud when you have the air turned all the way up. The handle is a nice size and it stays very cool. There are a lot of these stations on the market and they range from around $60 on up to well over $1000- I don’t know what the high end stations offer but they must be pretty spectacular given how well this thing works. At a little over $100 it’s an absolute bargain and I highly recommend it. If you’ve ever soldered a chip or connector in backwards or you’re trying to salvage parts from another board, this is the tool for you. Every electronics bench should have one.

SkyToppower STP3003H bench power supply
A nice little inexpensive power supply. Since this is a switching power supply it’s not as clean as a linear power supply but for most hobby electronics projects it works quite well.

Owon multimeter review
A quick review of the Owon B35T multimeter which features datalogging using bluetooth and Android/iOS devices.
Manufacturer’s page with specs, user manual, etc.- http://www.owon.com.hk/products_info….
Fast and cheap 3rd hand
Here’s how to make the simplest, least expensive 3rd hand ever. Works great for soldering electronics or small metal items using a torch.
Tevo Michelangelo 3D Printer review
This is a pretty nice little printer for $200.
UPDATE- 3d printer technology has changed a LOT since this printer came out. For something similar in size I’d check out a Kingroon KPS cantilever printer as they’re quite nice and you can even get them with Klipper pre installed. Otherwise, for something a bit larger the Soval and Elegoo printers are excellent budget picks.
Printerbot Simple Metal
This is my everyday printer and it’s held up remarkably well due to its solid construction. I have had zero issues with it. I would like a bit larger print volume so may add another inexpensive printer in the future. These printers are considered dinosaurs at this point in time, but they are easily upgraded with modern electronics and extruder.


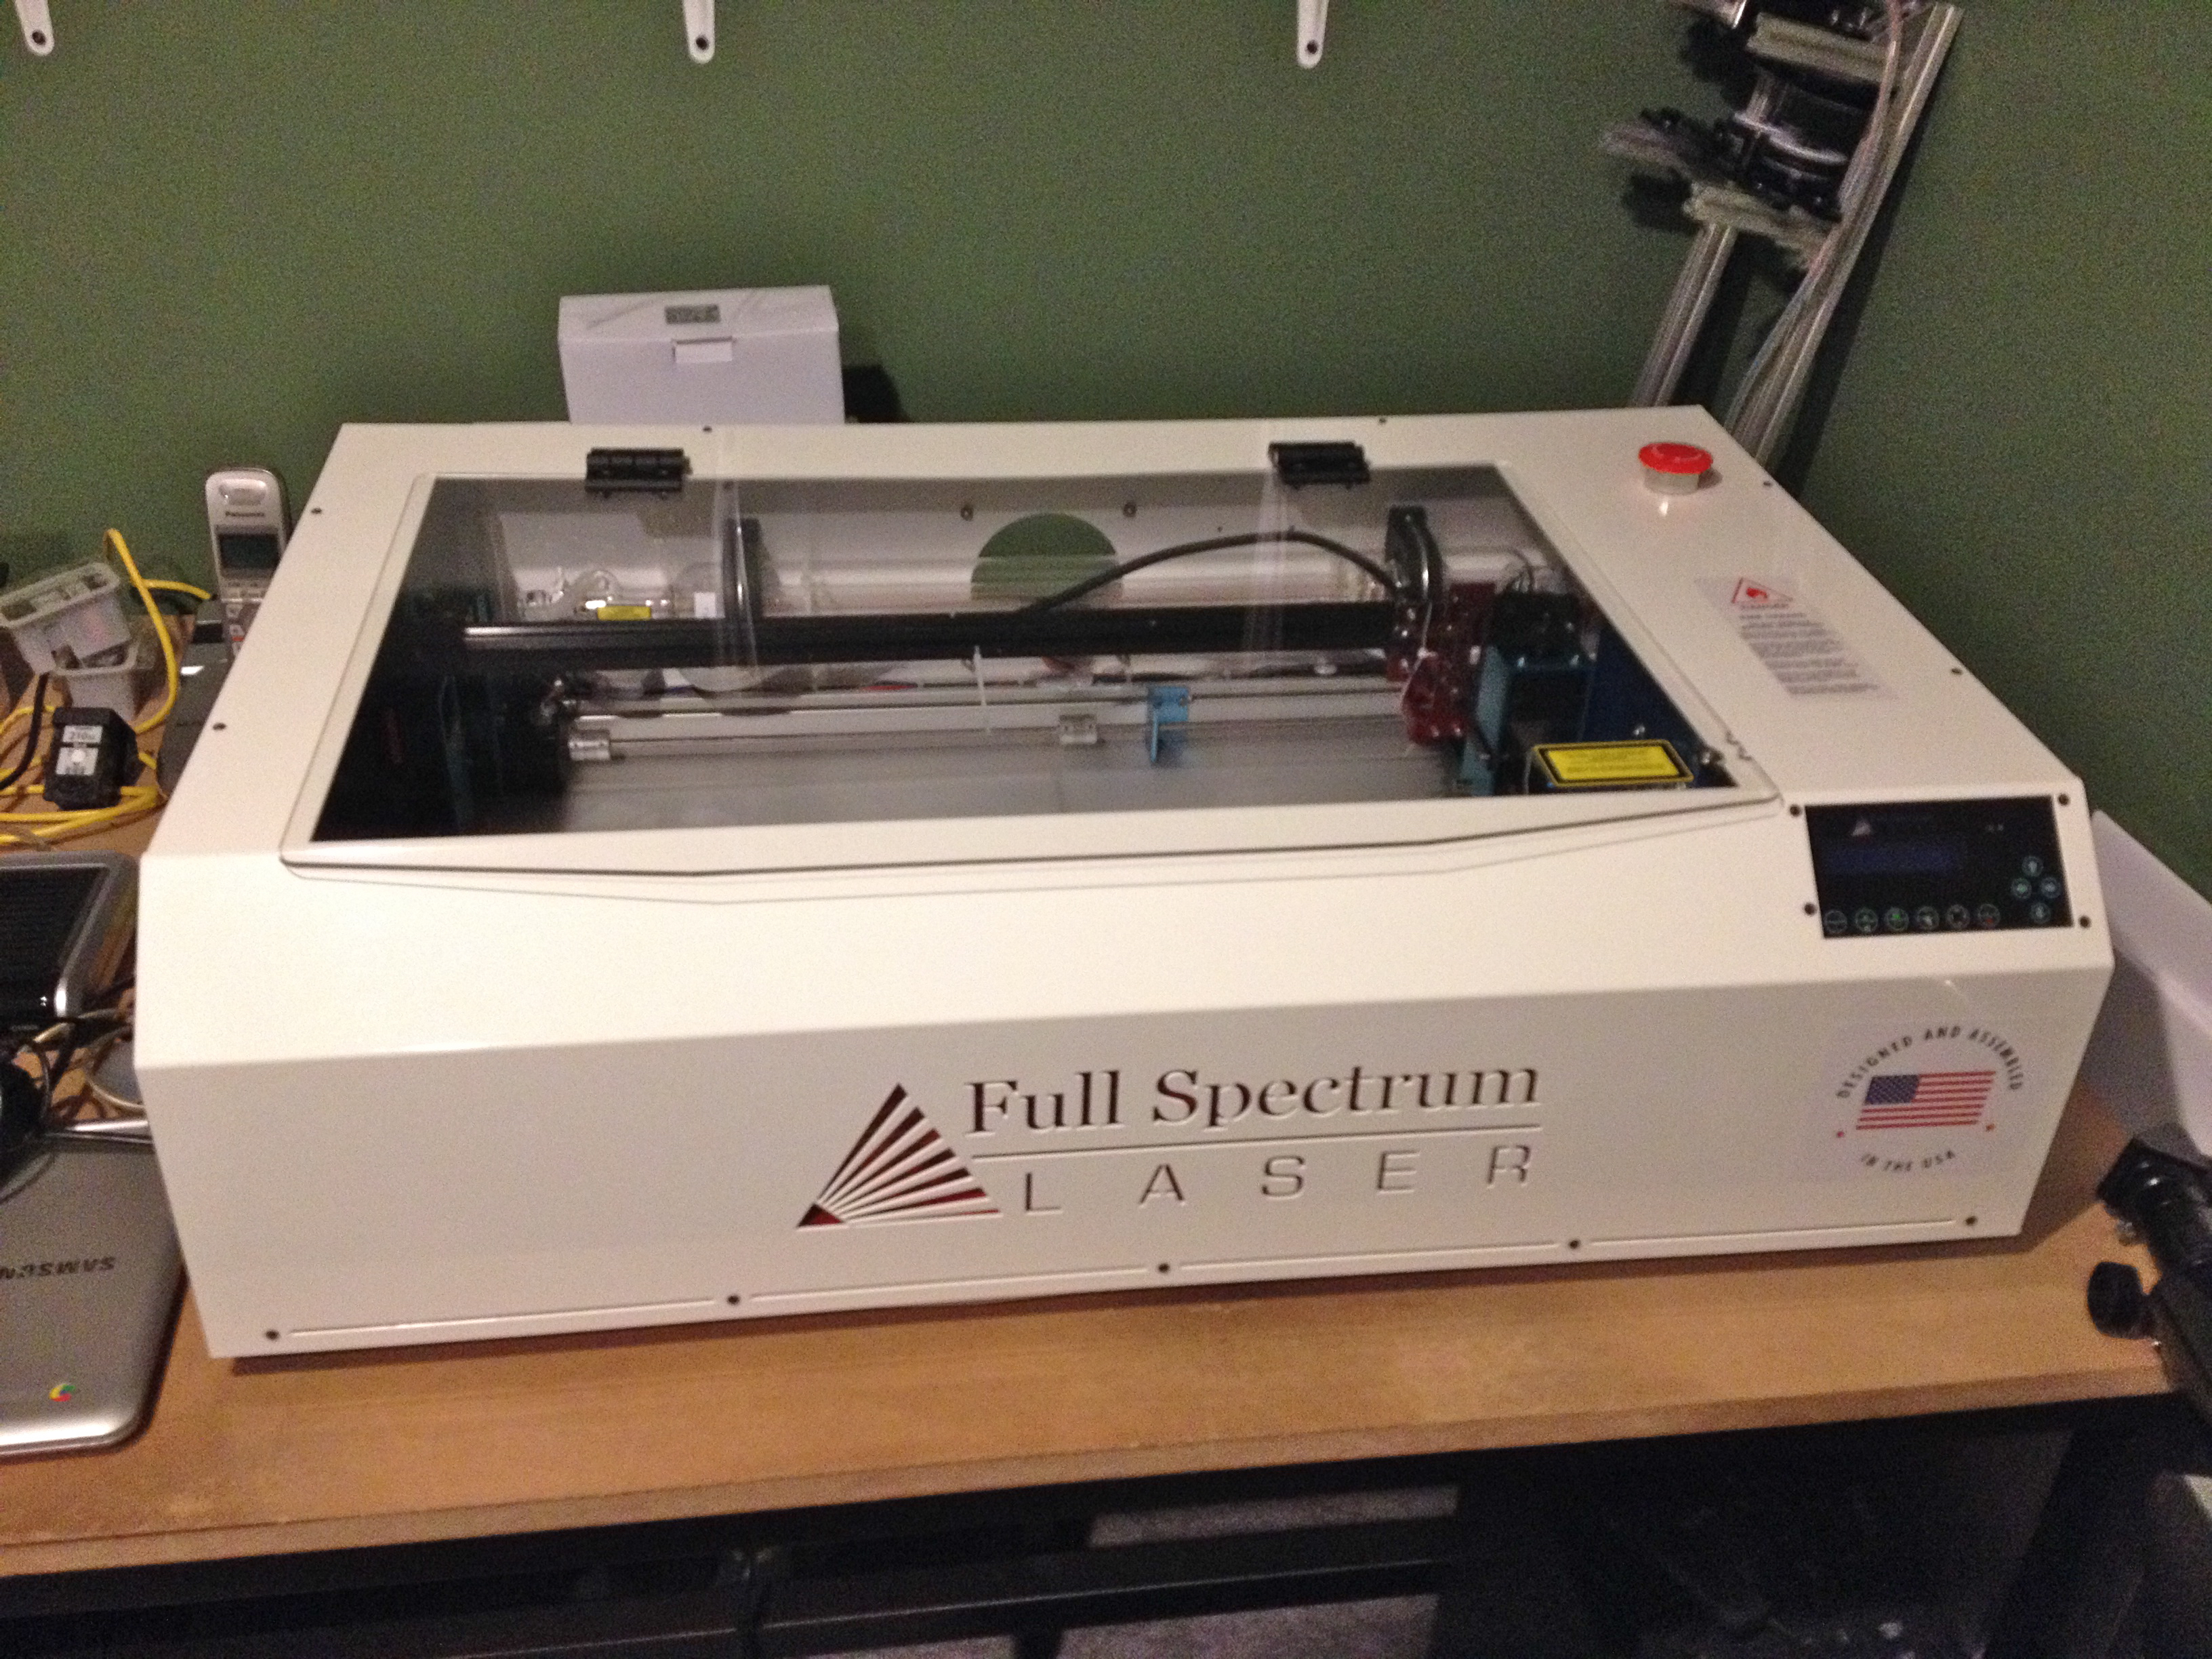
Full Spectrum laser cutter
This model is the FSA 40W CO2 Hobby Laser 5th gen. Overall this is a pretty good value in a hobby laser cutter. The cutting area is 12″ x 20″. First, it is by far one of the coolest tools I’ve ever used. Very easy to set up and run. You design your parts in a program like Inkscape and then hit “print” which exports the file to the laser cutter Retinaengrave program. Then you tell it to make a vector cut and set your speed and power settings. Three ply 1/8″ thick plywood sheet cuts in a single pass like a dream with the speed set at 45% and power at 90%. Six ply aircraft grade plywood is much more difficult to cut and takes multiple passes at a lower power setting to avoid burning.
Ventilation for these machines is a very serious issue and they cannot be left unattended nor can you cut any material that will off-gas, such as Sintra or other PVC based materials.
After remodeling our home and converting the downstairs work room into another bedroom there was no place to put the laser cutter so it has been donated to a local middle school for their engineering classes.
Laser Welder
I use this wonderful tool every day. It’s a Z-Tech 180 Joule water cooled YAG laser. Have over 10 million fires on it. It’ll weld any weldable metal alloy (provided you have the proper filler wire.) It has required a fair bit of maintenance- I often get to play laser technician and have replaced several driver boards as well as the pump and flash lamp and have had to modify the electronic shutter. I can’t imagine running a jewelry repair shop without one of these machines. This machine has now been replaced by a newer Sunstone Orion LZR 180.


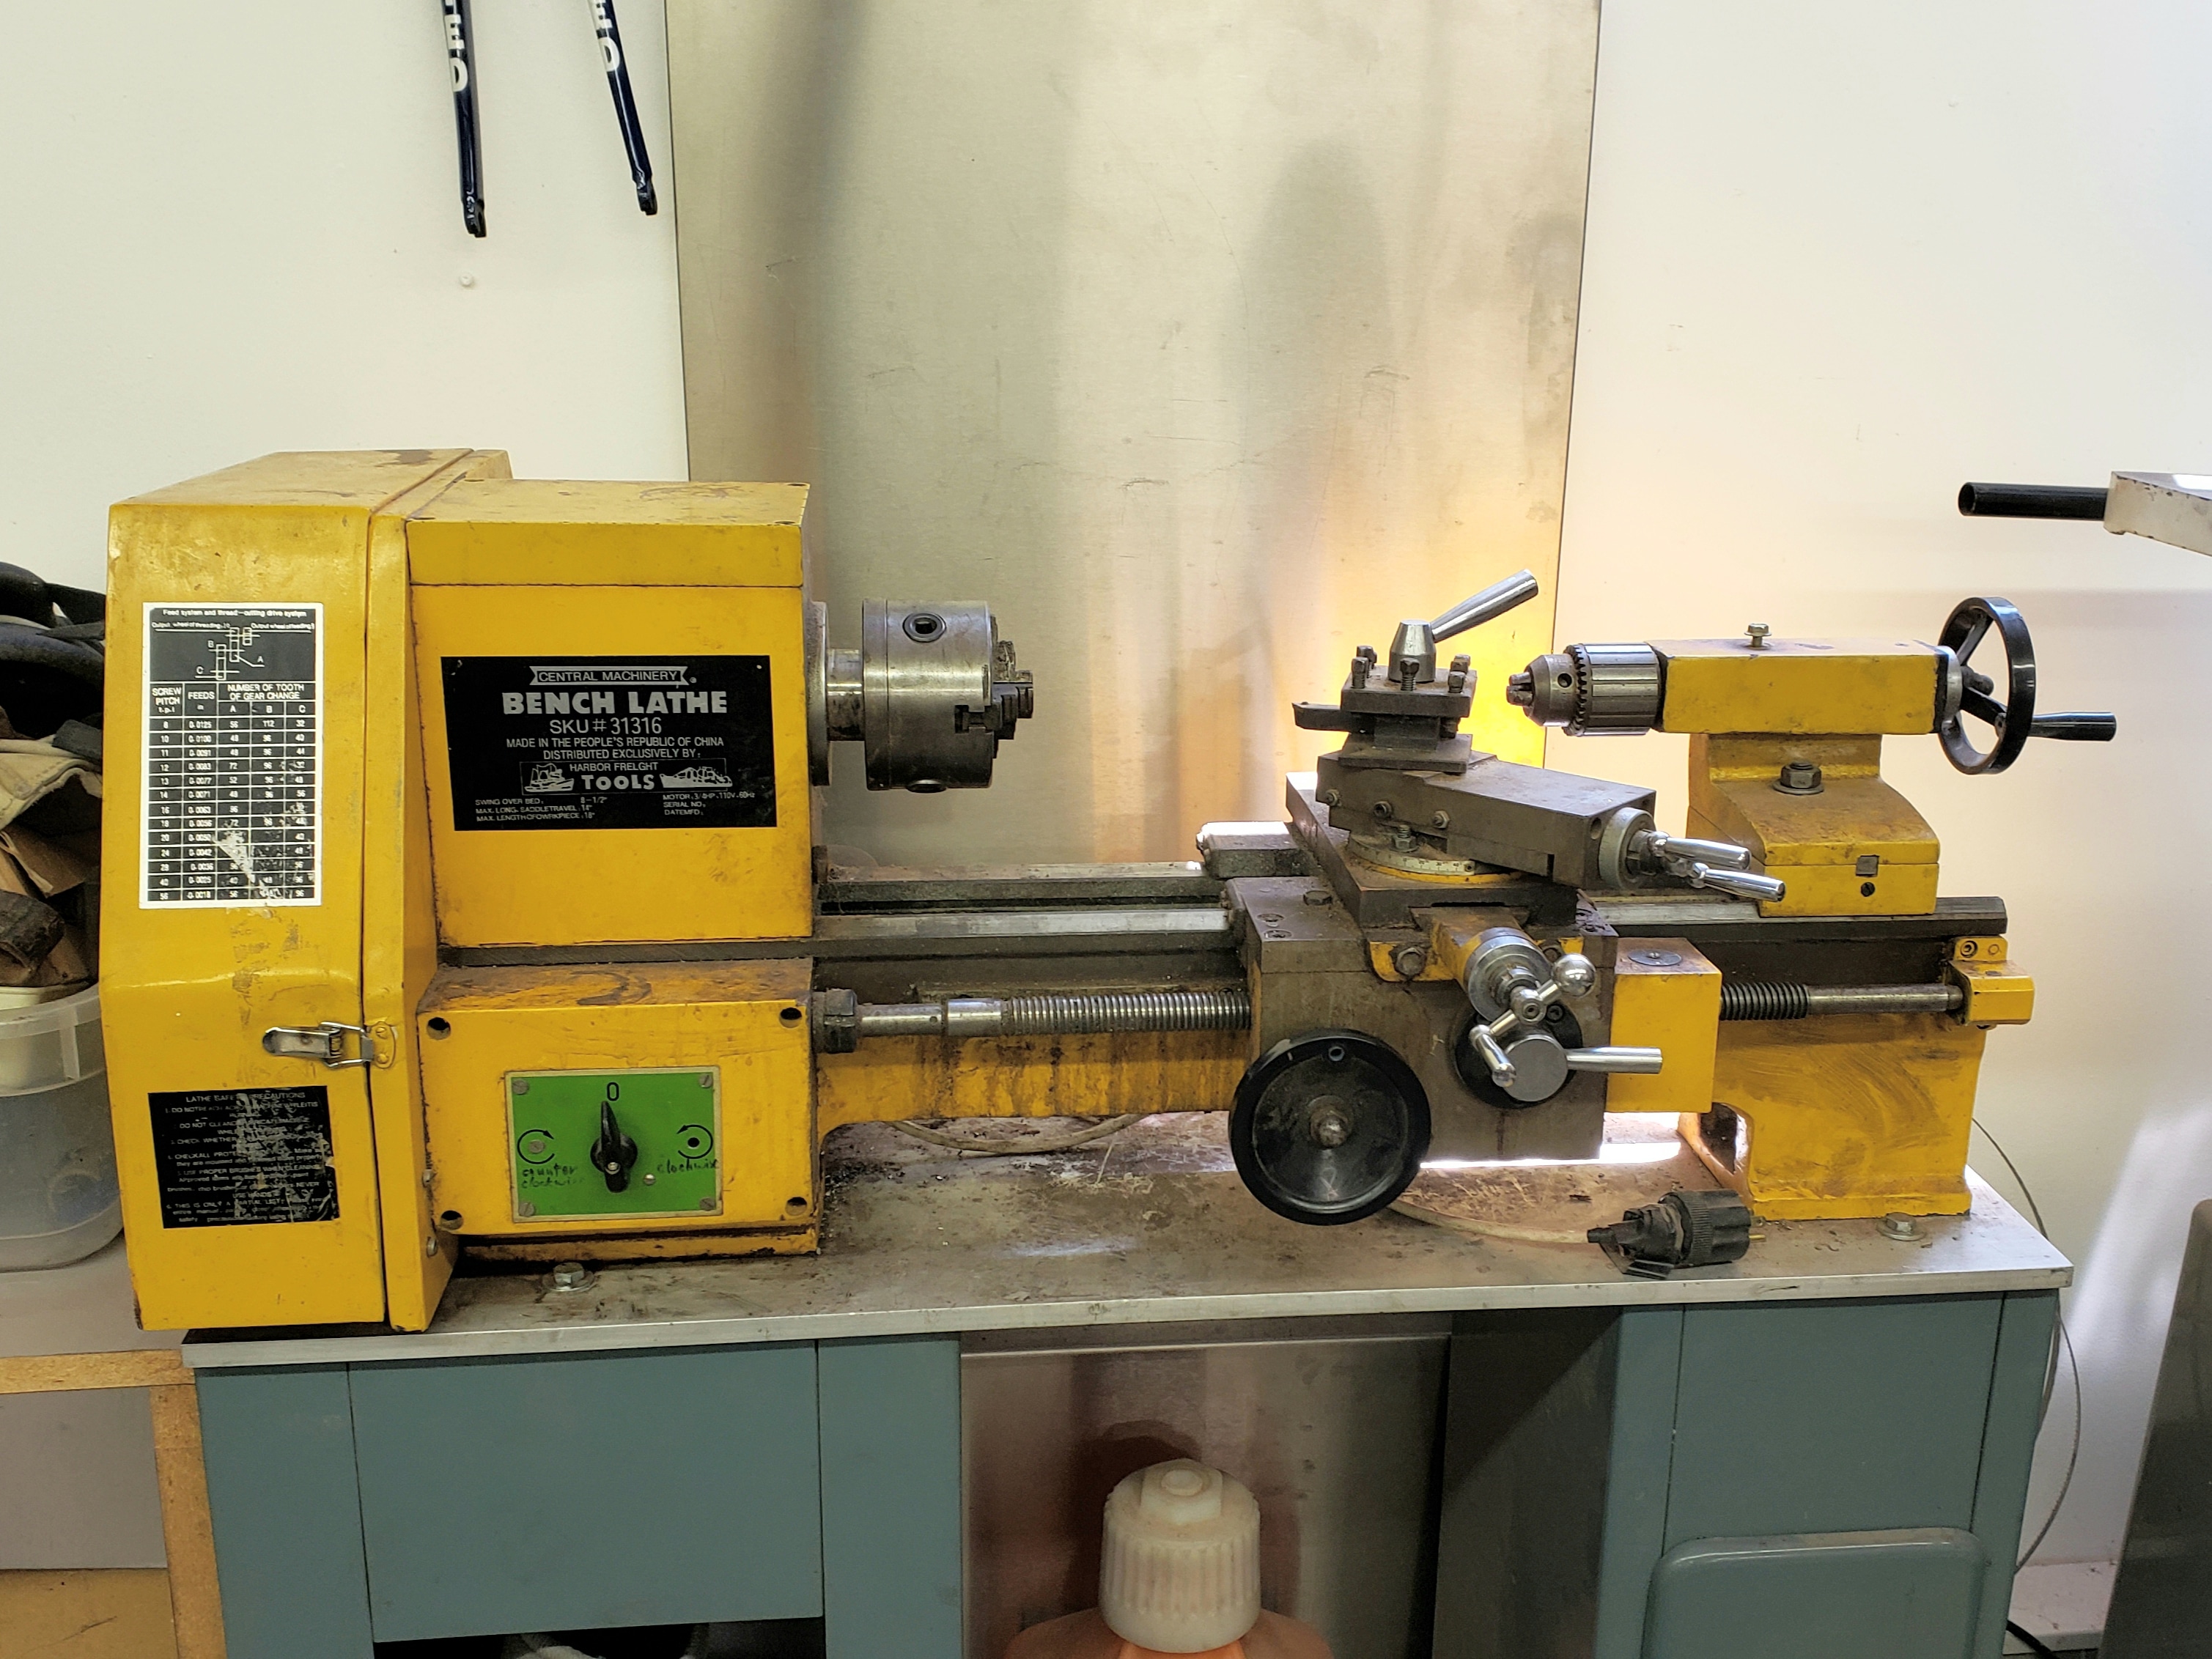
8.5″ lathe– I made lots of prototype parts on this lathe back in my bike industry days. It’s nothing special and is a typical example of an inexpensive import lathe that you would find at Harbor Freight/Grizzly/Etc. Once lathes like this get dialed in properly they can perform quite well for the hobbyist. I gave this lathe to a friend as I don’t have room for it in my small shop (I can pop on over to his house to use it if I need to, which is nice.)
Taig benchtop lathe– The Taig lathe is probably one of the best buys out there for a small benchtop lathe. It’s extremely versatile (shown here with a ER16 collet chuck and milling attachment) and can hold very good tolerances. The work envelope is larger than you’d think and you would be surprised at what this machine can do. There are a ton of accessories available, all at a reasonable cost. One of the most useful tools in my shop.

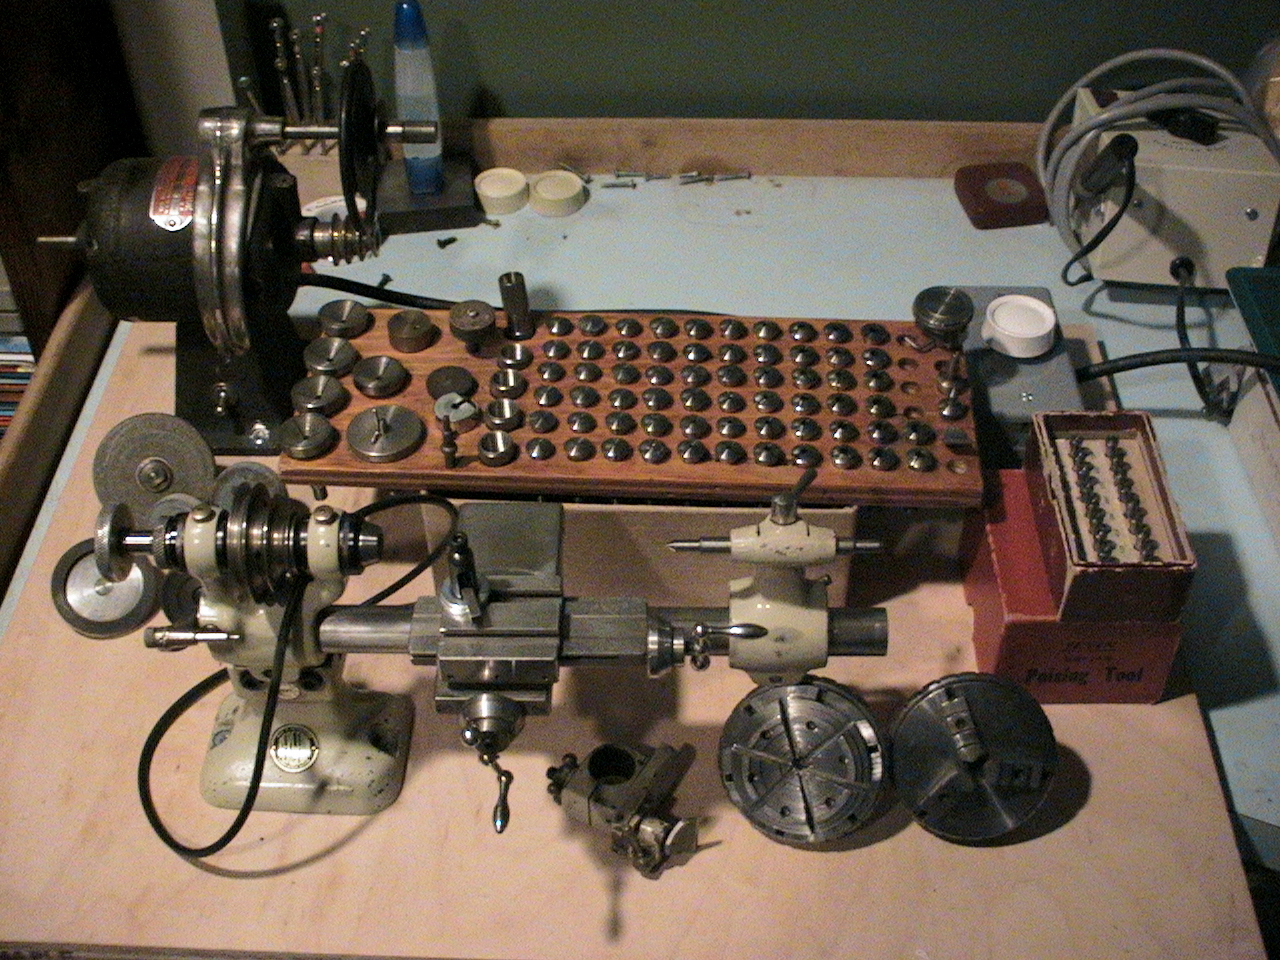
Bergeon watchmaker’s lathe– A wonderful and extremely precise micro lathe. I picked this up years ago for next to nothing and of all the tools I’ve owned this is the one I regret selling the most. For working on really small parts these watchmaker’s lathes are tough to beat. When I purchased it it came with a full set of collets, two chucks (3 jaw and 6 jaw) and several accessories. Accessories for these types of lathes can be mind blowingly expensive.

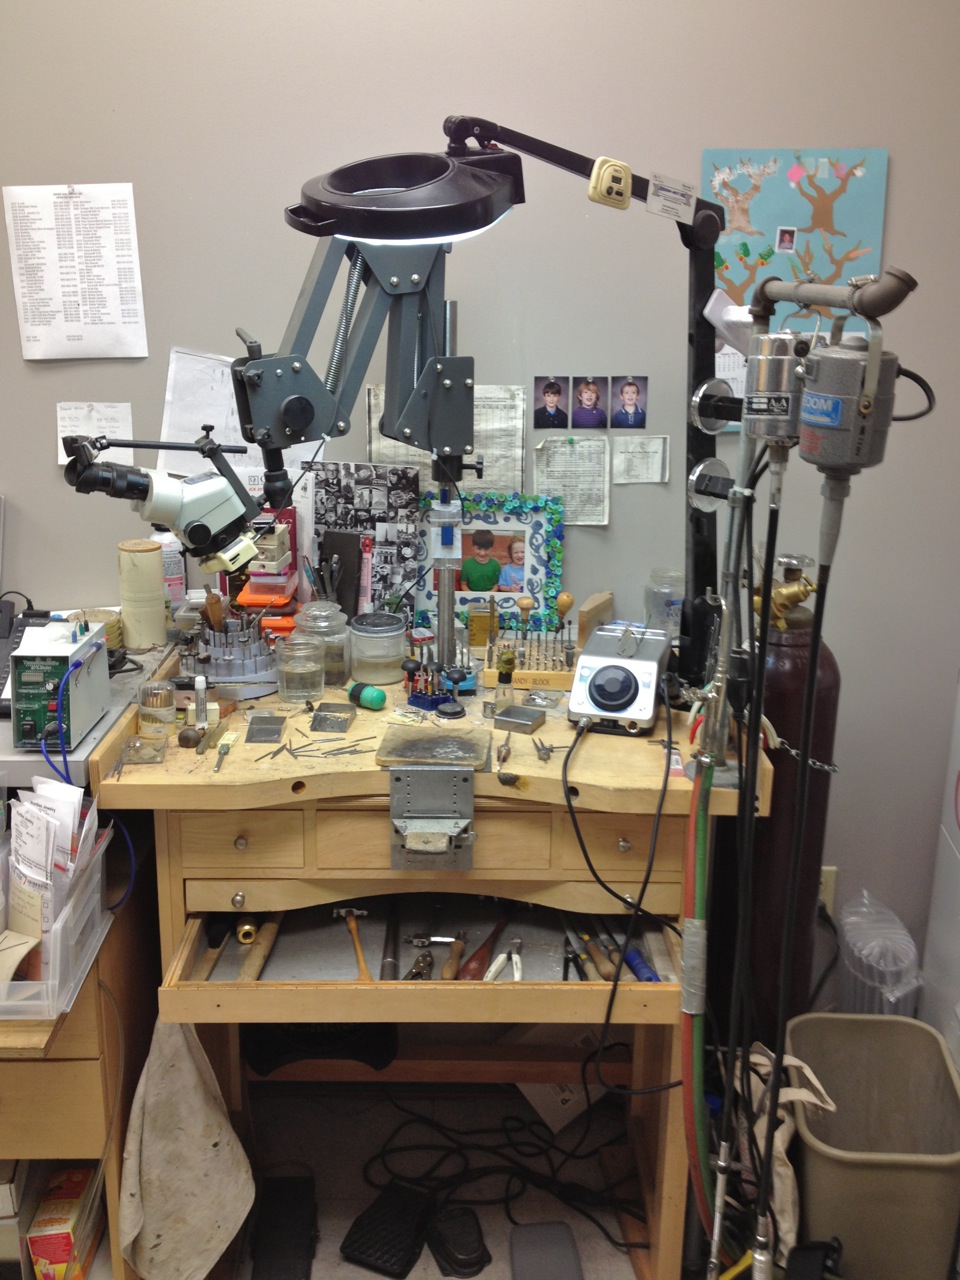
Jewelry bench
This is where I work at my day job. Jewelers use an enormous variety of tools. For a complete guide to most of the tools I use at the bench have a look at this instructable where I go over a lot of the tools in detail.